Best Autotune Plugin for GarageBand
If you’re mixing in Garageband and you want to tighten up your vocal tracks, you might consider using a quality auto-tune plugin. In my opinion, auto-tune is often misused or misunderstood. However, in modern music, it’s become an essential tool, just like compression, EQ, or reverb.
Garageband is one of the most popular digital audio workstations, since it's easy to use and comes free to all us Mac users. In this article you'll learn how to enhance your vocal processing in Garageband with autotune software.
Whether you're looking to create your own signature vocal sound like T Payne or want to clean up your vocals without noticeable effect, this article will show you how to get great results from any autotune plugin, as well as recommend some of my favorites.
Even the best vocal performances often need a slight tweak here and there to help things sit perfectly. While Garageband has a free auto-tune tool that comes with the program, it’s not the most reliable or flexible option.
Today, we’re going to go through a few auto-tune plugin options and a few tips and tricks to auto-tune your vocals like a pro!
Note: This article may contain affiliate links, meaning I would receive a commission - at no cost to you - for any products you purchase.
There is a Free Version of Pitch Correction Software in GarageBand
GarageBand includes lots of free plugins, including a free pitch correction tool. Now, it is not the best autotune or pitch correction out there. In fact it's pretty weak. It doesn't often a lot of control options, and doesn't work very well as a creative tool But it can get the job done in a pitch.
To access this, you need to open an audio track within GarageBand. From there, you'll want to record your vocal takes, and do some vocal editing to create a "comp" of your best takes.
Then select the vocal track and open the editing window.

Make sure the "Track" tab is open.
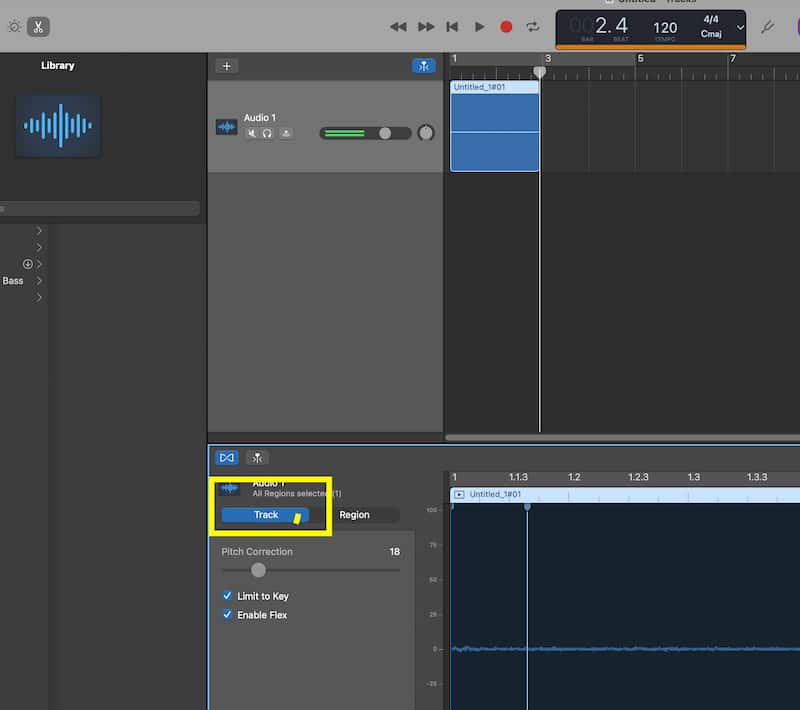
Along the top left of that window, you'll see a slider. You can use it to dial in the amount of pitch correction you want to add to the track.

You can also choose to force the pitch correction to be within the same key as the song. If not, it will instead correct the pitch to the nearest semitone, regardless of the key.
I also recommend you click the "Enable Flex" option for a more naturalistic sound.
The Five Best Autotune Plugins for Garageband
| Name | Rating | Price |
| Antares Auto-Tune Pro | ⭐⭐⭐⭐⭐ | |
| iZotope Nectar 4 | ⭐⭐⭐⭐ | |
| Waves Tune | ⭐⭐⭐⭐ | |
| Revoice 5 | ⭐⭐⭐⭐ | |
| Melodyne | ⭐⭐⭐⭐ |
If you find that the free edition of the pitch correction software that comes with GarageBand isn't cutting it for you, these five plugins below are going to be your best options for the autotune vibe.
Antares Auto-Tune
Antares is the company that invented auto-tune, and to this day, has continued to perfect it. The new graph mode on the Pro version of the plugin is out-of–this-world. You’ll also find some pretty incredible features that allow you to set variable retune speeds for different words so that your tuning sounds as transparent as possible.
While the plugin is a bit pricey, it is very well-designed and has an intuitive interface, making it easy to use when applying auto-tune to all kinds of vocal. It's also optimized for Apple Silicon, so you'll be able to bet bleeding edge performance on new Macs.

Check out the Autotune plugin so good it is literally called Auto-Tune. Check price on Plugin Boutique
Antares makes several different versions of its autotune plugin at different price points. Frankly, they're all pretty good, so if all you can afford is Auto-Tune Access, you'll get a ton of value.
That said, if you're really looking to fine tune your vocals, Auto-Tune Pro is the best choice. It includes features like:
- advanced vibrato settings for a more natural sound
- formant filters
- midi input
- the ability to change detection based on the singer's vocal range
Izoptope Nectar
Within Izotope Nectar 4, you’ll find an accurate and transparent pitch correction module that can detect pitch and key to tune vocals quickly, whether you’re looking for a subtle sound or an all-out robot sound.

Check the price of Izotope Nectar on Plugin Boutique or ADSRSounds.com
The interface is incredibly intuitive and the new real-time display gives you a visual as to how hard and accurately your pitch correction is working. Nectar also includes other great features like automatic gain control of your vocals, and is actually a full fledge tool for mixing vocals including lots of unique abilities you won't see on other autotune plugins, like a built in saturation, compression, reverb and eq.
Of all the tools, Nectar is closest to your "one stop" vocal processing signal chain.
Waves Tune Realtime
Waves Tune is very similar to Melodyne with its graph-style editing, allowing you to surgically tune your vocals with ease. Waves often runs sales, allowing you to pick this plugin up for only $29 if you’re lucky, which is an absolute steal.

Check to see if there's a sale going on at Waves.com!
You get fine control that is comparable to high-end plugins, and it’s easy on CPU, allowing you to use multiple instances at once. One thing I love about it is it can preserve the subtle nuances of the human voice by allowing you to dial in the amount of natural vibrato (or an unnatural amount of vibrato if that's what you're looking for)!
When it comes to the be value, Waves Tune is the winner. It's better than any free option, and it is probably powerful enough for most artist just looking to create professional sounding music.
You can read my full review of Waves Tune Realtime here.
Revoice Pro 5
Revoice Pro is basically you’re all-in-one vocal editor, allowing for graph-style tuning, timing alignment, and performance matching, great for when you’re trying to lime up stacked vocals quickly. If working with vocals is your main gig, then this plugin is an absolute must-have, even with the insanely high price tag. Its extra features make it hands down the most powerful plugin for tune vocals.

Revoice Pro is the winner if you're working with lots of vocal takes at once, have big vocal stacks, multiple harmonies etc. It's a massive time saver.
Melodyne
Celemony Melodyne introduced graphical editing to auto-tune, completely changing the game. This plugin has become the studio standard for manual and surgical pitch correction. With the top-tier versions of the plugin, you can work with multiple tracks at once, making dialing in robust vocal productions easier than ever.

The software also has the ability to detect atonal information like consonant sounds and esses so they’re left untuned, which is pretty incredible and save tons of time.
Best Free Autotune Plugin for Garageband
Grallion Live Voice Changer is probably the best free autotune plugin option for GarageBand. It includes some basic, but usable pitch correction signals. But it also includes lots of other tools for sound design, like:
- built-in pitch shifting
- bit crusher
- a harmony tool
- a high pass filter section
How To Add an Autotune Plugin To A Garageband Track
Garageband is a digital audio workstation that runs plugins in the audio units or AU plugins format. Every major plugin manufacturer offers plugins in these formats, so you don't need to worry. And all of the plugins we recommend below will be compatible with GarageBand (and it's big brother Logic Pro).
To add a third party autotune plugin like Antares Auto-Tune Pro, follow these steps below.
First, download and install the plugin in accordance with the manufacturer's specifications. Some plugins require a separate authorization step or even something called iLok to control. Once the autotune plugin is successfully installed, you'll see it be scanned by GarageBand the next time you launch the program. If you installed it while GarageBand was open, you may need to restart GarageBand.
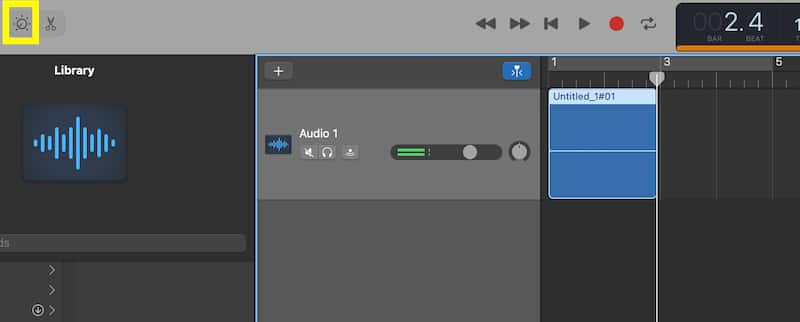
Next, select the audio track in GarageBand, open the control panel view.
From there, expand the "plugins" section.

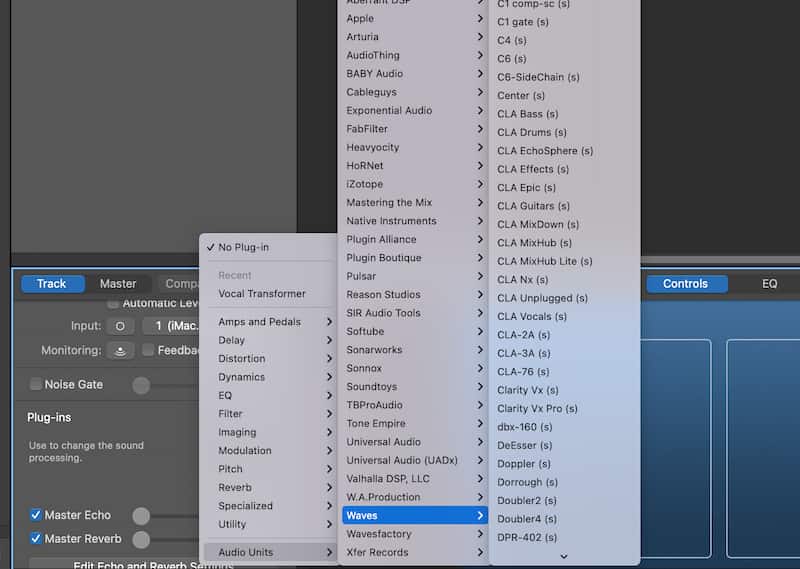
Click on a blank slot in the plugins section and scroll down the menu until you see a sub-menu labelled "Audio Units."
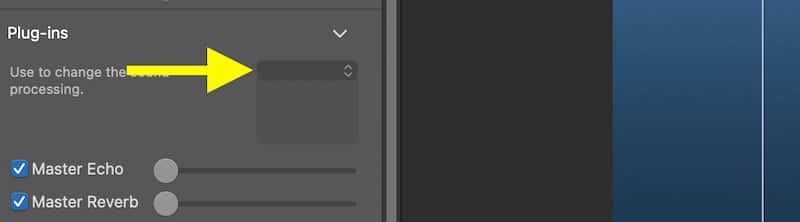
A new sub-menu will pop up with the AU plugins of all of the manufacturers you've installed plugins for. For example, if you were using Antares auto-tune access, you'd select the manufacturer "Antares" and a new sub-menu would pop up enabling you to select "Auto-Tune Access" as the plugin.
From there, the plugin is now up and running on the audio track. Click on the plugin's name and it will open up the plugin so you can start your vocal tuning.
What Is An Autotune Plugin?
Autotune plugins have become one of the most common vocal effects in modern music production. Producers use the autotune effect for everything from making a robotic sound in EDM to crafting a smooth trippy vocal effect in hip hop tracks.
The truth though, is that autotune plugins are used on almost every recording made these days. Usually most producers are more concerned with employing the subtle pitch correction features of auto-tune to their vocal takes in a way that subtly enhances the pitch of the vocal, but is generally transparent to the listener.
Pitch Correction
Obviously, one of the most popular uses of auto-tune is pitch correction. Auto-tune is more flexible than it ever has been, meaning you can correct pitchy vocal performances without any listener ever knowing you used an auto-tune plugin.
People’s ears are very attuned to pitch differences thanks to the near-perfect vocals found in modern pop, hip-hop, and EDM. With proper pitch correction, you can tighten up your vocal performances in a subtle yet effective way.
Enhance Clarity
With auto-tune, you can enhance the clarity of your vocals by ensuring there isn’t any dissonance relevant to the music. Auto-tune can be especially helpful in this regard when it comes to stacks of backing vocals. Even if you have a stack of backing vocals with one harmony off, it can feel muddy and dissonant.
By putting everything in place with subtle auto-tune, you can ensure each party of your harmony composition is sitting where it should be.
Get The Autotune Effect
Of course, there’s no reason why you can’t push the limits of auto-tune to get the T-Pain effect. By dropping the Speed parameter to 0, your auto-tune plugin will latch onto each note and inflection, tuning it to perfection in the scale. In doing so, you get a unique robotic effect. This style of auto-tune requires very little finesse, as all you truly need to do is select the right key and scale while letting the plugin do the rest.
4 Tips On Using Autotune PLugin To Enhance Vocal Performance
If you want to get the most out of the best autotune plugins for GarageBand, you need to know how to use them well! Here are for tricks for dialing in the perfect autotune settings!
Sensitivity
Sensitivity, sometimes labeled as “tracking,” is one of the most important parameters on any auto-tune plugin. On Antares Auto-Tune, one of the most popular auto-tune plugins, this control is set to 50 or half. This control determines how sensitively the plugin reacts to the recording.
If you have a really clean studio recording, you can set the sensitivity higher. However, if you have a ton of background noise in your recording, you might shift the value slightly lower.
Formant Shift
If you want to transpose your track using a larger interval without getting a chipmunk or Barry White-style effect, you can use the formant shift control to adjust the virtual throat so that it corresponds with the chosen pitch. Of course, you can also use this as an effect to create unnatural high or low timbres!
Speed Knob
The main control on most any auto-tune plugin is the speed control, as it allows you to adjust how quickly the tuner corrects the pitch. The lowest speeds will create T-Pain or Cher-style effects, while slower retune speeds will sound far more gentle, allowing the initial pitch to poke through before the plugin changes it.
Choosing The Right Key Or Using MIDI Input
Usually, you have the ability to choose the key and scale with auto-tune plugins, allowing the plugin to automatically push certain notes into place based on that chosen scale. You can also use the MIDI input on your auto-tune plugin to choose the right notes with MIDI notes.
FAQ
How Do I Get The Daft Punk Vocal Effect?
Beyond auto-tune, getting the Daft Punk effect requires a Vocoder - not an autotune plugin. Typically, you can route your vocal track to a chosen vocoder plugin and draw in the MIDI notes so they match the chords of your track to get that spread-out, robotic effect. Here are some of the best vocoder plugins.
How Do I Get The T-Pain Vocal Effect?
Getting the T-Pain effect requires setting the lowest-possible retune speed on your tuning plugin so that it latches onto your vocals immediately and leaves no room for tuning error. There is truly no subtlety involved when dialing in this heavy-handed effect so feel free to get crazy with your effect, though just make sure you set the key and scale correctly!
How To Get A Robotic Effect
Getting a robotic effect is basically the same as dialng in a T-Pain effect, as you need to set the retune speed so it’s as fast as possible. You can also try experimenting with the formant control so that the voice sounds a bit less human.
How Do I Get A Kanye West Vocal Effect?
Setting your auto-tune between subtle and T-Pain is a great place to start when going for a Kanye West-style effect. Typically, Kanye has some sort of saturator or bitcrusher on his voice too which adds to the grit, as well as a vocoder tucked underneath to thicken things up.
From a Frustrated Producer in a Ragtag Bedroom Studio to Major Placements on TV Earning $1,000s!
My name is Evan, and I've been making music since around 3rd grade. I'm from San Diego, California, but I've lived in Washington, DC for the last 20 years.
While I still have a full-time day job, I have created systems that have allowed me to produce dozens of songs a year in my spare time.
My songs have been on Netflix, TV shows like the 90 Day Fiance, an award-winning indie film, and NPR’s “All Thing Considered.” They've also been streamed millions of times.
In addition to being a music producer, I am passionate about teaching people how they can make professional-sounding music and earn money licensing it, all in their spare time.
Thousands of musicians, like yourself, have trusted me to guide their musical journey. My YouTube videos have been watched nearly a million times. And my story has been in Forbes, Side Hustle Nation, and the Side Hustle School.


EQ is the most essential tool you have for making music sound clean, clear, and professional. In this book you'll learn how to use the R.O.S.E. System, a simple 4-step EQ formula to help you master the world of EQ
