Best De-Esser Plugins & Tips To Use a De-Esser
When it comes to mix processing, the de-esser is often one of the most misunderstood tools out there. However, it is also one of the most necessary tools for mixing, especially if you want your vocals to sound crisp and professional.
There are so many factors that contribute to the overall process of de-essing, which is why we’re going to provide you with everything you need to know in this handy guide.
Let’s get rid of those spitty consonants, shall we?
Note: this article may contain affiliate links, which mean that I receive a commission for any purchases you make, at no added cost to you.
What Is A De-Esser Plugin?
A de-esser plugin is a niche form of a compressor plugin that exclusively acts on the desired frequency range. While you can often alter the frequency range the compressor works on with a de-esser plugin, it is most often used to control the sibilance that occurs in the human voice.
Most engineers use de-esser plugins so that they can get loud, bright, and upfront vocals without having harsh consonants like “S’s” take over. Whenever these consonants get out of control in a vocal recording, a de-esser will reduce the frequency loudness and even them out, making vocals easier to listen to.
Why Use a De-Esser?
As we said before, de-essers are used to control sibilant frequency peaks found in vocal recordings. Engineers refer to these peaks as sibilance, and they come about when singers use certain consonant sounds, such as “S” and “T.”
Webster's Dictionary defines sibilant sound as "having, containing, or producing the sound of or a sound resembling that of the s or the sh in sash."
Sibilance can sound very unpleasant if not dealt with, which is why we use de-essers to deal with their harshness. While you could use a compressor to clamp down on volume peaks, you would affect the entire sound of the vocal, which can often bring sibilance out even more.
For this reason, we use de-essers or frequency-dependent compressors to narrow in on what we’re trying to accomplish.
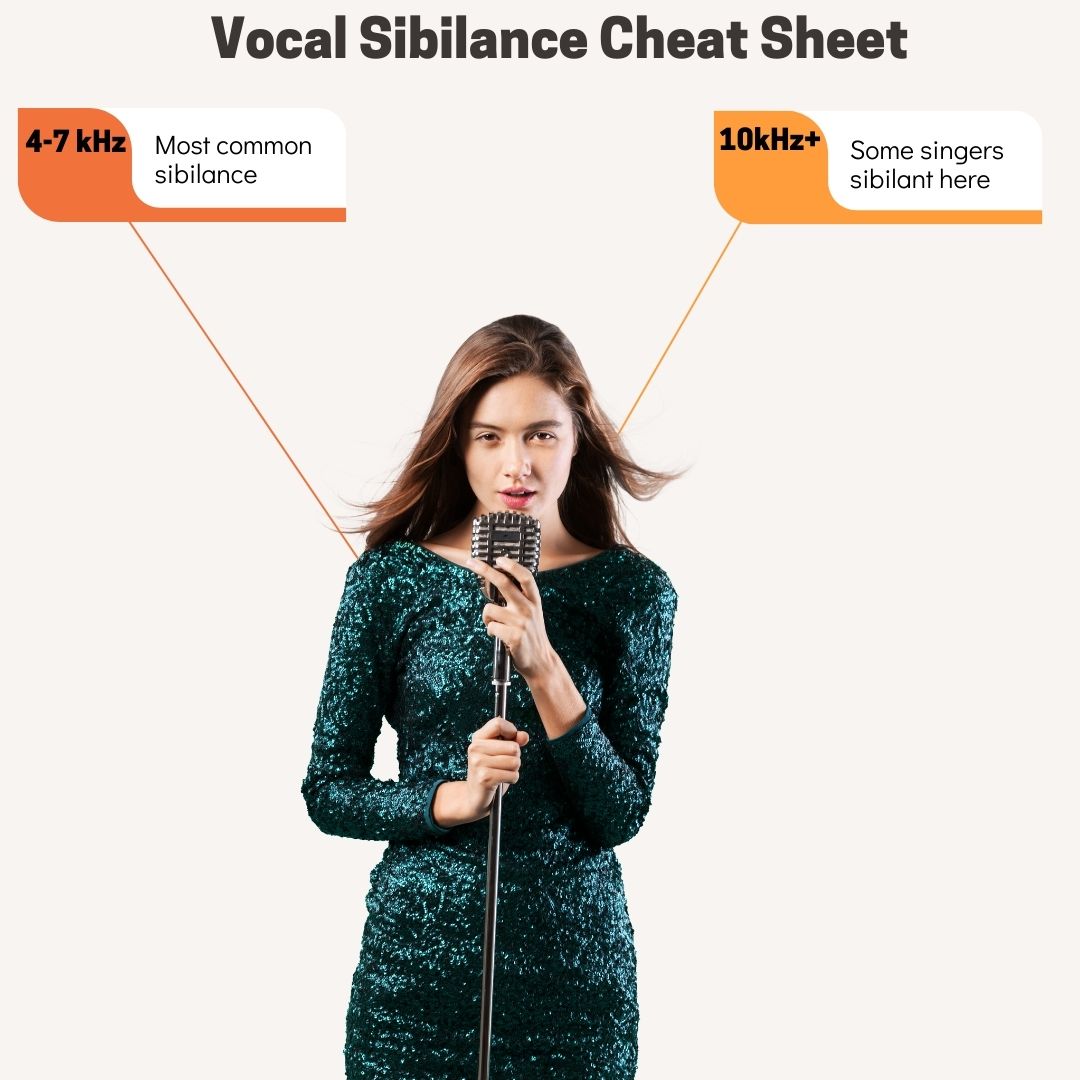
What Are the Main Sibilance Frequencies?
More often than not, you’ll find sibilance frequencies between 4kHz and 7kHz.
However, some singers can have sibilance as high as 10kHz. The frequency range depends on the singer, the microphone, the recording environment, and any compression used during recording or mixing.
When to Use a De-Esser?
If you have a vocal recording that has harsh sibilant consonant sounds, it’s best to control or get rid of them using a de-esser.
Let’s say your vocalist sings a line that sounds like:
“Hold me in your armS”
While most of the line might sound tight and controlled, the “S” at the end of “arms” sticks out like a sore thumb. To control this “S” without compromising the rest of the vocal track, you could use a de-esser to clamp down on it when it appears.
De-essers are especially great for pop vocals, as you often want them to be upfront and bright without any harshness.
Where to Put a De-Esser In the Signal Chain?
The answer to this question is long debated, though we’ll give you our two cents.
Wherever you choose to place your de-esser in your signal chain, you want to make sure you are doing it with intention.
For example, you may not need a de-esser when you play your raw vocal, though the minute you start compressing it and boosting the high-end, the sibilance will begin creeping out. In that case, you would put your de-esser AFTER your compression and EQ.
However, you might have a sibilant vocal right off the bat that needs treatment BEFORE any EQ and compression, which is totally fine!
There are many times where I’ll place a de-esser at the beginning of my vocal chain to get rid of any sibilance before further processing, and one later down the line to get rid of any sibilance I may have introduced with compression and EQ.
Think intentionally and do what you need to do to get your vocal sounding right! This article on the best vocal signal chain will help you get things just right!
Main Controls on a De-Esser Plugin
While all de-essers can have different parameters, you’ll find the same controls across most de-esser plugins, including:
- Threshold: The level at which the de-esser reacts to your sibilant consonants. The further down you pull your threshold, the more your de-esser will react.
- Frequency: The range in which your de-esser works. Some de-essers will allow you to set a center frequency, such as 5khz, while others will allow you to set a range, such as 7kHz-10kHz.
- Wide/Split: Wide band de-essing pulls the entire signal down when sibilance is detected while split–band de-essing pulls down only the selected band of frequencies.
- Monitor/Listen: Allows you to listen to what the de-esser is attenuating in solo for more accurate monitoring.
How to Use a De-Esser Plugin
The first thing you’ll want to do is select the right frequency, which is the frequency or frequency range that is giving you the most unwanted sibilance. As we said before, this frequency range typically lies between 4kHz and 7kHz.
You can typically find the harshest frequency by using the “monitor” parameter, which allows you to detect the frequencies you want to attenuate. Using the “monitor” parameter makes finding the offensive range much easier than trying to listen for the most sibilant frequency with every other frequency intact.
Once you find your offending frequency or frequency range, you can turn off the “monitor” button and set your threshold. Slowly pull down your threshold until you are only turning down the sibilant frequencies, such as “S” or “T.”
The threshold on a de-esser works very similarly to the threshold on a compressor. The further you pull it down, the harder it will work. It’s best to go light with your threshold if you want to maintain the most natural sound possible. Most de-esser plugins come with reactive meters that will give you an idea of how much sibilance you’re attenuating.
How to De-Ess Vocals
When de-essing vocals, the first thing you need to do is ask yourself,
Do I NEED to de-ess my vocals?
If there isn’t any harsh sibilance, you might not need to use your de-esser at all! While it’s uncommon for there to be no sibilance in a modern mix, it’s not unheard of.
If you decide you need to use a de-esser, your first step is to determine where you should put it. If your raw vocals are sibilant without any processing, you can use your de-esser as the first plugin in your chain. If it’s not sibilant at first, but it becomes sibilant the more processing you add, you can wait until consonants start poking out to place it in your chain.
Once you have your de-esser in your chain, it’s time to select the right frequency. To find the right frequency you want to attenuate, flip your “monitor” switch on so you can hear the frequency or frequency range you are set to in solo. Once soloed, you can sweep slowly through the sibilant frequency range and listen for where the sibilant consonants are the harshest.
PRO TIP: In some cases, you might have harsh sibilance around 4kHz AND 8kHz. Luckily, the processing power of modern computers makes it so we don’t have to compromise and choose one frequency to focus on. You can use TWO de-essers in this instance, one which focuses on 4kHz sibilance and one which focuses on 8kHz sibilance.
When determining how much you want your de-esser to work, you’ll use the Threshold parameter. Similar to threshold on a compressor, the threshold on a de-esser will determine how loud your frequency or frequency range needs to be before it attenuates it. By pulling the threshold on your de-esser down further, the de-esser will react more strongly to sibilant consonants.
It’s important to treat this part of the process with care, especially if you want your vocals to sound natural. All too often, amateur engineers will pull their threshold too far down on their de-essers, resulting in lispy sounding vocals.
For best practice, loop a section of your vocal recording where sibilance is bothering you. While the vocal is playing, slowly pull the threshold down while listening to how it is reacting to the sibilance. The second it begins to sound lispy, back it off a tad. At this point, your sibilance should feel in control and your de-esser should feel transparent.
You may have to automate your threshold in some instances. If your threshold setting works for the majority of your song, though it sucks the life out of a single “S” in one portion of your track, you may have to slightly automate the threshold so it doesn’t clamp down on that “S.”
PRO TIP: Wide-band de-essing, which works by pulling down the entire vocal signal when sibilance rises above the threshold, is typically better with a single vocal recording, as it sounds smoother and more natural than split-band processing.
What to Listen for With A De-Esser VST
Listen for sibilance that sticks out. When it comes to de-essers, we try to get rid of harsh “S’s” and “T’s” without making it sound like the singer has a lisp. First, listen to find where the majority of the sibilance lies, then listen to how it is being attenuated as you pull down the threshold.
If you pull the threshold down and you get rid of that harsh sibilance without crushing the vocal or making it sound like the singer has a lisp, then you’re on the right track.
Creative Uses of a De-Esser - Guitar, Drums, Etc.
While most people think of the de-esser as a vocal tool, it is far more versatile in its use.
You can use a de-esser to round off harsh frequencies in instruments as well, including drums, guitars, or synths. Some engineers will use a de-esser on the entire mix bus if necessary!
Here are a few ways you can use a de-esser on your instruments:
- Taming Harsh Percussion: From cymbals to shakers to tambourines, you can use a de-esser to tame harsh frequency spikes that arise in your high-frequency percussion instruments.
- Reducing Harsh Guitars: When you compress a guitar, you can amplify string noise and fretting. With a split-band de-esser, you can attenuate this unwanted noise without compromising your overall tone. Electric guitars often have harsh-sounding frequencies, especially when you introduce distortion. With a de-esser, you can smooth out the signal while leaving the good grit intact.
- Reducing Harsh Synths: Many people use digital synthesizers these days, which can often have ultra-bright high-end. You can use a de-esser to get rid of that shrill character in your distorted synth leads or dubstep-style basslines.
- De-Essing Time-Based Effects: Inserting a de-esser before time-based send effects, such as reverb and delay, can help you smooth out your tone before it is processed.
- Mastering: Many mastering engineers will use de-essers on the stereo mix buss to tackle excessive harshness or brightness in the high-end.
Best De-Esser for Vocals - FabFilter Pro-DS
There is no question that FabFilter designs some of the slickest and most intuitive digital mixing tools on the market today. The FabFilter Pro-DS is no exception, as it provides transparent de-essing with an easy-to-use interface.
The FabFilter Pro-DS comes with the same award-winning filtering and compression technology found in the FabFilter Pro-Q and Pro-C plugins as well.
The UI, as with all FabFilter plugins, is clean and easy to navigate. You get wide and split-band modes to help you process both single vocal sources or all-around sources like vocal stacks and instruments.
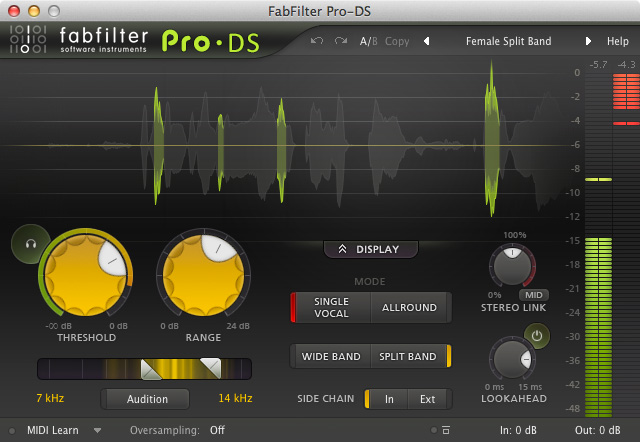
What we truly love about the FabFilter Pro-DS plugin is that it does an extraordinary job at detecting sibilance and getting rid of unwanted consonants. The visual display feedback is second to none, allowing you to see exactly what the plugin is attenuating in your audio track as it moves through the plugin.
The second standout feature on the FabFilter Pro-DS is its “lookahead” feature. Yes, lookahead can cause a bit of latency, though it does a fantastic job at applying de-ssing to a vocal up to 15ms before any sibilance occurs, giving you clean and transparent de-essing, even on the harshest and fastest transients.

Weiss De-Ess
Many consider the Weiss De-Ess to be one of the best hardware de-essers in existence. With the Softube Weiss De-Ess plugin at your disposal, you can now obtain the same powerful processing as the original hardware unit without spending big bucks.
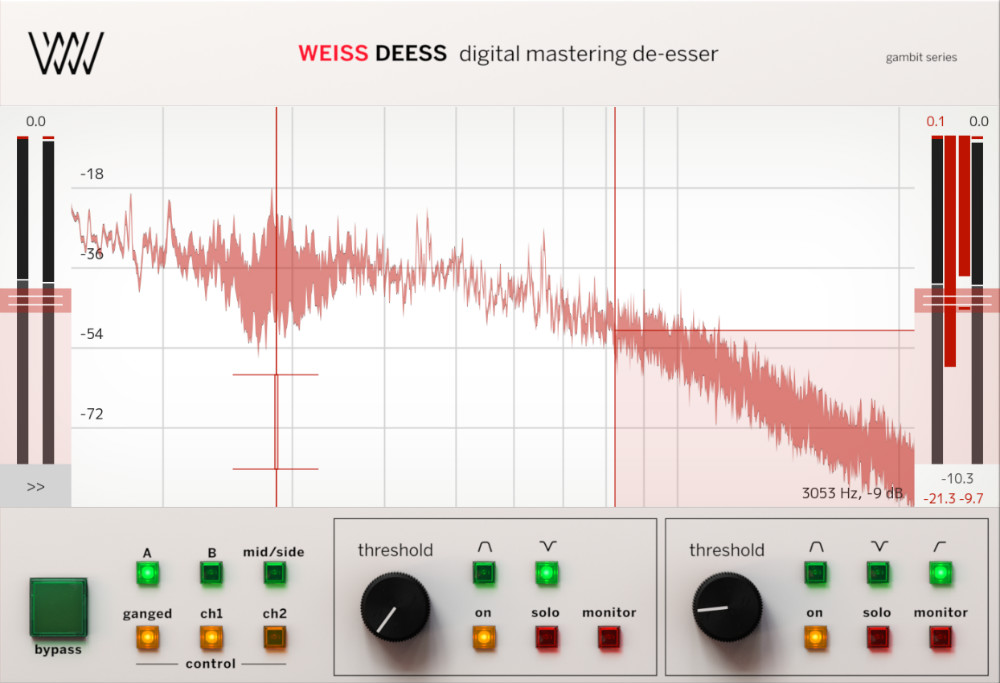
With two separate bands that have their own parameters, it’s a wonderful tool for fixing sibilance that exists in multiple frequency ranges. It also features mid-side control, making it an excellent mastering tool when you need more accurate control.
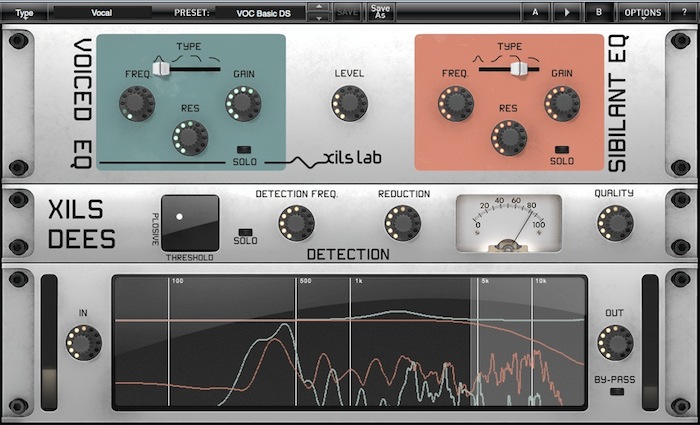
Xils DeeS
Xils DeeS is one of the easiest de-esser plugins to use on our list, allowing you to move the frequency knob and apply sibilance reduction without having to think. The interface is super clean and the signal path is clear, allowing you to solo each channel to expose harsh sibilance in an instant. Plus, with the real-time frequency graph at the bottom of the plugin, you get a clear visual reference to help you make better decisions.
Oxford SuprEsser
Yes, the Oxford SuprEsser isn’t messing around with that price tag, though if you’re serious about the quality of your de-esser, there is no better choice.
Oxford is one of those plugin companies that has been around forever and continues to do so well without ever re-inventing the wheel with their plugins. The Oxford SuprEsser is an instant classic, giving users supreme detail over their vocal tracks with tons of metering to keep an eye on exactly what’s happening.
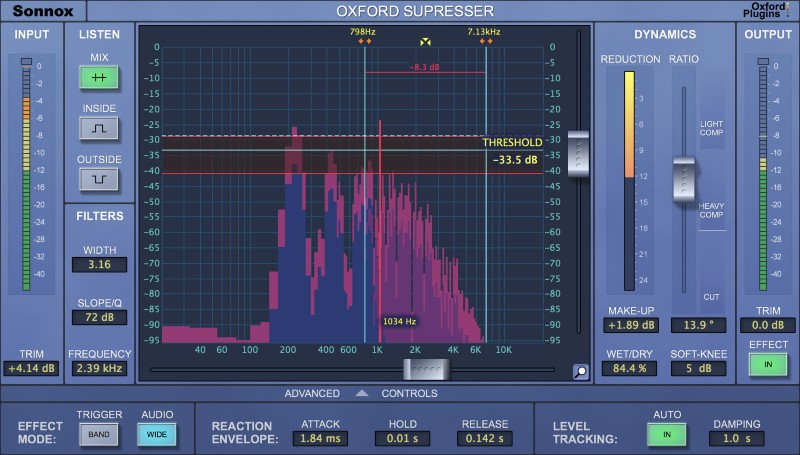
The Oxford SuprEsser comes with unique auto-leveling features, allowing you to see how much processing you are applying to your signal with various dynamics. Though the interface might seem simple, Oxford used this plugin to take the de-essing process to new heights, perfect for professional use.
Unlike some of the de-esser tools listed above, we certainly don’t think of this as a set-it-and-forget-it tool. It’s a dynamic equalizer with a variety of de-essing modes, giving you total control over the sibilance in your vocal.
We absolutely love the fact that Oxford added a “Mix” knob, allowing you to squash your audio with de-essing and thoughtfully blend it into your raw track to give you the best of both worlds.
Best Value De-Esser VST - iZotope Nectar 3
For transparency, iZotope Nectar 3’s De-Esser is one of the best de-esser plugins out there. The elegant interface is easy to navigate and the spectrogram gives you all of the visual information you need to make the best de-essing decisions.
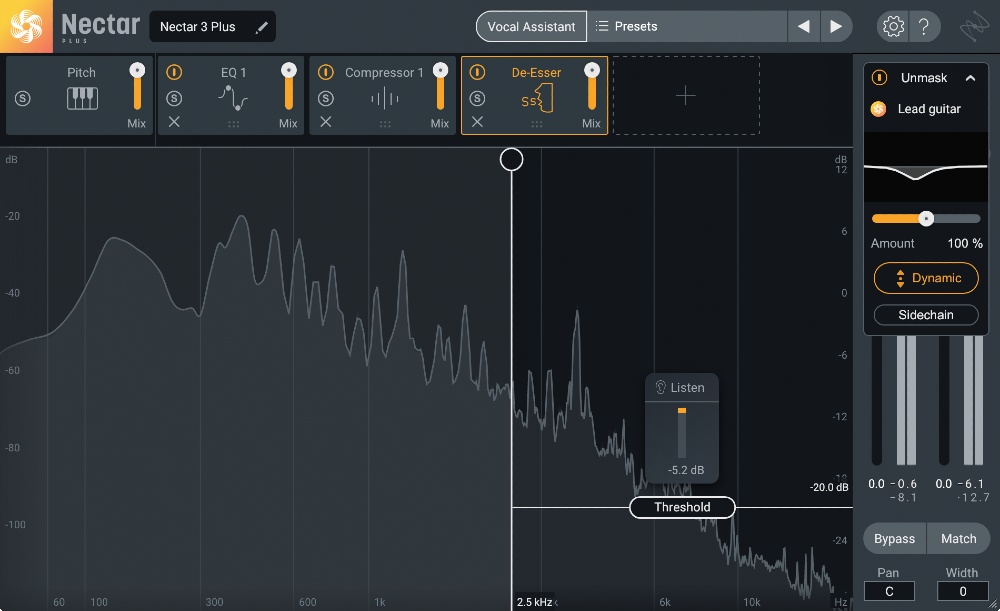
With iZotope’s high-end Vocal Assistant functionality, you can even let the AI algorithm do the work for you!
Best Waves Dresser - DeEsser
DeEsser by Waves is a simple and straightforward DeEsseing plugin that will quickly get you good results. The Waves DeEsser offers a simple set of controls that allow you to quickly dial in the control you're looking for. Simply set the frequency and threshold, and you're good to go.
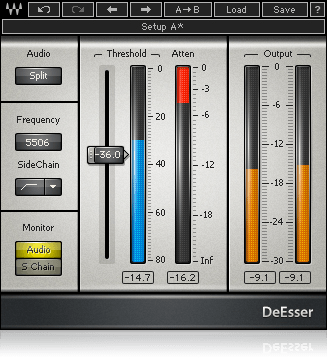
One thing that's really cool about the Waves' DeEsser is that it includes the option to side chain the trigger to another instrument, allowing for more precise control in situations where you're looking to control harsh transients. For example, you could have a De-Esser on an acoustic guitar that is triggered by the vocals, so that when the voice is at its loudest, the frequency of the acoustic guitar that competes with the vocals drops back just a touch.
While the interface appears somewhat dated, the quality of the sound is great. At press time, the plugin was on sale for less than $30, so this is definitely one of the best deals out there, if you grab it on sale!
Free De-Esser Plugin - T-De-Esser
While we certainly don’t have a shortage of high-powered de-essing plugins out there, you might not always need the best tool around. Plus, some people can’t afford to break the bank for a de-esser plugin.
If that’s the case, we recommend T-De-Esser. The de-esser is super easy to use and is a wonderful de-esser to start with if you’re new to mixing and want something that is uncomplicated and uncompromising.
From a Frustrated Producer in a Ragtag Bedroom Studio to Major Placements on TV Earning $1,000s!
My name is Evan, and I've been making music since around 3rd grade. I'm from San Diego, California, but I've lived in Washington, DC for the last 20 years.
While I still have a full-time day job, I have created systems that have allowed me to produce dozens of songs a year in my spare time.
My songs have been on Netflix, TV shows like the 90 Day Fiance, an award-winning indie film, and NPR’s “All Thing Considered.” They've also been streamed millions of times.
In addition to being a music producer, I am passionate about teaching people how they can make professional-sounding music and earn money licensing it, all in their spare time.
Thousands of musicians, like yourself, have trusted me to guide their musical journey. My YouTube videos have been watched nearly a million times. And my story has been in Forbes, Side Hustle Nation, and the Side Hustle School.


EQ is the most essential tool you have for making music sound clean, clear, and professional. In this book you'll learn how to use the R.O.S.E. System, a simple 4-step EQ formula to help you master the world of EQ
