Quickly Learn How to Use Sidechain Compression in Reason Like a Pro

Reason Tutorial: How to Use Sidechain Compression in Reason
Whether you’re new to Reason or an Expert, this you’ll find this Reason tutorial on how to use sidechain compression in Reason useful. I’ve been using Propellerhead’s Reason DAW (affiliate link) for about 15 years now, and I’m going to share all of the secrets to unlocking Reason’s incredible sidechain options.
Be sure to check out this in-depth tutorial on all sorts of cool, crazy ways to use sidechain compression for cool effects!
This Reason tutorial is going to start simple, explaining what sidechain compression is and offering simple examples. You can skip directly to whatever section you might find useful.
- What is sidechain compression?
- 2 ways to use a source to sidechain a single sound
- 3 ways to use a source to sidechain multiple sounds
- How to use a loop to trigger a sidechain compressor
- How to setup a ghost sidechain to create unique pumping sounds
I think video is probably the best way to teach DAW lessons, so I’ve put together this 30 minute guide. But if you prefer reading or are looking for a reference, keep reading
What is sidechain compression?
Before showing you how to use sidechain compression in Reason, and before even answering the question about what sidechain compression is, let’s dig into the concept of compression.
Compression is basically automated volume control. In its simplest form, if you put compression on the drums, it will turn down the loudest parts. If the peaks are reduced by 3db, this allows you to turn up entire drum track by 3db without losing clipping or interfering too much with other tracks.
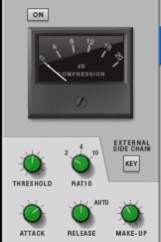
The threshold control determines how much sound is needed to trigger the compressor to turn down the volume. The ratio control determines how much the volume is turned down once the threshold is crossed. The attack determines how quickly the volume is turned down, and the release determines how quickly the volume returns to normal.
For a much more in-depth guide to compression, check out the free guide by Rob Mayze.
But isn’t this Reason tutorial about sidechain compression?
Yep.
So how is it different?
Well, sidechain compression, separates the sound that is being turned down and the signal to turn it down.
Say what? How would you sidechain a synth?
Basically, with sidechain compression, you can have a kick drum act as the trigger for the compressor, but the compressor turns down the volume of the synth! All of the compressor controls (threshold, ratio, attack, release) control how the kick drum triggers the compressor. But the compressor doesn’t affect the compressor. It affects the synth.
2 ways to use a source to create sidechain compression in Reason on a single sound
Ok, now let’s look at to ways of using a compressor in Reason.
The first way is the simplest, most straight forward method. This should work in Reason 5 through Reason 9.
In Reason create an mClass compressor on the channel you want to sidechain, for example, a synth. It will be automatically created as an insert effect, and by default, it will just be compressing the synth. Then you take the parallel output from your kick (or whatever sound you want to trigger the sidechaining) and connect it to the sidechain input of the compressor on the channel you want to sidechain.

Adjust the compressor setting until you get the sound you're looking for. Voila. You’ve got a sidechain.

Another equally easy way to do this in Reason 6 and above is to take advantage of the SSL Mixer’s sidechain option. While this requires less routing, you’ll notice that the SSL Mixer gives you fewer options to control the signal. For example, it lacks an attack control, which is really important for sidechaining.
But here’s how to do it.
Take the parallel out signal from your kick, but this time connect it to the dynamics section of the synth. Connect it to the sidechain input.
The key button will light up when sidechain mode is activated. Then go to the mixer, turn on the compressor on the synth channel, and dial in your sound.
3 ways to use a source to sidechain multiple sounds
The first two methods are great if you only want to use the kick drum to trigger one synth. But what happens if you’ve got multiple sounds you’d like to sidechain? Let’s say you want the kick to control a sidechain compressor on a synth and a bass. This is one of the most useful ways how to use sidechain Compression in Reason
Don’t worry. This Reason Tutorial has you covered.
Method 1 – using a Spider Audio Merger & Splitter to create multiple audio streams.
This is probably the most straight forward method. You use one of Reason’s most useful tools (it’s under the Utilities menu), the Spider Audio Merger & Splitter.
Create the Spider in the Kick’s mix channel. Then connect the kick’s parallel output to the Spider’s to the A and B inputs on the right side of the Spider. Create an mClass Compressor on the Bass and Synth channel. Then go connect the outputs from the right side of the Spider to the sidechain inputs of both mClass Compressors.

If you need to side chain more signals, you can chain multiple spiders together (see the diagram) or go to the Prop Shop and get the Polymodular Splitter for free.
Method 2 – Get on the Bus!
The second way how to use sidechain compression in Reason is to get one signal to use a single signal to sidechain multiple signals is to bus all the signals to a single bus, then insert a compressor on the bus channel.
For example, you could send 4 synths to the Synthesizer bus, and then use the first method to create an mClass compressor on the Synthesizer bus controlled by the kick drum.
Finally, you can setup an mClass compressor on a send effect channel. Let’s say it’s on Send 1. You can use the kick drum to trigger the sidechain. Then you could go to the mixer, and click the Send 1 button on the channels that you want to send to the compressor. If you click the “pre” button and turn down the mixer volumes, only the send level will control the volume being sent to Send 1.
This can be useful for cool sidechained send effects if you add a reverb or delay after the compressor. Or it can create a cool pumping parallel sidechain compression.
How to use a loop to trigger a sidechain compressor
But what happens if you have a drum loop that you want to use to trigger the sidechain compressor on a synth?
You can’t just set up a Rex loop to trigger the sidechain compressor on the synth, because EVERY loud hit on the drum loop will trigger the compressor.
That’s right, the snare, the kick drum, and the crashes are all going to be triggering the compressor. This is going to sound like garbage, because there won’t be a consistent rhythm the sidechain compressing.
But I’ve got you covered.
Enter the Stereo Imager
The easiest way to do this is to use the trusty MClass Stereo Imager. This let’s you split the signal into high and low frequencies.
I made an easy patch for you to use here.
But let me explain what’s going on because teach a man to fish.
To get the kick drum of a drum loop to trigger the sidechain input of a separate compressor on a synth track, create an MClass Compressor on the Synth track. Then hold down the SHIFT key, and create an MClass Stereo Imager below the Compressor.
Holding down the SHIFT makes it so that the MClass compressor is not automatically connected to other effects.
To wire in the MClass Stereo Imager, connect the parallel output from the Rex Drum track to the audio input of the Stereo Imager. Then connect the “Separate Out” section of the Stereo Imager to the “Sidechain In” of the MClass Compressor.

Make sure the “Lo Band” switch is flipped on the back of the Stereo Imager. Then hit Tab to flip to the front of the Stereo Imager and adjust the X-Over Frequency down to 100HZ. The X-Over frequency determines which frequencies are sent through the lo-band. So by setting it to 100HZ, only sounds below 100HZ will flow into the sidechain. This ensures that the kick drum will be driving the sidechain compression. Now you know how to use sidechain compression in Reason with loops.
How to setup a ghost sidechain to create unique pumping sounds
Sometimes, however, you want a sidechain compressor, but you don’t want to have a pounding drum track.
Thankfully, the Reason DAW is flexible enough to handle this, too.
The final great trick for triggering the sidechain compression effect in Reason is what I’d call using a “ghost” kick drum.
Now don’t get scared.
It uses the same basic technique described in part one, but the kicker (get it? Kicker?) is that the kick drum is not actually plugged into the mixer, so it doesn’t create any sound in the song.
Here’s a ghost kick drum patch you can work from.
But again, I’m gonna teach you how to fish.
So you create your synth track. Then you create an MClass Compressor. Then you hold down SHIFT (remember, no connection) and create a REDRUM drum computer. Take the stereo out portion from the REDRUM and connect them to the Sidechain In on the MClass Compressor.
Then flip the REDRUM around and create a patter that fits the sidechain compression you’d like.
Boom.
Now you’ve got a ghost sidechain compressor.
Conclusion
I hope you’ve enjoyed this exhaustive (and exhausting to write) guide on how to use sidechain compression in Reason. Feel free to share it with your friends!
Can you think of any other ways of how to use sidechain compression in Reason? Let me know in the comments.
From a Frustrated Producer in a Ragtag Bedroom Studio to Major Placements on TV Earning $1,000s!
My name is Evan, and I've been making music since around 3rd grade. I'm from San Diego, California, but I've lived in Washington, DC for the last 20 years.
While I still have a full-time day job, I have created systems that have allowed me to produce dozens of songs a year in my spare time.
My songs have been on Netflix, TV shows like the 90 Day Fiance, an award-winning indie film, and NPR’s “All Thing Considered.” They've also been streamed millions of times.
In addition to being a music producer, I am passionate about teaching people how they can make professional-sounding music and earn money licensing it, all in their spare time.
Thousands of musicians, like yourself, have trusted me to guide their musical journey. My YouTube videos have been watched nearly a million times. And my story has been in Forbes, Side Hustle Nation, and the Side Hustle School.


EQ is the most essential tool you have for making music sound clean, clear, and professional. In this book you'll learn how to use the R.O.S.E. System, a simple 4-step EQ formula to help you master the world of EQ
