How to mic a piano
Recording a piano is probably one of the most intimidating studio tasks for a sound engineer, as capturing a great sound doesn't come easy.
If you have a few microphones ready and you’re looking for a good jumping-off point to record your piano in the studio or at home, come dive in as we look at five great techniques for procuring flawless piano recordings.

For the best result, you'll want to record piano in a treated room with as much sound dampening as you can find. As an acoustic instrument, room position of the piano really matters, too, unless you happen to be recording in a concert hall. So if possible, move the piano around the room until you find the room's sweet spot where it sounds natural, and not overwhelmingly echoey.
In this article you'll learn five different techniques for recording piano as well as get recommendations on my favorite mics for each (plus a bonus technique using 3 microphones at the end). The techniques are:
- Stereo pair of microphones by the players head
- Stereo pair of microphones over the soundbar
- A stereo pair of microphones over the hammers
- A-B Mic'ing from the audience perspective
- Boundary mic'ing with piezo microphones
- Pairing a small diaphragm condenser with a large diaphragm condense
While these techniques provide a good starting point for home recording, be sure to experiment with different ways moving the mics across the piano strings to emphasize the high strings or the low strings, as necessary.
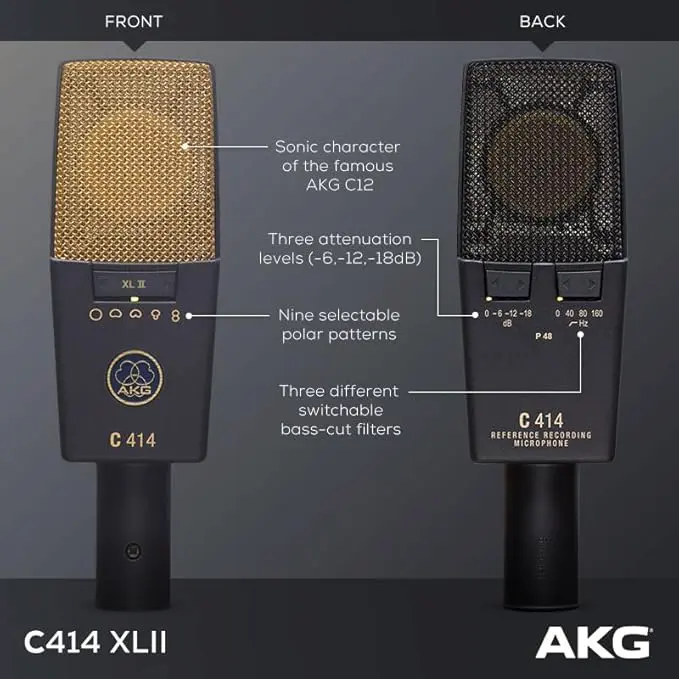
For most techniques, you'll also need a couple of decent cardioid mics. You can find my review of the best mics for recording piano here. Generally, for most of these techniques I'd recommend a stereo pair of mics, preferably condenser mics with several polar pattern options.
Note: some of the links below may be affiliate links, meaning that I receive a commission if you purchase through them.
Challenges of Recording Piano
The two biggest issues you'll run into with recording piano are capturing too much room sound (since most non-professional rooms will have too many reflections) and phase issues arising from using a couple of mics. Each of these techniques is designed to balance room and phase issues, but they will also be determined by the style of song you're recording, the piano you're using, the room you're recording in and the mics you're using!
So be sure to experiment with great care, and be sure to take time to setup the mics and do a few quick demo recordings before committing anything to final recording
Stereo Pair by Player’s Head
If your piano already sounds good in the room, the simplest miking technique is the stereo pair near the player's head. This mic technique represents what the player is hearing, and you can either close or open the lid to get the sound you desire.
While there are many stereo techniques you can choose from with this setup, such as mid-side, Blumlein, or X/Y, one of my favorites is the ORTF technique, which mimics human hearing. For this technique, you want two small diaphragm condensers with their capsules spaced around 17 centimeters apart at 110-degree angles set in a cardioid pattern (make sure you don't use the standard pattern on an omnidirectional microphone). This positioning simulates the spacing of our ears on our heads.
If you can, move your piano out into the open for this mic technique, as it minimizes nasty room reflections. You can also move it slightly off-center so that it's not parallel with any walls in the room.
On the other hand, if you're unable to move your piano away from the wall, the best way to eliminate room reflections is by hanging some padded blankets or towels on the wall above it.
This might take me to give you a full-range sound, which is perfect for solo piano recordings.
Feel free to experiment with the how open the piano lid is, especially if you're having trouble with room reflections. Sometimes a lit that's open just a crack can provide a good balance of brightness in a challenging room.
Stereo Pair on the Soundboard
Whenever I'm recording a jazz or classical music, I also consider using a stereo-spaced pair on the soundboard. This mic technique gives you a full yet relaxed tone, especially when used on an upright piano.
You can think of the wooden panel on the back of your upright piano as a resonance panel, giving your instrument its body and tone. You'll get plenty of sustain from this mic technique, which is why I recommend it more for slower tracks or ballads. It's also an excellent technique if you're recording a piano with a singer, as it will provide decent isolation from the vocalist.
To use this technique, position two large diaphragm condenser microphones six inches from the soundboard and a few feet apart.
The closer you place them to the sound panel, the more bass build-up you'll get, thanks to the proximity effect. This low buildup can be desirable in some cases, though in the context of full arrangements, it's often too muddy. Take time to figure out how far to the left (toward the lowest bass strings) you place the left-hand microphone. You're looking for a balanced sound with out phase issues.
Note that with this mic technique, you'll get a nice, deep, and full tone, though you won't get much of the action from the hammers, which doesn't necessarily capture the natural sound of the piano. Though frequently in a mix, you don't actually want a natural sound of the acoustic piano, but something the fits in more smoothly!
To combat this, if necessary, you can add an extra microphone to the equation that sits right above the hammers and subtly mix it with the other mics.
Stereo Pair Pointing at the Hammers
If you're recording an intricate piano piece or a track that requires the sound of the hammers, such as a rock or blues track, this technique is one of the best. If I feel that the piano is playing a rhythmic role in the track, capturing the sound of the hammers is necessary to get that desirable punch and a forward attack.
I like using small diaphragm condensers for this mic technique, as they capture quick transients really well. Because you're very close to the sound source, I'd recommend using mics with integrated pads to keep them from distorting.
Start by opening the lid or front panel of your piano so the hammers are exposed. From here, the position options are endless. However, I recommend placing your microphones right above the hammers on each end of the piano to give yourself a wide stereo image.
X/Y positioning will give you a stronger stereo image with better phase coherency, while a spaced pair on each side will give you a wider sound.
If you're mixing your piano in the context of a rock track, I recommend throwing some compression on the insert with a fast attack and fast release to help your piano poke through the guitars and drums.
A-B Mic’ing from Audience Perspective
When I'm recording classical piano music, I find that the best results come from having two omnidirectional microphones in the front of the piano using an A-B stereo position.
You can place the A-B stereo pair on each side of the piano, giving the listener the perspective of the “audience.” From there, you can adjust how far away the microphones are from the piano, depending on the timbre and ambiance you want from the recording.
I have to prefer placing my microphones about two meters apart from the piano’s arch at the center. I’ll also place the microphones about 40 to 60 centimeters apart and mix them so that the high keystrokes are on the right and the low keystrokes are on the left when recording classical music to give a subtle signal of space.
Boundary Mics Using Piezos
One fun way to experiment with recording piano is using a piezo as a boundary mic, which is a microphone that is positioned flush with the surface of the piano. There are many ways to use boundary microphones, though placing them inside the lid of the piano is one of the most popular.
This kind of mic technique will give you very gentle undertones and pick up on the sharper, percussive transients of the hammers. I also find that this mic technique is a great way to get a little bit more low-end out of a piano, especially if you need the extra weight in a classical recording.
Tips on How to Mic an Upright Piano vs. Grand Piano
There are thousands of ways to mic grand pianos and upright pianos, though the type of piano you use will better indicate the microphone placement. For recording upright piano, I often find that the simplest approach is placing two microphones atop the piano with the sound panel open, spreading them out so that one captures the treble keys and the other captures the bass keys.
Or if you’re recording a grand piano, you might start by placing a single microphone about 8 inches from the hammers and around 8 to 11 inches from the strings. You can then place the other microphone near the back end of the grand piano, around 6 to 12 inches from the sound panel and 6 to 11 inches from the strings.
FAQ
Pairing a small diaphragm condenser with a large diaphragm condenser for piano is
You can use any of these techniques above to pair a small diaphragm condenser with a large diaphragm condenser, combining precision and warmth. Generally, I'd recommend a pair of small diaphragm condensers using one of the above techniques to give you that surgical detail, crisp transients, and high-frequency sparkle. They are great for the attack of the hammers, the shimmer of the higher keys, and spatial accuracy. Then I'd add a large diaphragm condenser to bring the buttery low-mids, roundness, and vibe. It tends to flatter the resonance and body of the piano. It could be useful for a placing by the player's head or dropping it further back in the room to capture a rich ambience of the room tone and avoid needing to use as much reverb.
One challenge with three mics is phase alignment, though, so take care setting everything up. Flip the polarity on one channel and see if it sounds tighter or flabbier—your ears will tell you.
Can I Record Piano with Only One Microphone?
Absolutely! If you're using a single microphone to record the piano, I recommend recording from above to capture the entire sound of the piano and the room around it. Whether you're recording a grand piano or an upright piano, the microphone should be placed in the center around six inches from the top to start. The fewer mics you have though, the more you'll want to be sure you invest in high-quality mics that can record the full frequency spectrum.
Can I Record Piano with a Dynamic Mic?
While you can record a piano with dynamic mics, they may not capture the high frequencies of the instrument as well as a condenser mic. With that said, if you only have dynamic microphones to record with, experiment by moving it around the piano to see how you can capture the best sound.
How Can I record a Digital Piano?
If you're recording a digital piano, you can plug it directly into your audio interface. If you're looking for a little more analog warmth, you can consider using an active pre-amp direct box, like the WA-DI-A, which will add a touch of analog warmth to signals you pass through it.
Want to learn more about microphones?
Have more microphone questions? Here are some other articles that might help you!
- The 19 Best Budget Podcast Microphones
- The 13 Best Recording Studio Microphones
- The 13 Best Wireless Microphones for Singers
- The 13 Best Mics for Recording Epic Drums
- 10 Best Microphones for Acoustic Guitar on any Budget
- How to Mic Acoustic Guitar: 7 Fool-Proof Techniques for Pro Sound
- The 10 Best Microphones for Recording Piano on any Budget
- The 7 Best Rapping Microphones for Effortless Flow
- Best Microphone Features - 25 Experts Share Their Tips
From a Frustrated Producer in a Ragtag Bedroom Studio to Major Placements on TV Earning $1,000s!
My name is Evan, and I've been making music since around 3rd grade. I'm from San Diego, California, but I've lived in Washington, DC for the last 20 years.
While I still have a full-time day job, I have created systems that have allowed me to produce dozens of songs a year in my spare time.
My songs have been on Netflix, TV shows like the 90 Day Fiance, an award-winning indie film, and NPR’s “All Thing Considered.” They've also been streamed millions of times.
In addition to being a music producer, I am passionate about teaching people how they can make professional-sounding music and earn money licensing it, all in their spare time.
Thousands of musicians, like yourself, have trusted me to guide their musical journey. My YouTube videos have been watched nearly a million times. And my story has been in Forbes, Side Hustle Nation, and the Side Hustle School.


EQ is the most essential tool you have for making music sound clean, clear, and professional. In this book you'll learn how to use the R.O.S.E. System, a simple 4-step EQ formula to help you master the world of EQ
