How to Mic Acoustic Guitar

Recording acoustic guitar can seem like an incredibly intimidating task if you've never approached it before.
As with recording just about any acoustic instrument, there are several additional variables to consider beyond the instrument itself, such as the microphone choice, the room choice, the recording technique, and more.
Luckily, you've come to the right place.
In this guide to recording acoustic guitar, we're going to show you everything you need to know to record acoustic guitar like a pro! Focusing especially on using different mic positions to get the best results in your next recording session.
Let's dive in!
Note: this article may contain affiliate links, which mean that I receive a commission for any purchases you make, at no added cost to you.
General Tips for Micing an Acoustic Guitar
First, I'll cover some general tips for micing an acoustic guitar that will apply to recording an acoustic in your home studio no matter which mic placement technique you use. These include tips like:
- whether you should be using dynamic mics or condenser mics
- determining if a two-mic setup is right for you
- how to approach room sound in small rooms
Choosing the Right Type of Mic: Dynamic, Condenser, or Ribbon
Before you dive in and start recording, you'll need to decide what kind of microphone you're going to use. Aside from the quality of the guitar (and its strings) and the skill of the musician, mic choice is probably the most important factor in sculpting your sound.
There are three main microphones that people use to record acoustic guitar, including:
- Dynamic
- Condenser
- Ribbon
Dynamic microphones are very rugged and do not require additional phantom power to work. While dynamic microphones are very popular for all kinds of recording applications, their lack of detail compared to condenser mics makes them a less popular choice for acoustic guitar.
Condenser microphones have long been the go-to microphone for recording acoustic guitars, as they are more sensitive to nuances and provide a more open sound. It's worth noting that condenser microphones require +48v phantom power to work, so you will need a preamp or interface that delivers it. While condenser mics are objectively the best type of mics for capturing an acoustic guitar, the main downsides to condenser microphones are that they are often more fragile than dynamic microphones and are sensitive to the negative tonal characteristics in untreated rooms. Some of this you can manage by changing the mics' polar pattern, but room acoustics can be a challenge with condensers.
You'll also need to choose between small-diaphragm condenser mics and large-diaphragm condenser microphones. Generally, small diaphragm condenser microphones are better when you're recording in stereo and large diaphragms are better when you're recording with a single mic. Here are some of the best microphones for recording acoustic guitar.
Last night, we have ribbon microphones, which have a much warmer mid-range and darker top end compared to condenser microphones. Newer ribbon microphones are far more robust than their vintage counterparts, which is why they have become incredibly popular for recording acoustic guitars, especially if you want a fuller sound.
How Many Mics to Use to Record Acoustic Guitar?
Generally, you will want to use one or two mics to record an acoustic guitar. There are several ways to mic an acoustic guitar, each with pros and cons.
Single microphone recordings are much easier to capture, as you can eliminate phase issues that are often caused by poor positioning or microphone phase mismatches. Phase problems will make the guitar sound washed out and weak. However, the trade-off is that you do not get the stereo image.
On the other hand, you can use two microphones placed in one of several positions depending on the sound and stereo spread you're going for.
For subtle rhythm parts in busy mixes, a single microphone will typically do the trick. However, if your acoustic guitar is one of the main focuses of your mix, you might consider using a stereo mic pair.
Basic Room Treatment for a Small Room for Recording Acoustic Guitar
One of the most predominant challenges you might face when trying to record acoustic guitar at home is poor room acoustics
If you don't have acoustic treatment, it can be hard to get clean acoustic guitar recordings without room reflections or frequency imbalances.
If you don't have the budget for professional acoustic treatment, consider recording in a room with many soft furnishings to limit reflections. In fact, it could be the case that your bedroom has a better sound than your studio room.
On the other hand, if you can afford acoustic treatment, we recommend getting 3" thick acoustic panels and placing them up around your room where reflections are at their worst. I've been really happy with panels from GIK Acoustics.
Where in the Room to Sit
The best place to place your microphone in your room will depend on the room itself.
I often like to walk around my room while strumming, carefully listening until I find the spot that sounds the tightest. In my room, that spot happens to be about 1/3 of the way from the long side of the room.
For you, it could be the center of the room, away from reflective surfaces, or near the corner where you have a small sofa or some acoustic panels. To be clear, do whatever you can to avoid aiming your guitar at hard surfaces. Spend some time hunting down this spot the first time you try to record, and you'll always have it in mind for future recordings.
It can help to have a reliable acoustic guitar stand next to you so you can take time to experiment with position the mic and making room adjustments.
Avoid Pointing mics at the Front of the Sound Hole
One of the biggest mistakes beginners make is pointing the microphone directly at the acoustic guitar's sound hole.
This is where the sound is coming from, so it makes the most sense to point the mic there, right?
Unfortunately, that's not the case, and you typically end up with a lot of low-end build-up due to the proximity effect, which is pretty hard, if not impossible, to remedy during the mixing phase.
Tuning and Intonation
I can't stress the importance of tuning and intonation enough.
Nothing can fix a poorly tuned guitar in the mix.
Before you sit down to record, make sure your strings are fresh, your guitar is intonated up and down the neck, and you are completely in tune.
Phase Issues
When you're recording with more than one microphone, you risk running into phase issues.
The best way to minimize phase issues is by following the "3:1" rule, which states that the second microphone should be around 3:1 as far from the first microphone as the first microphone is from the body of the guitar.
While this is certainly a good place to start, your particular setup might require a slight bit of mic placement experimentation until you get the sound you hear in your head.
Finger Noise
Nothing can ruin a great guitar recording like the distracting sounds of fingers squeaking up and down the fretboard.
You can minimize finger noise by getting a fresh set of coated strings or working on your playing technique to avoid dragging along the string when you note or chord. However, if those things aren't minimizing the squeak, you might consider pointing your microphone further away from the fretboard so that it picks up less finger noise.
You might also consider using a dampening product like a string dampener, which reduces fretting hand string noise, though it also gives you a more muted tone. If you still have finger noise issues, you can try using a de-esser during the mixing process to control the harshness.
Room Noise
Depending on the sound you're going for it, you might want some room noise in your recording. There's nothing like a great-sounding room to make your acoustic guitar recording sound more natural.
However, if you're dealing with poor room noise and you've already tried adding furnishings or acoustic treatment to the room to limit reflections, there are a few other things you can try.
For starters, you can use a dynamic microphone, which will be less sensitive to room reflections. If you only have a condenser microphone, you can move it closer to the guitar, so there is less space between the body and the front of the microphone, eliminating the number of room Reflections it captures.
Single Mic Techniques & Pros and Cons for Recording Acoustic Guitar
There are two main single-mic techniques that engineers use to pick up the natural sound of an acoustic guitar. Both are fairly straightforward.
I recommend using a large diaphragm condenser mic, like the AKG C 414 to capture all the warmth and nuance of the guitar.
Single Mic Technique 1: Mic Pointed at 12th Fret
One of the main single mic techniques that I often find myself using is the 12th fret single microphone technique.
I'll start by placing the microphone around 6-12 inches away from the 12th-14th fret to get a balance between the sound of the guitar's body and the sound of the fretboard.
The advantage of this technique is that you get a natural and balanced sound. It's also quite flexible, depending on me how far you turn the microphone. For example, you can point the microphone further toward the neck for a thinner tone or further toward the sound hole for a beefier tone.

An illustration of how to mic acoustic guitar with a single mic
The main downside with this technique is that you don't get any stereo spread, and it can be hard to capture the best of both worlds. I find that for solo acoustic guitar recordings, this 12th fret mic technique never quite delivers the fullness I need to let the guitar stand on its own.
Plus, this microphone technique is very susceptible to finger squeaks, especially if you haven't recently changed your strings or your technique is not up to par.
With that said, it's an incredibly easy microphone technique to employ, which is one of the main reasons, so many engineers use it.
Single Mic Technique 2: Pointed at Bridge
Sometimes, I like to point a single microphone at the bridge or body of the acoustic guitar instead.
This technique yields far more bass and low-mid-heavy tone compared to the 12th fret technique. It's a great recording technique if you need more body or a fuller tone from your acoustic guitar, though it does come with a few downsides.
For starters, similar to the 12th fret technique, you won't get any stereo spread, giving you a slightly one-dimensional sound.
Secondly, when you point your microphone at the bridge, you miss out on capturing the sparkly high-end that you get from the fingers on the neck. Depending on the sound you're going for, this can be a good thing, though it is worth considering if you want to try this technique out.
Lastly, with poor microphone placement, your recording can sound boomy and muddy. Many microphones suffer from what's called the proximity effect, which is essentially a build-up of low frequencies caused by placing a microphone too close to a sound source. Essentially, this technique requires a lot more care and the above technique to capture a good sound, so be sure to experiment with different distances to make the proximity effect work best for your sound.
Two-Mic Setups & Pros and Cons
A two-mic setup is the recommended approach to recording an acoustic guitar if the guitar will be featured prominently in the mix. One of the big benefits is that it leads to the flexibility to create a wider stereo image. It also gives you more precision to balance the tone of the guitar by balancing the relative levels of the two microphones.
The downsides to using a two-mic setup are several. First, there is the risk of unwanted phase cancellation, rending the use of two mics pointless. Second, you may not have two microphones! Third, a stereo setup can exacerbate room resonance issues. Finally, you may not even need two mics if the acoustic is being used a background instrument, so it's not worth the hassle.
X-Y at the 12th Fret
One of the most popular two-microphone acoustic guitar recording techniques is the X-Y pair at the 12th fret.
With this technique, you want to place each of the microphones with their diaphragms as close to one another as possible, which helps avoid any phase issues down the line. The microphone should also be 90 degrees from one another.

How to setup your mics for the X-Y technique
While some people will argue about where the best placement for this stereo mic technique is, I often find that pointing the two microphones at the 12th fret or where the top of the neck meets the body of the guitar are the two best spots to aim for.
The advantage here is that one of the microphones picks up the warmth and fullness of the body, while the other microphone will pick up the top end that comes from the neck.
The main advantage of this stereo mic technique is that it is one of the easiest to employ without having to worry about phase issues. You can get a full yet balanced sound. However, it's worth noting that you won't get the same stereo spread that you would get with a spaced pair technique.
For this technique, I recommend a stereo pair of small-diaphragm condenser mics so you can get them perfectly positioned.
This technique is a lot easier to do with the help of a special mic-clip that lets you easily place the two mics on the same plane and adjust the angle between them.
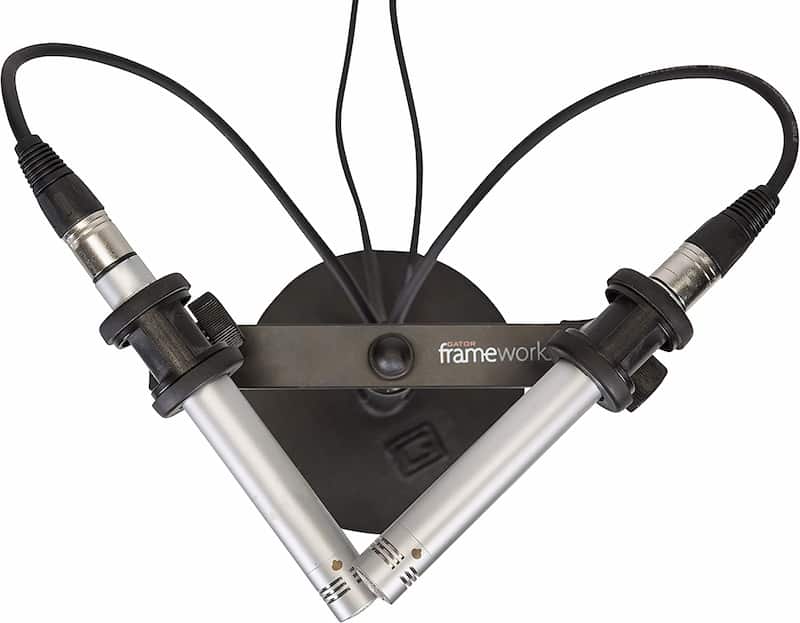
The perfect tool for setting up X-Y mics without any phase issues!
Mid-Side
The mid-side recording technique is slightly more complex than the X-Y technique, though it also offers several advantages.
For example, one of the main weaknesses of the X-Y mic technique is that you're essentially stuck with the way you record your acoustic guitar, including the stereo image. Plus, in some cases, collapsing the two microphones to mono can result in phase cancellation.
With the M/S technique, you get more control over the stereo spread.
For this technique, you'll want to use completely different microphones or two similar microphones with varied pickup patterns. The AKG C414 works great for this with it's 4 polar pattern choices.
You'll place the "mid" microphone facing the center of your acoustic guitar, somewhere around the 12th fret, and the "side' microphone aimed 90 degrees off-axis from the sound source utilizing a figure 8 pattern. Engineers will typically place both mics as close together as possible, with one right above the other.
One of the main disadvantages of mid-side miking is that it can pick up unwanted reflections in the room, meaning it's a better option if you have a treated space. And, though it has better mono compatibility than the X/Y technique, you still have to keep phase issues on your radar.
Close Mic and Room Mic
If you love the sound of your room and you want your acoustic guitar recording to have a more ambient sound, you might consider using a single microphone placed about a foot away from the 12th fret of your acoustic guitar and another microphone pulled further back into the room.
One of the main downsides to this technique is, as you probably guessed, phase issues. I often find myself having to look closely at the waveforms once they're in my DAW to make sure they're not out of phase and nudging them into place if they are.
The good thing is that you can use any microphone you want to capture the room tone, though a microphone with an omnidirectional pickup pattern works best. The good thing about omnidirectional microphones is they often have a flat response overall, capturing the natural sound of the space around them.
Note that we only recommend employing this technique if you have a decent-sounding room.
If not, you can always use a good room reverb plugin in your DAW that captures the sound of real-life rooms, such as Altiverb or Valhalla Room. Simply set up a send channel with your room reverb on it, send your dry acoustic guitar signal to it, and mix it in until you get just the right amount of room you're looking for.
Live Guitar Micing Techniques
When it comes to micing an acoustic guitar in a live situation, it's best to use a dynamic microphone. Dynamic microphones with cardioid pickup patterns are much better at focusing on single sound sources while blocking out or reducing the sound of the room around them with their off-axis rejection designs. This means you don't have to deal with as many feedback issues as you would with a hot condenser microphone.
In most cases, you also want to have your microphone placed as close to the sound source as possible to increase the direct sound-to-background noise ratio.
How to Use a Single Mic to Record Vocals and Acoustic Guitar
If you have a single microphone and you're looking to record vocals and acoustic guitar at the same time, the most important thing you'll need to do is find the sweet spot. In fact, this is the way that most old singer-songwriter recordings were made, meaning it's great for capturing a vintage tone.
Getting the right balance between the vocals and the acoustic guitars may require some trial and error, though you'll typically want to start by placing the microphone closer to the vocalist's mouth to emphasize the lyrics. Too far in either direction can make one of the elements feel slightly distant in the mix, so it's up to you to determine which one is more important.
Want to learn more about microphones?
Have more microphone questions? Here are some other articles that might help you!
- The 19 Best Budget Podcast Microphones
- The 13 Best Recording Studio Microphones
- The 13 Best Wireless Microphones for Singers
- The 13 Best Mics for Recording Epic Drums
- 10 Best Microphones for Acoustic Guitar on any Budget
- The 10 Best Microphones for Recording Piano on any Budget
- How to Mic a Piano: 5 Pro Techniques for Perfect Recordings
- The 7 Best Rapping Microphones for Effortless Flow
- Best Microphone Features - 25 Experts Share Their Tips
From a Frustrated Producer in a Ragtag Bedroom Studio to Major Placements on TV Earning $1,000s!
My name is Evan, and I've been making music since around 3rd grade. I'm from San Diego, California, but I've lived in Washington, DC for the last 20 years.
While I still have a full-time day job, I have created systems that have allowed me to produce dozens of songs a year in my spare time.
My songs have been on Netflix, TV shows like the 90 Day Fiance, an award-winning indie film, and NPR’s “All Thing Considered.” They've also been streamed millions of times.
In addition to being a music producer, I am passionate about teaching people how they can make professional-sounding music and earn money licensing it, all in their spare time.
Thousands of musicians, like yourself, have trusted me to guide their musical journey. My YouTube videos have been watched nearly a million times. And my story has been in Forbes, Side Hustle Nation, and the Side Hustle School.


EQ is the most essential tool you have for making music sound clean, clear, and professional. In this book you'll learn how to use the R.O.S.E. System, a simple 4-step EQ formula to help you master the world of EQ
