Best Vocal Plugins for Logic Pro

When mixing radio-ready vocals, you'll find an overwhelming amount of quality plugins that you could potentially add to your collection.
The types of plug-ins you use can have a dramatically different impact on the sonic quality of your vocals. In this article, we'll give you our favorite list of plugins for amazing, radio-ready vocals, as well as our general order of processing.
These plug-ins offer a unique mix of creativity and technicality, allowing you to achieve talk to your mixes with your own sonic stamp.
Let's dive in and explore the ins and outs of the best vocal plug-ins for Logic Pro X users. Where possible, I'll share free versions of stock plugins that are included with Logic. Sometimes they get the job done just fine and there's no need to invest in more expensive options.
| Plugin | Rating | Availability |
|---|---|---|
|
Waves De-Breath |
⭐⭐⭐⭐⭐ | Check price |
|
Nectar |
⭐⭐⭐⭐⭐ | Check price |
|
Antares Auto-Tune |
⭐⭐⭐⭐⭐ |
|
|
Fabfilter Pro-Q3 |
⭐⭐⭐⭐⭐ | Check price |
|
Arturia Comp-FET 76 |
⭐⭐⭐⭐⭐ | Check price |
|
Summit Audio TLA-100 |
⭐⭐⭐⭐ | Check price |
|
Waves Vocal Rider |
⭐⭐⭐⭐⭐ | Check price |
|
SofTube Harmonics |
⭐⭐⭐⭐⭐ | Check price |
|
Rev Plate-140 |
⭐⭐⭐⭐⭐ | Check price |
|
Little Alter Boy |
⭐⭐⭐⭐ | Check price |


Note: some of the links below may be affiliate links, meaning that I receive a commission if you purchase through them
The Vocal Recording Process
Before you reach for any of these plugins, it's essential that you've made some good vocal recordings. First, you want to make sure that you've recorded great vocal performances of all the main vocal parts:
- Lead vocal
- Harmonies
- Gang vocals
- Ad-libs
I find that you usually need at least 6 takes of the lead vocals in order to combine (or "comp") them into a single vocal take that is edited together seamlessly to sound like a great vocal recording.
This article includes tons of useful tips for recording an incredible vocal performance.

The importance of your Vocal Processing Chain
While vocal processing isn't rocket science, having the right tools in your vocal processing chain can make or break your mix. A vocal processing chain is simply a series of plugins or processors that you run your dry vocals through to create a more polished mix.
The way in which you use your vocal processing chain will depend on the tone and genre of your track, so note that you may have to switch up the order or exclude certain plugins altogether to get the proper mix.
With that said, this list of plugins in this particular order is what I have found works best for my general vocal production.
The general rule for your vocal chain is that first you want to remove bad and unwanted sounds and frequencies, then control your vocals and finally enhance them. This article will teach you how to setup your vocal chain to get the best results from your plugins.
The Best Vocal Plugins for Logic Pro
As a long time user of Logic Pro, here are my favorite vocal plugins for radio-ready recordings. Some of these sound absolutely amazing, some of these will save you tons of time with your workflow, and some of them will help you do things beyond what is capable with stock plugins in Logic.

Waves De-Breath
Nothing can kill a great vocal track quite like harsh breath sounds. Even if you are able to track a vocal that sounds full and present, a jarring “ess” or “shh” sound that sticks out of the mix can pull the listener out of the track. This is where a plug-in like Waves DeBreath comes in handy. It's an easy way to quickly clean up your vocals.
While you could certainly sift through your entire mix and remove or turn down every single breath, that process can take many hours of precious mixing time and energy. This is especially true if you are working in a modern mix with several vocal tracks. With the Waves DeBreath plug-in, you can let the robots do all the hard work.
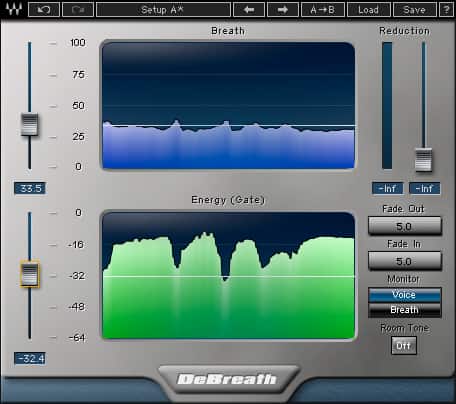
This unique vocal processor can turn down or get rid of breaths altogether. It does so by separating your vocals and breaths into two tracks, allowing you to control how much of each is heard using the interface’s reduction slider.
One of my favorite elements of DeBreath has to be the room noise simulation, which stimulates the tone of a room to make the silence of a lack of breath far more natural.
There is not a free plugin for Logic that does this as easily or transparently. However, you can find all of the breaths on your vocal take and use the razor tool on the sequencer to manually remove them. This will probably result in worse sound quality, though, because it doesn't let your properly simulate the silence of the room noise, which can actually be a really noticeable sound.

iZotope Nectar for Noise Gate & De-Esser Plugin
Nectar 4 is an all-in-one vocal processing suite that utilizes the same modular design as Izotope’s Ozone and Neutron mixing and mastering plugins. The beauty of Izotope Nectar 3 is that there are 12 individual modules that you can use to process your vocals, though two of our favorites within the plug-in include the Noise Gate and the De-Esser.
These two modules are of the highest quality, offering you total digital control over two important aspects of vocal mixing. Plus, two of these models come with the nifty iZotope Vocal Assistant feature, which automatically does all of the leg work for you based on the incoming signal. This powerful tool is a great way for music producers to get amazing clean vocals by removing unwanted background noise.

This way, you can always make sure that you are using just the right amount of de-essing and noise-gating to give you clean, crisp, and professional-sounding vocals. iZotope Is an excellent suite to invest in for both mixing and mastering, and Nectar 4 is a great plug-in to start. Even beyond the Noise Gate and De-Esser, you get access to a wide range of helpful vocal effects modules to mix your vocals from start to finish, including a 24-band EQ, a saturation plugin, a compressor, a gate, a dimension tool, reverb, pitch correction, and more.
That said, Logic does include two free plugins that can help you with this. Logic has a built-in noise gate and de-esser. They're a little more difficult to use than the intuitive interface of iZotope's offerings, because they lack the useful visual feedback.
Pitch Correction with Antares Auto-Tune Access
Simply put, all modern music production require pitch correction. Even when it's just used subtly, the challenges of the human voice mean that pitch help is essential. Even outside of the mixing community, auto-tune is one of the most famous vocal processors of all time, whether you love it or hate it. Antares created this famed auto-tune software, paving the way for digital pitch correction since the late 90s. In fact, the guys that created Antares Auto-Tune used the very first iteration of auto-tune in a song ever with Cher’s hit, “Believe.”
This automatic pitch correction software can deliver everything from natural-sounding tuned vocals to out-of-this-world robotic vocals. It has all the flexibility of some of the top pitch correction plugins, like Melodyne, with the ease of use that comes from automated tuning plugins, such as Wave Real-Time.

You can give total control to the plugin’s Auto Mode, choosing a scale or using real-time MIDI notes the snap your vocals into place, or use the powerful graph mode to control the tuning and timing yourself.
The humanism and quality of the pitch and vibrato effects are absolutely incredible, and the core algorithms present in Auto-Tune Access are some of the best on the market. No matter what level of transparency you need, Auto-Tune Access can deliver.
Logic Pro includes the ability to manually tune your vocals, which is the best way to get great sounding vocals. It also includes a built in pitch correction tool, but the sound quality and usability leave a lot to be desired.
Tame harsh frequencies and a high-pass filter with FabFilter Pro-Q 3
FabFilter plugins have become a go-to part of my mixing arsenal. When it comes to taming harsh frequencies and getting rid of low rumble in vocals, nothing is better than FabFilter Pro-Q3 (read my Pro-Q3 review here). It's the perfect surgical tool with a clean interface and a range of intuitive controls, not to mention a quick learning curve. This EQ is loaded with powerful, unique features making it a great plugin for all your EQ work.
As with most of FabFilter’s plugins, Pro-Q 3 has a very clean and transparent sound. With a high number of frequency bands, natural and linear phase options, and mid-side functionality, there is virtually endless flexibility with this plugin.

It has truly become my Workhorse plugin for subtractive vocal EQ. I also often use it to carve out extreme high-end, low-end, and resonances on my vocal reverbs. You'll even find a dynamic EQ feature, which you can use to remove lead and backing vocal resonances. This feature can be super helpful for vocals that are totally dynamic.
One of the my favorite tools available on the FabFilter Pro-Q3 is the masking feature, which allows you to compare the frequency range of your vocals with other instruments in your mix to get a visual of where masking is potentially occurring. This feature can be super helpful for setting up pockets in your mix for your vocals to sit in.
Logic doesn't include the ability to use dynamic EQ, but it's stock EQ is still a great option for controlling high frequencies.
Control dynamic range with Arturia Comp-FET 76
One of the best compressors for getting an upfront vocal sound is the 1176 compressor. The original unit became so popular for its ultra-fast attack times and colorful tone. If you listen to just about any hit record made in the past 50 years, you’ll likely hear the sound of the 1176 found on it. There have even been a number of hardware reissues of the original unit, which was developed in 1968 by Bill Putnam as an alternative solid-state compressor to his tube compressor, the 1176.
While there are many emulations of this famous compressor on the market today, one of the best we’ve found is the Arturia Comp-FET 76.
You get an iteration of the original unit, as well as a new page with additional controls. To access the new section, you can simply click on the double arrow on the main user interface. Here you’ll find an EQ, a “time warp” function, input detection modes, and sidechain settings.

The input detection modes include stereo, mid-only, side-only, and reversed stereo. The input EQ comes with a high-pass filter, low-pass filter, and one peak band, which you can use to sculpt the signal before it hits your compressor.
Then, you have the time warp feature, which allows you to change the compression timing by a few milliseconds, either forward or backward in time.
Overall, it’s the Comp FET-76 is a very effective compression plugin for controlling dynamic range on vocals.
Logic Pro includes and incredibly powerful compressor that includes multiple vintage emulations, including of the 1176.
Further tame dynamic range with Summit Audio TLA-100
When it comes to high-end hardware emulations, Softube is one of the best developers in the industry. Every plugin they develop is carefully modeled after top-notch studio hardware, yet you’ll consistently find a range of additional features to take the emulation above and beyond what you would expect from the original unit.
The TLA-100 is an emulation of the famous TLA-100 Tube Leveling Amplifier hardware, which comes with a few extra controls that Softube so graciously gave us. The original hardware was somewhat of a go-to piece of equipment for vocals and other acoustic instruments. The hardware was known for automatically controlling the vocals to maintain presence using a smooth workflow.
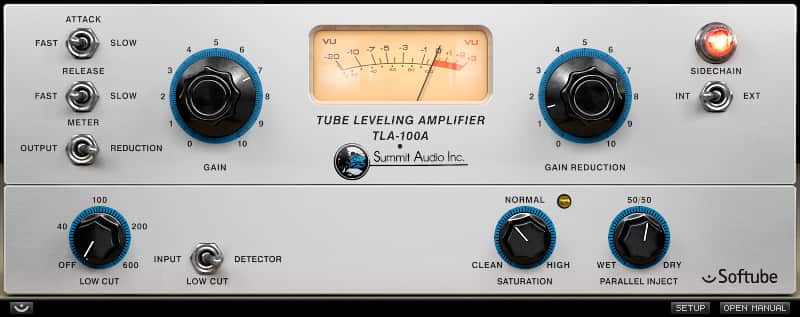
You can basically use the “set and forget” mentality with this compressor, using the peak reduction knob to capture high levels and the soft-knee response to gradually bring levels down.
The plugin version has a couple of additional controls, including the low-cut filter to set the bass response, and the saturation control, which you can use to add a bit of overdrive to the signal to get the classic color of hardware.
So far, we’ve yet to find a better emulation of the TLA-100 optical compressor. If you want that industry-standard compression tone, look no further. That said, the built-in Logic Compressor has a decent version of the LA-2A that could be worth experimenting with.
Create a present vocal with Waves Vocal Rider
You can read my full review of Waves Vocal Rider here.
One of the best plugins for keeping the dynamics of your vocal tracks consistent without squeezing the life out of them using compression is the Vocal Rider plugin. Back in the days of analog, mixing engineers would have to adjust the levels of vocals manually using the faders to get the vocal to sit perfectly in the mix.
While we can do the same thing these days using DAW automation, it can make take quite a long time. Luckily, Waves created the unique Vocal Rider plugin, which handles this time-consuming task automatically.
The plugin can be used to make loud phrases quieter and quiet phrases louder. Plus, the overall sound is far more organic than using compression to squeeze the dynamics out of your vocals. Simply set the “Target Level” on the plugin and the Range Slider to give your vocal dynamic boundaries to stay within.
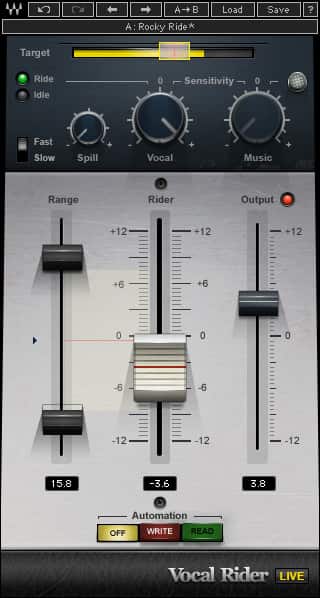
You’ll also find a handy Vocal Sensitivity control, which gives the plugin an idea of the difference between your actual vocals and the background noise so that the plugin focuses exclusively on the vocals and nothing else. This can be super helpful if you’re working with live recording situations.
With plenty of nuanced sensitivity controls and automation algorithms, Wave's Vocal Rider the perfect plugin for keeping vocals nice and level.
There's no built-in volume riding plug-in for Logic, but you can manually automate the volume of your vocal. It's not the easiest way to do things, but it will get the job done.
Use SofTube Harmonics as a saturation Plugin
One of the best tools for improving a vocal mix is saturation. Engineers will often use saturation to add presence and warmth to their vocal mixes. However, there are several different saturation types to choose from, including tape saturation, tube saturation, and more. The sheer number of options can make choosing the right saturation plug-in challenging.
Softube Harmonics Is one of our favorite all-around saturation plugins, as it is one of the most versatile on the market. This plug-in uses the Softube Dynamic Transient Control algorithm, which analyzes the incoming signal and applies unique processing depending on the transients of your sound.
One of the major benefits of helping an algorithm like this is that you can apply heavy forms of saturation and distortion without obliterating the transients of your incoming signal.

You can choose between a wide range of distortion models, including modern, solid-state, Transformer, master, and tube. I absolutely love the interface, which comes with handy VU meters that give you a better sense of your overall input and output levels.
Beyond that, the interface has a very simple layout that is easy to navigate, giving you the controls you need and nothing more.
The built-in saturation and distortion choices in Logic are a little to aggressive for my taste. They can be useful for sound design if you want special effects on your vocals, but if you're just looking for a little gray and warmth, go with SofTube!
Use Arturia Rev Plate 140 as your vocal reverb plugin
The EMT 140 is one of the most legendary hardware plate reverbs of all time. The original unit weighed in at over 600 pounds and used vintage vacuum tubes to create sound. It was used on some of the most iconic albums of all time, including Dark Side of the Moon.
Arturia developed a beautiful emulation of this classic piece of hardware, delivering the elegant smoothness that one would expect from a quality plate. You get adjustable plates and a number of parameters to give you total control over the tone and length of the reverb.
You also get a number of additional mixing features to sculpt your reverb even further, including the pre-filtering and post-filtering reverb EQ, helping you get rid of excessive high-end and low-end to fit your reverb perfectly into your mix.

You’ll also find an integrated Drive control, which allows you to crank your signal a bit to get some dirt if you need it. To keep your reverb from swallowing up your vocals, you can use the pre-delay and pre-filter parameters to carve out exactly when you want your reverb sound to start.
Overall, you get all the smoothness and warmth of the original plate hardware with the control and versatility of a digital reverb plugin with the Rev Plate 140.
Logic has a few different reverbs built-in. I think they do room and hall sounds alright (especially the Chromaverb), but I haven't been thrilled about the way they emulate plate reverb, which is essential for a breathy vocal.
Add pitch shifting with Soundtoys Little Alter Boy
Soundtoys has some of my favorite effects plugins for all-around production and mixing. When it comes to adding cool pitch-shifting effects to my vocals, Little Alter Boy is a go-to. Though the GUI is relatively simple and intuitive, the tool itself is pretty complex.
You’ll find three modes and four knobs, which offer a wide range of impressive effects, including everything from a vocoder to a pitch-shifter. Essentially, there are a hundred unique ways to transform your voice, whether you want a driven, low-octave vocal or a natural fifth harmony to add some extra dimension to your vocals.
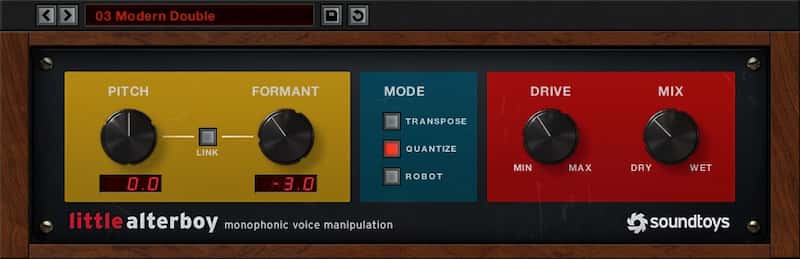
One of the most impressive parts about Little Alter Boy is that you can control the plugin via MIDI. You can connect the controller and adjust the MIDI sends to transform your vocals using intricate harmonies or a robotic effect.
On the right end of the plugin, you’ll find a handy Mix parameter, which you can use to lightly blend in your heavily-effected vocals with your clean vocals. As the cherry on top, you get a crispy analog tube overdrive that can use to push your vocals ever so slightly out of the mix or completely obliterate them altogether.
If you'd prefer, there is a free pitch shifter in Logic Pro, as well. However, in my view, it's just a not a very clean or nice sounding plugin for vocals.
Add harmonies with iZotope Nectar
What can't Nectar do? It's a great tool for almost everything related to vocals, including harmonies. You can add up to two harmonies on lead vocal. You can choose to how loud and where they are panned. And you can choose what interval you want each harmony to play at.
The harmonies tend to sound pretty good, too.
One of the coolest features about Nectar's harmony module is that you can also introduce subtle timing variations into the harmonies, creating a more organic, natural sound.
So it's no surprise that one of the best free vocal plugins is the iZotope Vocal Doubler, which appears to use much of the same core technology as Nectar. Instead of allowing you to choose the harmonies, though, the Vocal Doubler limits you to just creating a double-track of the main vocal. This can be huge in creating fatter, fuller vocals, making the easy-to-use vocal doubler perhaps the best of the free vocal VST plugins.
Logic doesn't really include a great harmonizing plugin.
Other Resources for Logic Pro
If you're looking to go even deeper and perfect your Logic Pro setup, be sure to also check out these articles!
- The 34 Best Free & Paid VST Plugins for Logic Pro X
- The 10 Best Audio Interfaces For Logic Pro X
- The 20 Best Free & Paid Vocal Plugins for Logic Pro
- 18 Best Free & Paid Drum Plugins for Logic Pro X
- The 13 Best Control Surfaces for Logic Pro
- The 10 Best Audio Interfaces for Logic Pro
- The 10 best MIDI Controllers for Logic Pro
From a Frustrated Producer in a Ragtag Bedroom Studio to Major Placements on TV Earning $1,000s!
My name is Evan, and I've been making music since around 3rd grade. I'm from San Diego, California, but I've lived in Washington, DC for the last 20 years.
While I still have a full-time day job, I have created systems that have allowed me to produce dozens of songs a year in my spare time.
My songs have been on Netflix, TV shows like the 90 Day Fiance, an award-winning indie film, and NPR’s “All Thing Considered.” They've also been streamed millions of times.
In addition to being a music producer, I am passionate about teaching people how they can make professional-sounding music and earn money licensing it, all in their spare time.
Thousands of musicians, like yourself, have trusted me to guide their musical journey. My YouTube videos have been watched nearly a million times. And my story has been in Forbes, Side Hustle Nation, and the Side Hustle School.


EQ is the most essential tool you have for making music sound clean, clear, and professional. In this book you'll learn how to use the R.O.S.E. System, a simple 4-step EQ formula to help you master the world of EQ
