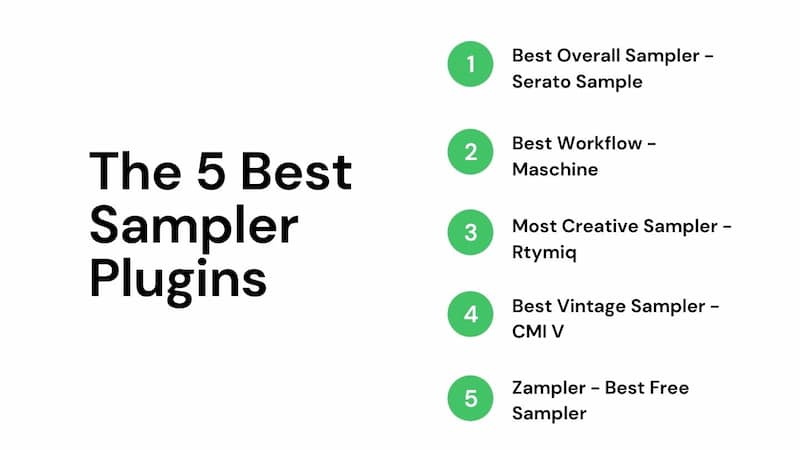
Best Sampler VST

If you’re in the market for a sampler VST, stop whatever you’re doing, put down whatever you’re holding and spend 5 minutes to read this article because it’s the most important article you can read on the best sampler VSTs. You should be well informed on the best sampler VSTs in today so you can make the best decision financial and creative investment for your music career.
In this article you will learn:
- The Seven Top Notch Sampler VSTs
- How to Properly Utilize These Specific Samplers for Out of this World Effects
- Little-known Tips for Music Producers to Make their Samples Sound Amazing
This article will leave you feeling confident that you have the right knowledge to make an informed decision on choosing the right sampler VST for you.
Note: some of the links below may be affiliate links, meaning that I receive a commission if you purchase through them.
| Sampler VST | Pros of Sampler VST | Cons of Sampler VST | Purchase | Ranking Out of 5 |
| 🏆Serato Sample 2 |
|
|
Check the price of Serato Sample | ⭐⭐⭐⭐⭐ |
| 🏆Maschine |
|
|
Check the price of Maschine | ⭐⭐⭐⭐⭐ |
| Rhytmiq |
|
|
Check the price of Rhtymiq | ⭐⭐⭐⭐ |
| Arturia CMI V |
|
|
Check the price of the Arturia CMI V | ⭐⭐⭐⭐ |
| Reason Mimic |
|
|
Check the price of the Mimic | ⭐⭐⭐⭐ |
| CR8 |
|
|
Check the price of the CR8 | ⭐⭐⭐⭐ |
| Zampler |
|
|
⭐⭐⭐ |
Before we dive into the best synth plugins, though, we've also put together reviews of other types of synths that might be more what your looking for. If these types of plugins are more up your alley, then go check them out. Everyone of these can help you up your music production quality.
- Best Drum Machine VSTs
- Best Bass Synths
- Best Rhodes VST Plugins
- Best Piano VST Plugins
- Best Synth VSTs
🏆 Best Sampler VST – Serato Sample 2 🏆
Without beating around the bush, let’s start with the crème de la crème of Sampler VSTs – Serato Sample 2. It’s hard to find something better than this if you want to work in the box, and would be my number #1 recommendation. For features, easy of use, and price, Serato Sample is easily at the top of the best sampler vst plugins.
This nifty piece of software comes locked and loaded with awesome features such as a Random mode if you’re after a bit of chaos in your sample. There’s also ‘Pitch ‘n Time’ algorithms which allow you to stretch your samples and shift keys at the drop of a (hi)hat. There's a reason that Serato Sample has become the industry standard virtual sampler.
It's a stupid simple sampler whose beautiful interface focuses on letting you quickly finding great sounds in your samples and chop them.


Serato Sample’s advanced algorithm also allows you to quickly discover the best 16 samples in your track and chop them up as you see fit. Just drop in one of your favorite audio files and use the find samples function. It actually has a ton of sample slots, so you can search for even more sample points if you're feeling bold!
If you want to elevate the whole experience, you can even take a single sample and map it across all keys on your controller to play it like a synth. The possibilities are endless. Overall, the Serato Sample is hands-down one of, if not, THE best sampler VST on the market.
And with Serato Sample 2, they have added an insanely powerful AI feature that lets you isolate various parts of a sample.
Want just the drums? No problem!
Just the vocals? Sure thing.
Just the backing track? Easy breezy!
Pros of Serato Sample
- Fast
- Simple
- Sounds great
- Easy to use
- Elegant
- Multiple modes
- AI isolation
Cons of Serato Sample
- No sample library included
🏆 Best Way to Chop Samples – Maschine 🏆
To chop your samples efficiently, you need a high powered machine; or should I say, Maschine! Corny jokes aside, Native Instruments hit it out of the park with their new production system called Maschine. This tool is unmatched when it comes to chopping up your samples like a pro, but costs more than just standalone software.
Maschine has a heavy duty 96kHz/24-bit built-in audio interface with USB-powered hardware giving you total control of the audio and the flexibility to slice/shape your sample fluidly and precisely at the highest sample rate. It's great for all genres, from electronic music to hip hop.
✅ Check the price of Maschine
Maschine comes fully loaded with integrated software and hardware systems including an arranger, mixer, sampler, FX and a built-in audio interface. This generation of Maschine comes with Native Instrument’s other flagship offering which is Komplete Kontrol. Komplete gives you the keys to 50 GB worth of effects and instruments.

Mashine is built for speed which is crucial for effortlessly producing beats, samples and melodies. The 16 touch-sensitive multi-color pads emulate the feel of the thick drum beats they produce. This means that Maschine excels at mapping its built in drum machines to different pads.
These pads also serve as a piano in Keyboard mode or a pitch automation tool in Step mode. It doesn’t matter if you’re a beginner or an experienced beathead, the Maschine by Native Instruments should be on your radar if you’re serious about chopping your samples like a pro.
Maschine's combination of midi controller, digital audio workstation, sound effects, step sequencers and powerful sampler make this the top choice for live performance. However, if you're going to use Maschine for live performances, I recommend you check out Maschine+, which is specifically designed for standalone gigs (so you can leave the computer behind).
Pros of Maschine
- Unprecedentedly easy workflow
- Fast and smooth
- The best tool for programing beats
- Bundled software
Cons of Maschine
- More expensive than pure software
- Need room for the hardware
Most Creative Sampler VST – Rhtymiq
The eccentric name of this sampler VST is fitting because the Accusonus Rhythmiq is coincidentally the best sampler VST on the market in 2021 for sheer creativity. This tool gives you the power of an infinite library of beat variations at your fingertips which can all be adjusted to your liking with an easy twist of a virtual knob.
✅ Check the price of Rhtymiq
Rhtymiq is your new drummer – we bet he’s a lot more cooperative than your current one! We'd also bet he keeps better time. The Rhtymiq bear assistant will analyze your beats and cleverly suggest world-class variations.
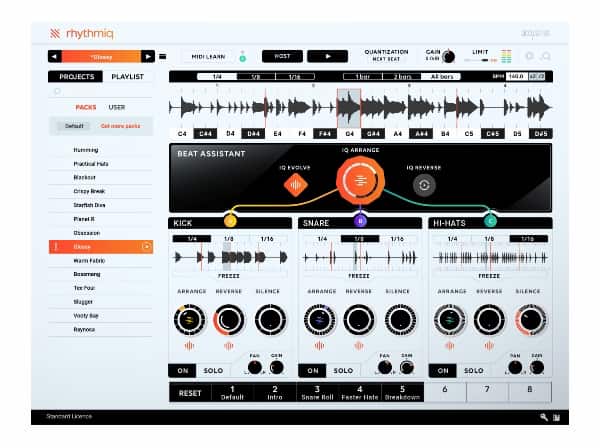
Don’t be intimidated by the cutting-edge AI technology – in the end, it’s all controlled by you! You can even save these beat variations and tweak them to your liking by adding fills, breaks and build-ups by utilizing built-in functions such as Silence, Reverse and Arrange all without stopping the music and your flow. And that's the power of artificial intelligence! Plus, it's compatible with a lot of the main audio formats, so you can go wild with any sound source.
All in all, the Rhtymiq offers an exciting way to perform your beats and offers a unique suite of functionalities which is why it tops our list for creativity in the sampler VST marketplace. You'll find yourself creating unique sounds before you know it, making it a must for any sound designer!
Pros of Rhtymiq
- Super creative processing
- AI help
- Totally unique chopping tools
Cons of Rhtymiq
- It's not a "pure" sampler
- Not that good for straightforward chopped beats
Best Vintage Sampler Plugin – CMI V
If you’re looking for a classic vintage sampler, look no further than the CMI V by Arturia. The CMI V is a near identical reincarnation of the Fairlight CMI – the first digital sampling system commercially available in the music history. The Fairlight CMI was used for countless mega-hits from the early MTV-era.
✅ Check the price of the Arturia CMI V
From Peter Gabriel to early hip hop, you can hear this timeless synth everywhere. While it was complex and slow to use at the time, Arturia have kept the best bits of the Fairlight, while modernizing the workflow.

The physical design of this beautiful piece of equipment is right out of a sci-fi movie which any self-respecting keyboardist in the 1980’s would’ve paid an arm and a leg for. This complete workstation gives you access to 10 digital instruments at a time allowing you ultimate control of layering, mixing and splitting your track. If you're looking for that lo-fi sound, its got the ability to lower the bit-depth and sample rates.
The CMI V emulates one of the first hardware samplers, and also comes loaded with 300+ awesome presets from individual drum kit hits to keyboards to get you going along with a library of sounds used from countless hit tracks. And anybody who knows VST plugins knows that Arturia is one of the best in the industry.
All in all, if you’re looking for limitless creative options in a uniquely designed vintage workstation, the CMI V by Arturia is for you. If you're looking to get that lo-fi sound, check out some more of the best lo-fi plugins.
Pros of the CMI V
- Nails that vintage sample sound
- Loaded with tons of great presets
- Great look
- Very powerful
Cons of the CMI V
- Complicated
- Not great for traditional sample chopping
Best Value Sampler - Mimic
In Reason 12, Reason Studios added Mimic to its line of built-in Reason instruments. Now that Reason 12 can run as a plugin inside of any DAW, you can use Mimic as part of your workflow. It can be a great deal, because Reason 12 includes a DAW and tons of other great synths, effects, utilities, and samples.
It's actually an even better value, because Reason includes 10 different samplers, allowing you to chop samples a bunch of different ways!
What is great about Mimic is that it includes three different modes for manipulating samples. First you can use it as a pitch based sampler and play chords, melodies, etc. You can choose from multiple pitch-shifting algorithms, so you can preserve the timing of the sample while shifting the pitch.
Second, you can use it to take a sample and chop it into a bunch of different slices. These slices can then be individually triggered create new ideas on the fly. The built-in sensitivity knob allows Mimic to find the transients of a sample easily.
In the third mode, you can take up to 8 different samples and trigger them separately. You can set the start points, pitch, etc of each separate sample.
No matter what mode you're using, Mimic also includes a great collection of onboard effects that are perfect for giving you the classic sound of old school samplers.
This includes:
- A characterful compressor
- Fat high- and low-pass filters
- Bit-crushing
You can read my full guide for how to use Mimic here. And you can find my complete Reason 12 review here.
Best Waves Sampler Plugin
While you're cooking up beats, sometimes you need to get creative quickly. The Waves CR8 Creative Sampler takes everything fun and invigorating about sampling, and puts it into a quick, simple work process.
With CR8 you can transform any sound into a rousing playable instrument in a flash - it's the simplest way to:
- 8 sample up to layers, permitting you stack and blend tests, or split them across your keys
- 5 algorithms - Voice, Beats, Melodic, Harmonic and Classic - each permitting you to control pitch and time independentlyKey and BPM investigation to get you in order and in a state of harmony with your meeting in seconds
- Easyily Loop, Reverse, Freeze choices and more, for moment command over your example playback
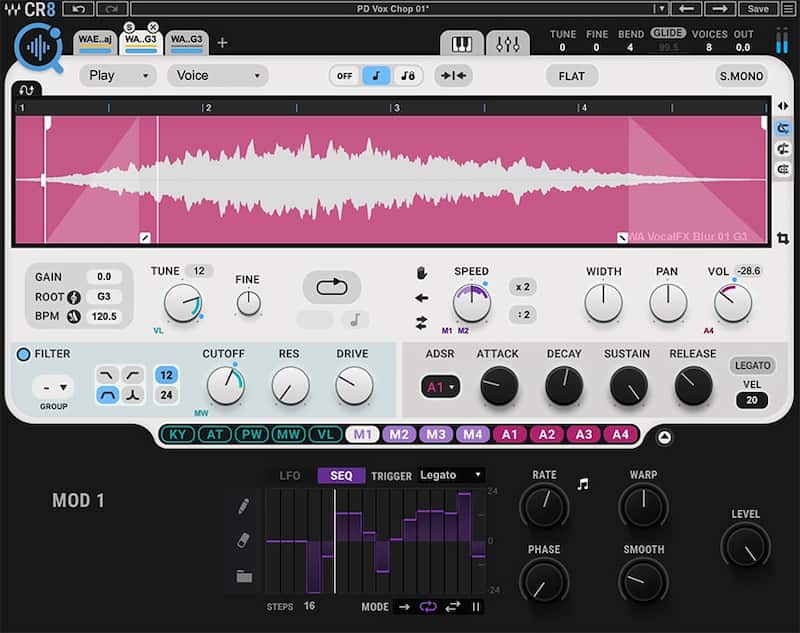
In addition, you can shape tone and tone utilizing the builtin channels and ADSR envelopes. You can drag and drop up to 4 LFO/Sequencer modulators and 4 ADSR envelopes and assign them to practically any Waves CR control. Plus there's a phat multimode filter that can be modulated by any (or all!) of the modulators!
You can likewise assign modulation based on your keyboard's aftertouch, speed, and mod-wheel to a large portion of CR8's controls, making your samples playable in a responsive melodic manner.
To round it out, it comes with loads of presets and over 2,000 samples! This huge sample library includes great drum samples, instruments and fun one shots.
Best Free Sampler VST – Zampler
If you’re new to the sampler game or would just like something to play around with for no cost, give the Zampler a shot! This free sampler plugin includes many of the features you would find in any current soft-sampler to sculpt sounds to your liking. For example, in the integrated multi-mode filter gives you access to various types of lowpass, highpass, bandstop, bandpass and more.
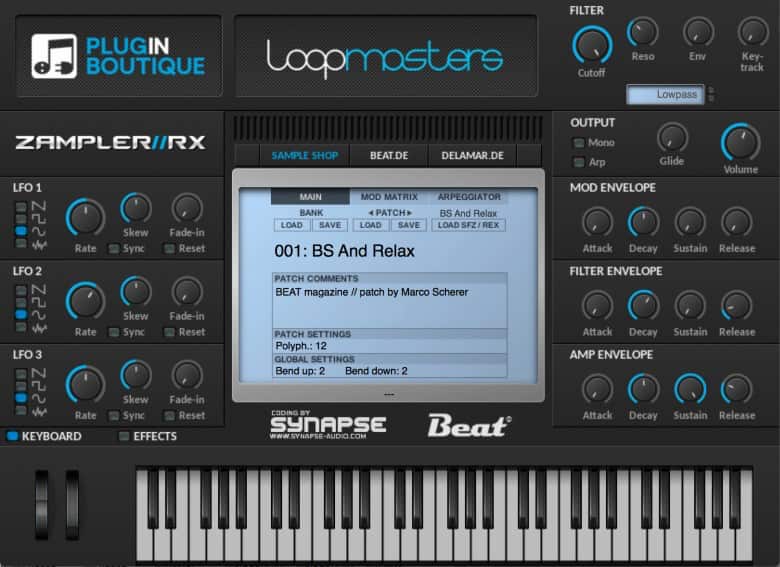
Bring the overall sound of your track to life with the modulation matrix and your choice of three LFO’s and ADSR envelopes. Some included effects include a wide range of tube saturation, phaser, delay, chorus, reverb and EQ as well.
You can use this free tool on a Windows or a Mac and it supports multiple sample rates and bit-depth. Overall, there is no harm in trying out the Zampler. In fact, you might find it does the job just fine without the need for another tool! Another good source of sampling free vst plugins is your DAW, as many these days include some form of built-in sampling.
Pros of the Zampler
- Simple
- Free
Cons of the Zmpler
- Not able to "chop" samples
And if you're looking for even more free synths, be sure to check out this roundup of the 61 Best Free Synth VST Plugins!
History of Samplers

Next to a synthesizer, the sampler is probably the most common instrument found in any modern recording studio. At the core a sampler is an electronic instrument that emulates physical instruments by recording notes from real instruments and assign them to be played back through a midi keyboard, drum pads, etc. Obviously you can record and trigger other audio material like foley and sound effects as well.
Early samplers were hardware devices, and include many famous products like the Akai MPC series, Akai S950 and the Emu SP1200. Hardware samplers are still produced (eg. the SP404, the Elektron Octratrack and MPC to name a few), but today modern sample based instruments are often virtual instruments running as plugins in your DAW. The industry leader here is certainly Native Instrument Kontakt, but each DAW has a more or less famous native sampler, like Logic’s EXS as well as Ableton’s Sampler and Simpler devices.
The big upside on with software based samplers is that modern computers have large RAM and hard drive space, which allow you to store a sampled instrument where each note is recorded in multiple velocities or articulations, which give you impressive realism and expressiveness.
While the core principles and workflow are straight forward, if you dive deeper into samplers (both hardware and software), you’ll encounter terms that might not be instantly clear to you. To save you from the menu diving and google searches, I’ve compiled a list of explanations below.
Key Features on Samplers

Rompler — In the days of hardware samplers, you found samplers which came with an internal sound library. While technically a sampler, they were more like sample playback devices. The Emu Planet Phatt for example which gave you a specific sound selection pre-installed into the ROM memory. A sampler that doesn’t let you sample your own sounds, is referred to as Rompler.
Multi timbral — The ability of a single electronic instrument to simultaneously provide multiple instrument sounds for recording & playback. Back in the days it meant on each one of the 16 different possible MIDI channels a different instrument voice could be played back.
Nowadays it is expected that you can open different instruments in your DAW. Some virtual instruments still offer the multitimbral functionality to be able to layer sounds, like different sampled pianos in Kontakt. With multitimbral functionality you can achieve richer, complex sounds.
Root Key — Since the sampler is based on recordings of real instruments and lets you play that instrument on a standard midi controller, samplers have to transpose the sample. That means they play the sample from all keys raising or lowering the pitch. For this to work properly a root key has to be defined for the original sample. If you recorded your guitar at C#, you will need to set the root key in your sampler to C# to have it mapped properly.
Transpose — After you mapped the root key, the sampler will transpose the sound across the keyboard. This works well within a few semitones, but transpose it too much and your instrument will sound unrealistic. It’s like playing a vinyl record, you dont only change the pitch, but also the the attack and decay times - the overall tone/timbre of sound.
Multisampling — This is why sample libraries get larger and feature multisampling. You record several notes of different notes from the same instrument and assigning them to play back from the appropriate keys on a midi keyboard.
Key Zone / Key Map — In multisampling, each sample has its own root key that describes its original pitch and a key zone, which determines how many other notes on the keyboard will also play that sample automatically transpoing it up and down.
This is only relevant if not all possible notes have been sampled from the original instrument. In the most detailed multisampled instruments, each note of the original was sampled, so each sample will be played from one key (its key map is one single key), the root key.
When you defined all the root keys and key zones, they are combined into a key map - the sound source from that sampled instrument. SImilar to an oscilator in a synth, this is the starting point of the patch.
Velocity Zones / Layers — Each sample is just a snapshot of the tonal variations you can get from the real thing. For example, a piano key sounds different if you hit it hard or soft. When you turn down the velocity of a hard hit in your software sampler, it will not sound soft, but like a hard hit with the volume turned down.
You are not getting the softer attack and less agressive tone. You can get close by using the ADSR and filter settings on your sampler, but most sample libraries now use multiple velocity zones / layers to achieve realism. That means they sample the instrument at multiple levels, and assigned a velocity zone. Each zone is assigned a midi veloctiy value from 0-127.
Keyswitching / Articulations — A string instrument has different playing styles, like legato, staccato and pizzicato, etc. To make these available it would require seperate keymaps / sampled instrument. But this is sometimes inconveinent if you want to switch articulations frequently within a musical phrase. With keyswitching you get several instrument articulations layered on top of each other and with a specific set of keys you can pick which articulation you want play. SO you can start playing a melody in legato in the C3 range, iht a key switch at C1 and instantly continue playing staccato. switch in real time.
Looping — Some instrument might need to provide an indefinite sustain, like on pads. Also looped rhyhtmic drum and percussion elements should run indefinitely. Repeat automatically as the key is held down. IF you import your own samples, the task of looping the sound correctly falls on you. You have to go to the edit page in your sampler of choice. Especially on drum phrases the looping is pretty straighfrward as all the elements are visually easy to identify.
Looping a sustaining sound is a lot more difficult to get right. You need to find the loop start and end point which don’t produce a click or glitch each time the wave moves around. In general you want to find two zero crossing to get the loop sounding smoothly. When that proves difficult, most samplers have a crossfade option, which easier to get right, but often the sound will be phasy. Just be prepared to spend some time getting the loops right. Commercial libriaries like … come with looped sampler patches already
Sample Rate / Bit Depth — Just like you have a project in your DAW set to a specific sample rate like 48khz or bit depth like 24bit, a sampler also has this. In early days of sampling, ram memory was at a premium. CDs were pressed at 16bit 44khz, but most samplers were at a much lower resolution, initially 8 bits, later sampler like the sp1200 defined the golden era boom bap sound with its crunchy 12 bits sampling.
Combined with the limited sampling time, these machines were a far cry from being realistic representations of instruments like the ones we get with a 17 GB sample library these days.
Nowadays the edgy lo-fi quality of these machines is their charme and many of them fetch far higher prices than what they used to sell for 20 years ago. If you can’T afford them, there’s of course virtual instruments in your DAW that mimic the sound of these machines. The funny thing is that a machine like the EMU Emulator II had on-board memory of …MB while its equivilant Kontakt Library comes in at a whopping 16.000MB. Modern, realistic sample libraries at 16bit 44.1khz minimum, often 24bit 48khz. Especially for sound design and film you even find higher sample rates like 24bit 96khz.
Time Shifting — Almost all DAWS let you change speed while maintaining pitch and vice verca. Hardware and virtual samplers often have this function built in, althought their name might change, like Kontakts ‘Timemachine Pro’ or ‘Beatmaschine’.
Hope this little excursion into sampler knowledge helped you a bit. Let us know if you have any specific things we've missed.
FAQ: Sampler VST Questions

How to Chop Samples?
Assuming you already have the sample you want to chop, you simply and straightforwardly chop up the track where you see fit. Just drop the sample into one of these software samplers, set the sample points, and start experimenting. Everybody has different styles and techniques for doing this.
For instance, you can chop wherever there’s a sound change, drum pause or pronounced transients. Many successful tracks simply chop on the beat. There are endless ways to chop your track and using a sampler VST is the easiest and most straightforward way to get it done.
How to Make Your Own Samples?
If you do not want to use a canned sample, just create your own! There are a few ways to do this. For starters, you can use an external mic and record a sample. You can get creative with microphone placement and even do things like hitting thick books, knocking on empty boxes, etc. Or you can bounce a virtual instrument to an audio file and use that for the sound source for your sampler.
Or, you can use your sampler VST to create tracks and add layers of effects to dial in the sound you want. You can even recycle parts of your other tracks or songs that have been sitting in your folder.
Where to get samples?
If you're going to be buying samples, I think that LoopCloud and Splice offer the most value and flexibility. To help you decide which to use, I've put together this helpful post of LoopsCloud vs. Splice. I've also put together a review of the best sites for free loops and samples.
Are Samplers different from synthesizers?
Yes! Samplers play pre-recorded sounds. Synths create their own sounds. This post digs into the difference between synths and samplers.
From a Frustrated Producer in a Ragtag Bedroom Studio to Major Placements on TV Earning $1,000s!
My name is Evan, and I've been making music since around 3rd grade. I'm from San Diego, California, but I've lived in Washington, DC for the last 20 years.
While I still have a full-time day job, I have created systems that have allowed me to produce dozens of songs a year in my spare time.
My songs have been on Netflix, TV shows like the 90 Day Fiance, an award-winning indie film, and NPR’s “All Thing Considered.” They've also been streamed millions of times.
In addition to being a music producer, I am passionate about teaching people how they can make professional-sounding music and earn money licensing it, all in their spare time.
Thousands of musicians, like yourself, have trusted me to guide their musical journey. My YouTube videos have been watched nearly a million times. And my story has been in Forbes, Side Hustle Nation, and the Side Hustle School.


EQ is the most essential tool you have for making music sound clean, clear, and professional. In this book you'll learn how to use the R.O.S.E. System, a simple 4-step EQ formula to help you master the world of EQ
