How to mix with Mid-Side EQ
You may have heard that mid-side EQ could potentially be the savior for your mixes, and even though you’ve heard about it a million times, you’re still questioning what it is and why so many engineers say it’s so useful.
Luckily, you’ve come to the right place, as we’re here to dispel the myths about mid-side EQ while giving you a rundown on what it is and when it can be useful in your mixes.
Note: this article may contain affiliate links, which mean that I receive a commission for any purchases you make, at no added cost to you.
What Is Mid-Side EQ?
Mid-side EQ is just what it sounds like!
With mid-side EQ, you can EQ the middle and side components of a signal independently. The main benefit is that it gives you more control over the stereo image of your mixes and the independent signals within your mixes.
You can think of the mid-channel as the identical left and right channels that make a single, phantom mono signal. The side or stereo signal is the difference between the left and right channels.
It’s important to note that no form of mid-side processing perfectly separates the middle and sides of the signal, and there will always be a bit of overlap.
When To Use Mid-Side EQ

Mid-side EQ is most beneficial when you’re looking to alter the tonality of the spatial qualities found within a signal. For example, a mastering engineer might get a simple stereo mixdown, though they want to be able to have independent control over the information in the middle of the mixdown and the side of the mixdown.
It can be helpful within mixes as well. For example, you might have a drum loop with a lot of low information on the sides. You may want to get rid of this low-end information on the sides while retaining the lows in the middle. Mid-side EQ can be very handy in this regard.
How To Use Mid-Side EQ
Let's talk a bit about how to get started using Mid-Side EQ. I'll give you some examples and tips and tricks to help you make the most of this powerful technique!

Common Examples of Using Mid-Side EQ
One way I often find myself using mid-side EQ is to create space for the vocals. For example, let’s say you have a vocal that feels a bit too sibilant in the mix, though in solo, feels fine. The problem might not actually lie in the vocals, but instead, the cymbals that are also playing in the sibilance range.
While you could duck anywhere from 5-9kHz out of the cymbals to get rid of that sibilance, you might end up stripping them of all that sizzly goodness that gives them their cymbal quality. Instead, you could use mid-side EQ to pull 5-9kHz out of the middle of the cymbals while keeping the side frequencies intact, effectively removing sibilant frequencies out of the way of your vocals.
I often find myself using mid-side EQ in heavy rock or metal mixes too, especially if I need the electric guitars to retain body in the low-end. Listen to modern rock mixes, and you’ll notice that a lot of the low-end comes from the guitars. However, it’s also the case that the bass and kick still feel present.
How is that?
Three Great Times to Use M/S EQ
Well, one way could be mid-side EQ. If you have doubled guitars panned hard left and hard right, you could dip the low frequencies in the middle using a mid-side EQ to get them out of the way of the bass and kick drum without completely stripping them off the beefy low-end they need to fill the soundscape.
If you produce electronic music, I highly recommend using mid-side EQ on your synth basses to tighten your frequencies and keep your lows in the middle. Many synth basses have tons of low information on the sides. With mid-side EQ, you can use a high-pass filter anywhere from 80 to 250Hz to clean up the stereo information on the side while keeping your center signal low and punchy.
Reverb is another great place to use M/S EQ. Because reverb can frequently compete with the underlying sounds, using mid-side processing on the reverb can help it sit more cleanly in the mix.
For example, if you had a piano part in the middle, you could use midside eq on the reverb send. You could cut out 4-5 dB in the main range of the piano (let's say 200hZ-1kHZ), so that the piano still sounds clean. But then you could boost the mid-highs on the sides (perhaps 3-5kHz) to make the reverb sound wider and more lush.

Mid-Side EQ Mastering
When there is a bit too much spatial spread in the low frequencies, mid-side EQ can be helpful in mastering. It can also be helpful if an engineer is looking to boost high-mids and highs in the sides without impacting the center frequencies.
Truthfully, mid-side EQ can’t fix a bad mix in the mastering process. However, it can certainly open up the mix to enhance the vibe.
It’s best to employ very soft mid-side EQ touches in mastering, as it’s easy to drastically change the sound of a track with significant EQ moves, which brings us to our next point.
While some engineers go straight to stereo wideners to add width to their mixes, we often find that adding a small high-shelf filter above 8kHz can deliver the same perceived width with a lower risk for phase issues.
Mid-Side EQ Mistakes
One of the biggest problems with mid-side EQ is that it has the ability to introduce phase issues. When the sides are boosted in a mix, yet some instruments aren’t panned hard to the sides, this kind of processing can alter the sounds in unwanted and unpredictable ways.
Essentially, when you use mid-side EQ, you’re EQng in two separate stages. When you then return those two stages to a single stereo signal, they might not fit like before. While you can create cool effects this way, it might not be your original intention.
Best Mid-Side EQ Plugin - FabFilter Pro-Q3
No matter what it is you need in terms of equalization, FabFilter Pro-Q3 delivers. There is a reason why it is one of the most popular parametric EQs on the market today. You get total control of a seemingly infinite number of bands, complete surgical operation, and a number of efficient stereo placements to choose from, including mid-side.

Check the price of the FabFilter Pro-Q3 at Plugin Boutique or at ADSR Sounds.
Beyond its handy mid-side capabilities, FabFilter Pro-Q3 gives users a beautiful real-time waveform display and a unique masking feature that allows you to compare frequency information between multiple tracks to make better EQ decisions.
It is by far one of the most comprehensive EQ plugins out there today.
Best Waves Mid-Side EQ Plugin - H-EQ
Not only does H-EQ from Waves provide quality mid-side operation, but it also has some of the best modern and vintage features inspired by the best American and British consoles to ever grace this Earth.
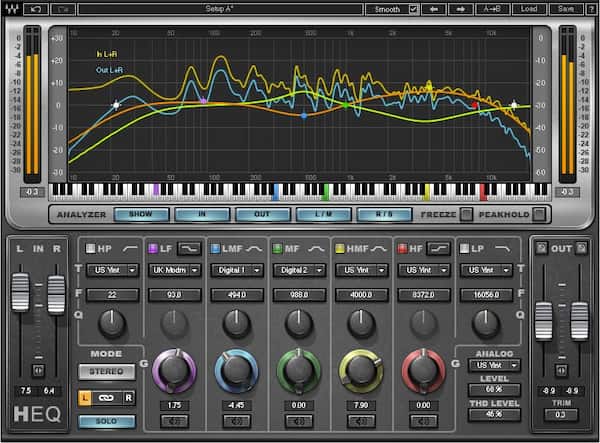
Check the price of the Waves H-EQ at Waves.com or Sweetwater
The unique graphic design gives you seven different filter types for each band, including a recently updated bell filter. The keyboard display that makes its way along the bottom of the plugin is super helpful as well, as it allows you to dial-in frequencies based on notes. I love that the Waves H-EQ lets you dial in analog saturation based on both types of consoles - or turn it off for a clean, clear sound!
Plus, the real-time waveform display gives you information on how you’re impacting your signal with your EQ bands, which is extremely helpful if you’re not working in the best monitoring environment.
Best Mid-Side EQ Free - Blue Cat’s Triple EQ
If you don’t have the cash to spend yet still want to take advantage of detailed mid-side equalization, then we highly recommend checking out Blue Cat’s Triple EQ. This free EQ has a low-shelf filter, a boost/cut peak filter, and a high-shelf filter, each of which delivers +/-40 dB per band.

While you’ll probably never find yourself boosting or cutting more than 40dB on a signal, I appreciate the flexibility.
How to use EQ Guides
To help you get the most out of your EQ plugins, we've put together these detailed guides to teach you how to use EQ on some of the most popular instruments.
- How to Mix with EQ
- Tips for EQing piano
- Electric guitar EQ tips
- How to EQ acoustic guitar
- How to EQ bass guitar
- How to EQ drums
- How to EQ vocals
- How to EQ woodwinds
- How to EQ strings
- How to Use Mid-Side EQ
- 3 Powerful Ways to Use Dynamic EQ
- How to EQ Loops
- How to EQ Reverb
- How to EQ Percussion
From a Frustrated Producer in a Ragtag Bedroom Studio to Major Placements on TV Earning $1,000s!
My name is Evan, and I've been making music since around 3rd grade. I'm from San Diego, California, but I've lived in Washington, DC for the last 20 years.
While I still have a full-time day job, I have created systems that have allowed me to produce dozens of songs a year in my spare time.
My songs have been on Netflix, TV shows like the 90 Day Fiance, an award-winning indie film, and NPR’s “All Thing Considered.” They've also been streamed millions of times.
In addition to being a music producer, I am passionate about teaching people how they can make professional-sounding music and earn money licensing it, all in their spare time.
Thousands of musicians, like yourself, have trusted me to guide their musical journey. My YouTube videos have been watched nearly a million times. And my story has been in Forbes, Side Hustle Nation, and the Side Hustle School.


EQ is the most essential tool you have for making music sound clean, clear, and professional. In this book you'll learn how to use the R.O.S.E. System, a simple 4-step EQ formula to help you master the world of EQ
