Tips for EQing Piano
As one of the most full-range instruments in the musical realm, EQing a piano to fit right in a mix can be challenging. Even trying to get the best sounding natural, solo piano can be quite a challenge if it wasn’t recorded right to begin with.
With such versatility and diversity, the piano is an instrument that is great for a number of things, including composition. However, because of its diversity, it can be incredibly hard to find the right EQ settings.
If you want more tips for how to make mix piano, be sure to check out this epic guide on how to make piano sound lifelike and realistic. And if you're unhappy with how your piano sounds, here are the best piano VST plugins. Or if you're looking to record a real piano, here are the best microphones for recording piano.
And when you're ready to precisely dial in your sound, here is our review of the 6 best EQ plugins.
And at the end of this article, you'll find a free Piano EQ Cheat Sheet that you can right click to download!
Note: some of the links below may be affiliate links, meaning that I receive a commission if you purchase through them.
Piano EQing Process
What follows is the typical process we use to make sure that our piano is EQ'd to perfection. Follow it in your mixes and the piano will fit perfectly!
Step 1: Low Pass Filter
When EQing piano, one of the most important things to start with is the low-pass filter. If you’re mixing a solo piano for a classical piece, you might not need to use a low-pass filter at all.
However, if you are dealing with a busy mix with bass and drums, getting rid of the low-end using a low-pass filter can help create room for your low-end instruments.
A lot of the frequency content that is below 20Hz is unencessary and non-musical. Most of what you’ll find is rumble from microphone stands or air conditioners in the studio. If you’re using a parametric EQ, we don’t recommend using a steep cutoff, as this can create an unwanted resonances boost. A 12dB per octave filter can do the trick.

Step 2: Remove Mud
If you want to get rid of muddy frequencies, we recommend looking anywhere from around 50Hz to 200Hz. From around 50Hz to 80Hz, you’ll find minimal frequency content, especially if the piano was recorded well.
However, if you notice that the low-end is clouding up the highs, this is a great place to start looking.

80Hz to 120Hz is where most of the boomy bass notes on the piano will lie. If you start cutting these out, take caution, as too much cutting can remove a lot of the warmth and body of your sound.
From around 120Hz to 180Hz you’ll find the lower mids. This ia great option for attenuation if your piano is feeling muddy. Depending on how the piano was recorded, this range might move up to 300Hz.
Again, be careful when cutting here, as too much can remove the fullness of the instrument. This is the range that is mostly likely to interfere with a bass guitar, so figure out which instrument you'd like to give the low-end spotlight to!
Step 3: Remove Unwanted Resonances
Recording acoustic instruments can be a difficult process. Depending on the room it was recorded in, the shape of the instrument (both the physical shape and the condition it is in), and the type of microphones you use, there might be unwanted resonances that stick out in your sound.
The best way to get rid of these is by using the sweep and destroy technique. Often VST plugins will also have some resonance issues once you start playing samples simultaneously.
To utilize this technique, pick a band on your parametric EQ and narrow the Q value. Boost this band by around 10-20dB and slowly sweep around the frequency spectrum looking for resonances that sound bad.
Sometimes, these resonances will only appear for a second or when certain notes are played. If this is the case, you might choose to use a dynamic EQ, like the FabFilter Pro-Q 3, that only clamps down on the particular frequency when it overexerts itself.
Otherwise, you’ll end up taking out parts of the frequency spectrum that enhance the overall sound for the majority of the piece.

Use the Pro-Q 3 to dynamically reduce unwanted frequencies!
We also only recommend using this technique if you notice something to start with. Don’t simply start boosting around 20dB looking for things to cut. Nothing is going to sound good with a 20dB, narrow Q boost, so you may end up cutting a bunch of necessary frequency points, resulting in an unnatural piano sound.
Step 4: Enhance the Piano with Broad EQ Boosts
When boosting a piano, we recommend using a Tube-Emulating EQ. This will reward you with a warm, more natural boost that seems to fit effortlessly into songs. One of our favorites is the Tube-Tech Equalizer Collection which will help your piano sounds sparkle with making it sound harsh or brittle like digital EQs would.

Use the Tube-Tech EQ for warm, broad EQ boosts!
We often want clarity, definition, and air when it comes to modern piano sounds. From 1kHz up is where most of the higher notes on the piano lie.
If you’re mixing a piano in a rock track, for example, which has a wall of guitars, you might want to boost your piano anywhere from 1kHz to 5kHz to give your piano a bit of extra presence and help it to cut through the wall of sound. We like to think of this frequency range as the “honky tonk” sound when it comes to pianos.
If you want a bit of added hammer attack, which is great for modern pop and rock tracks, we recommend looking from 5kHz to 10kHz. Not only can you get more of a hammered sound in this range, but you’ll also get much more sparkle.
If you notice that your piano needs some brightness, though boosts from 1kHz to 10kHz make your piano sound harsh, then you might choose to use a high-shelf above 10kHz to get some air on the top of your piano.
Good Equalizer Settings For Piano

Now that you understand the basic process for eqing piano, we're going to share some of our favorite EQ tips and tricks to really bring your piano to life!
Bring Out Body
If you want to bring out the body of your piano, we highly recommend looking in the range of 120Hz to 300Hz. This is where most of your bass notes will lie and where the true heart of the piano is.
When boosting in this range, it is always a good idea to use wide boosts so that you don’t end up accentuating specific notes over others.
Bring Out Bite
If you’re looking to bring out bite, start by looking in the 1khz to 5kHz area. Rock and pop tracks with piano often need boosts in this range to help the piano sit up front. Think of that over-compressed, Beatles-esque piano sound. Boosting in this range can give your piano a bit more aggression too, great for heavier or more energetic tracks.
Bring Out Air
Air always seems like a funny concept when it comes to EQ, as it never really that clear what your boosting in the air range. I like to think of air as the top-end or wind sound of a whistle. Go ahead, whistle to yourself really quickly and listen to the sound of the air or wind that is sitting just atop the note your are whistling. To me, this is air.
To accentuate this on your piano, you can use high-shelf boosts above 10kHz.
How to Make A Piano Sound Old Fashioned
If you’re going for that old-fashioned sound of the upright piano at the back of a saloon in an old western flick, then high and low-pass filters will be your best friend.
The focus for the piano should be between 600Hz and 3kHz for this kind of sound. Anything else can be filtered out using high-pass and low-pass filters. If you filter your sound and notice it needs some bite to stand out, give your piano a slight boost at 1kHz.
A really nice saturation plugin can also be added for even more character. And if you want it to sound even more old-timey, consider pairing it with one of the best tape plugins.
Questions?
Still confused about how to EQ piano? Just leave a question below and I'll respond as fast as I can.
And don't hesitate to share any tips or tricks you might have for make a piano sparkle!
Understanding the Piano Frequency Range
As we said before, the frequency range for the piano is quite wide. If we quickly look at the the different frequency ranges and how they can impact the piano, we get something like this:
- 20 - 80 Hz - Power and Boominess
- 80 Hz - 180 Hz - Body and Boominess
- 180 Hz - 300 Hz - Muddiness and fullness
- 400 Hz - 1kHz - Boxiness and depth
- 1kHz - 5kHz - Clarity, presence, and definition
- 5kHz - 20kHz - Sparkle, brilliance, and air
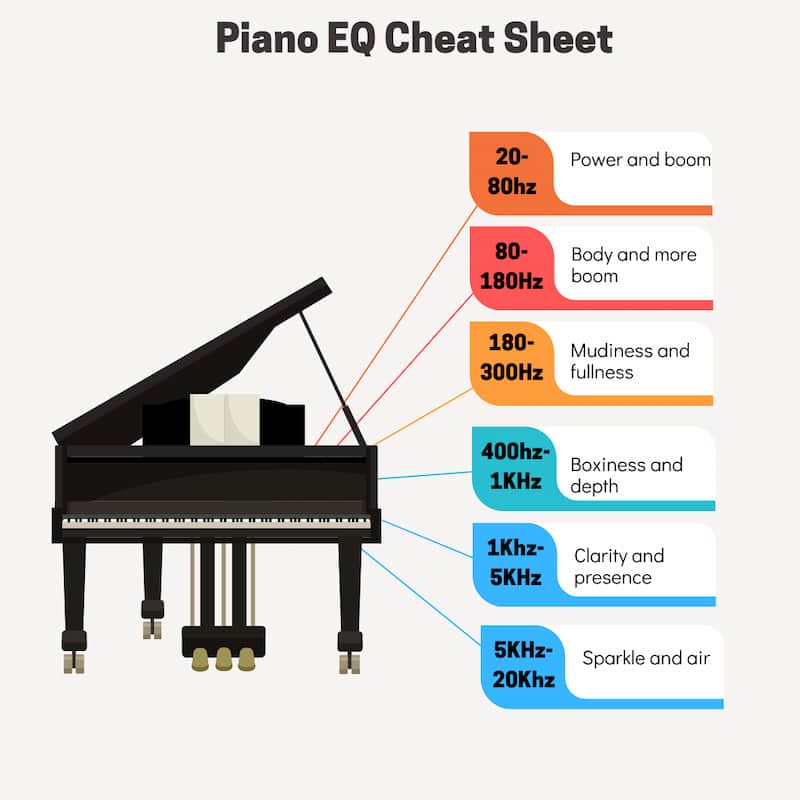
As you can see, the piano fills out the full range of human hearing, which ranges from 20Hz-20kHz. In this small tutorial, we are going to dive into how you can use your EQ plugin to shape and fit your piano into your mix with ease.
When EQing piano, it's important to understand early on what the role of the piano is in your mix. If it's a solo piano composition, then you can use more additive EQ.
However, if you've got a dense mix with lots of other instruments, you'll be looking to do a lot more cuts to the piano. That's because it is very easy for the piano to conflict with other instruments given its frequency range.
How to use EQ Guides
To help you get the most out of your EQ plugins, we've put together these detailed guides to teach you how to use EQ on some of the most popular instruments.
- How to Mix with EQ
- Tips for EQing piano
- Electric guitar EQ tips
- How to EQ acoustic guitar
- How to EQ bass guitar
- How to EQ drums
- How to EQ vocals
- How to EQ woodwinds
- How to EQ strings
- How to Use Mid-Side EQ
- 3 Powerful Ways to Use Dynamic EQ
- How to EQ Loops
- How to EQ Reverb
- How to EQ Percussion
From a Frustrated Producer in a Ragtag Bedroom Studio to Major Placements on TV Earning $1,000s!
My name is Evan, and I've been making music since around 3rd grade. I'm from San Diego, California, but I've lived in Washington, DC for the last 20 years.
While I still have a full-time day job, I have created systems that have allowed me to produce dozens of songs a year in my spare time.
My songs have been on Netflix, TV shows like the 90 Day Fiance, an award-winning indie film, and NPR’s “All Thing Considered.” They've also been streamed millions of times.
In addition to being a music producer, I am passionate about teaching people how they can make professional-sounding music and earn money licensing it, all in their spare time.
Thousands of musicians, like yourself, have trusted me to guide their musical journey. My YouTube videos have been watched nearly a million times. And my story has been in Forbes, Side Hustle Nation, and the Side Hustle School.


EQ is the most essential tool you have for making music sound clean, clear, and professional. In this book you'll learn how to use the R.O.S.E. System, a simple 4-step EQ formula to help you master the world of EQ
