How To EQ Drums
The sound of your drums provides a foundation for the rest of your mix to live upon. Think of it like this: the kick drum is the heartbeat of the song, while the snare keeps your rhythm moving forward. Your hi-hat and ride can be used to give the song a groove. And toms and crashes are there for some interest
Beyond crafting the perfect drum groove for your track and picking out great sounds, it is essential to EQ your drums correctly so they fit within the context of your mix.
You want your drums to not only sound right for the genre (an 808 sounds way different from a punk rock kick), but you also want to make sure that they sound good with all the other instruments you've got.
Remember, not all drum mixes are the same. The way that you choose to EQ and mix your drums will depend entirely on your preference. However, there are a few tips and tricks you can keep in mind when it comes to EQ to build the best foundation for your drum tone.
Note: This article may contain affiliate links, meaning I would receive a commission - at no cost to you - for any products you purchase.
Overview of How to EQ Drums
In this section will give you some guidance about how to think about EQ, and especially how to grasp its full potential for shaping amazing, radio ready drum sounds!
What Is EQ?
EQ is the process of altering the frequency balance of an audio signal. The human ears can detect quite a large range of frequencies, moving from 20Hz to 20kHz. We can use EQ to boost and cut different ranges within that larger range to alter the characteristics of a sound.
With EQ we try to remove the bad parts and enhance the good parts. Sometimes we can use EQ to carve out space in a mix so that two similar instruments can both be heard. You can also use EQ to transform your sounds more radically, such as dialing in an "old fashioned telephone" effect.
Additive Vs. Subtractive EQ
In approaching EQ, we will use two different methods: subtractive EQ and additive EQ.
Subtractive EQ is the process of removing unwanted frequencies from a signal, while additive EQ is the process of boosting the favorable parts of a signal.
I typically take the approach of using subtractive EQ to get rid of things I don’t want first instead of trying to boost to get the sound I’m looking for. I will only boost if it is necessary after the fact, as this helps keep the sound more natural a lot of the time.
While you can use any plugins you'd, like, if you've got the option, I'd recommend using a warm vintage style EQ for additive processing, like the TubeTech EQ, and a precise digital EQ like the FabFilter Pro-Q3 for my subtractive EQ.
Understanding the Overall Process of Drum EQ
My process usually works like this. Dial in the levels of the drums and send them all to a drum bus. A ton of work is done just by getting the individual drums at the best volume. Think about it like this: would it sound better to boost the low end or to turn up the kick?
From there, I apply some EQ to the drum bus to further help refine the drum sound. This is usually additive EQ, but I may notch out some particularly harsh frequencies.
Once things start sounding better, I'll apply subtractive EQ to the individual drums to get them to sit better in the mix. I may remove some of the high end on the kick, some of the sub frequencies from the toms, and a everything on the snare below 150hz. I also look for mud and resonances which I try to cut out.
I also say that drums are usually the first thing I mix when I start a track. Getting the right energy in the kick in the snare is really important for creating the whole vibe of the mix.
From there, if things still aren't sounding the way I want, I may consider adding some additive EQ on individual drums. For example to give a snare some air or to bring out the drum beater.
We'll talk about the whole process in detail below.
Drum EQ Step 1: Balancing Levels Between The Drums
Prior to using EQ, it is important that you balance the levels. EQing before a balance can lead you down a never ending path of back and forth revisions. Think about it this way, your drums might simply sound muddy because your kick is too loud, or harsh because your cymbals are way above where they should be.
To get your balance right, we highly recommend listening to reference tracks. This way, you can see where the kick, snare, hats, toms, and cymbals sit in the mix.
Drum EQ Step 2: Adding EQ To The Drum Bus
The “top-down mixing” approach, or the approach of mixing busses before individual instruments, is one that has been long debated. However, there are many benefits to the approach.
For starters, you can get the sound you are looking for much faster by focusing on a single bus rather than multiple instruments. Secondly, you get a macro view of your mix instead of spending too much time honing in on small details that don’t truly matter. Lastly, you use less processing power.
You might stick an EQ on your drum bus and realize that you don’t actually need to EQ any individual drums to get the sound you’re after.
We recommend using drum bus EQ principally for boosts. It can sound amazing if you run your drum bus through a warm, tube-emulation EQ. This adds just a touch more grit and harmonic saturation, which can really make the drums punchier and fatter. For this I really like to use the Tube-Tech EQ.
Drum EQ Step 3: High and Low Pass Filters
One of the first approaches you should take when EQing drums is using the high-pass filter. If you feel that your drum balance sounds muddy, filtering out any low, unnecessary frequencies can be very helpful. As a byproduct of high-pass filtering, you often get brighter, more present drums as well.
I find that it can be helpful to add high pass filtering to both the drum bus AND the individual drum channels. On the main bus though, we just do a cut around 20-30hz, just to make sure that now unnecessary sub frequencies make it through. Then, you'll want to be more aggressive with filtering the filtering on the individual drum tracks.
While the hi-hat, cymbals, and overheads often get the high-pass filter treatment to get rid of any weight or mud in the low-end, you might even choose to high-pass the kick if it’s too boomy or you want it to sit above the bass.

Drum Eq Step 4: EQing Individual Drums
Like said, I often start with the drum bus first to build an overall vibe and balance for my drums. Once they start to feel generally correct thanks to bus processing, I start EQing individual drums.
Adding EQ to each drum separately is a really important part of mixing, because the frequency characteristics of each of the drums are so vastly different, they often require their own special treatment.
On average, the kick will dominate the low-end, the snare and toms will cover the mid-range, and the cymbals will float around in the high-end.
How To EQ Drum Bus & Drum Bus EQ Settings
Similar to the room is the drum bus, as it includes all of the pieces of your kit. I highly recommend trying to shape your drum bus first before diving in and focusing on individual instruments, as you might find that your individual drums don’t need any EQ after the fact.
Here are a few things to consider when EQing your drum bus:
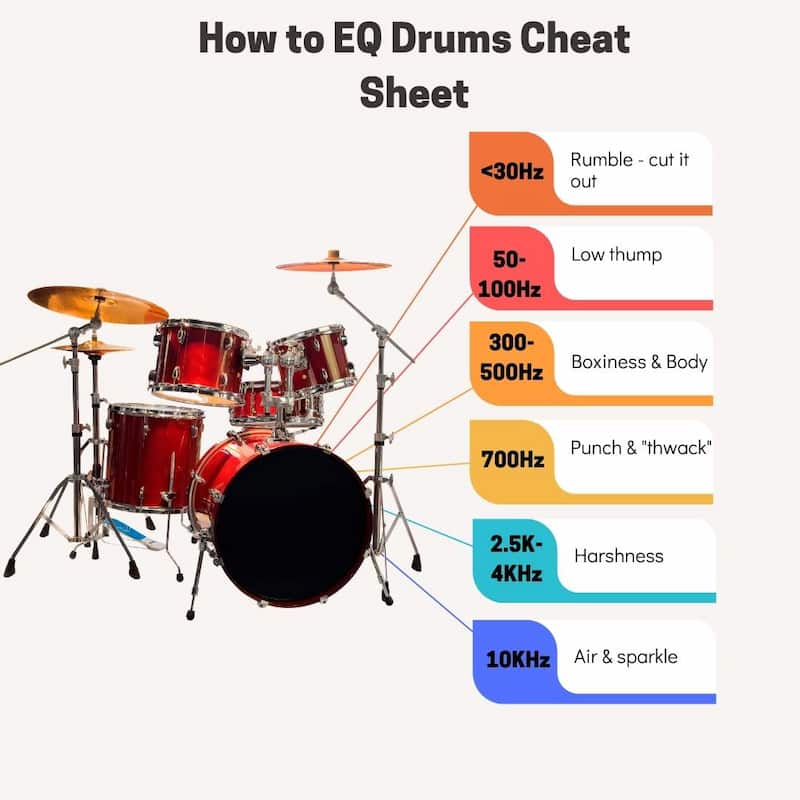
- High-Pass (To tighten sound): Up to 30Hz
- Low-end: 50-100Hz
- Boxiness or body: 300-500Hz
- Harshness: 2.5kHz-4kHz
- Sparkle: 10kHz and above
Settings to EQ Individual Drums
In this section, I'll share how to approach setting the EQ for individual drums. As you'll notice, it can often depend on what else is present in the mix, or what the genre calls for. Trust your ears!
How To EQ a Kick Drum
In most types of modern music, a punchy snare drum is essential, but also one of the most difficulty things to get correct. So first, I want to share some ways to approach EQing a kick drum. You'll need to approach the kick drum differently in each of these scenarios, so see which one fits closest with your track!
How To EQ Kick and Bass
When EQing kick and bass, it is important to decide which one will dominate the low-end. If you have too much low-end energy in your mix, your track will sound weaker. Seems counter-intuitive, huh? Here’s why
Speaker systems have low-frequency limits. If they must deal with tons of sonic information in the bottom end, they will often fail to reproduce that information, meaning your speakers won’t work as efficiently as possible.
If you have a subby bass sound with a click kick, you might consider high-passing your kick. The same goes for a deep kick and a mid-range-y bass line.
You might also consider taking the puzzle piece approach, which is finding room for your instruments to reside in certain frequency ranges by carving those frequencies out of combative instruments.
For example, if your kick constantly thuds around 50-60Hz, you might consider taking a few dB out of the 50-60Hz range.
One of the best ways to see where your kick or bass reside is by using a frequency analyzer. Your frequency analyzer might tell you that your kick has tons of information in the 50-60Hz range and 200-500Hz range, while your bass has tons of information in the 100-200Hz range. Use this information to lock the two instruments together liek a puzzle.
Once you've got the EQ part of the relationship between kick and bass settled, you can also consider sidechaining the kick to trigger the bass to turn down a touch whenever the drum hits. That way the two instruments are less likely to overlap. However, don't let sidechaining be a way to ignore addressing with the frequency overlap!
How To EQ an 808
If you’re using an 808 in the place of a traditional kick and bass, you might be able to leave it where it is without any problems. The 808 dominates the 50-100Hz range. If you feel like it needs some roundness on its own, you might even give it a bit of 100-250Hz.
The whole point of an 808 in this situation is to have it just fill up the entire low end. A high pass filter at 20 hz may be all you need, just to prevent an inaudible sub frequencies from eating up your headroom.
However, if you’re using your 808 with a kick and bass, you will need to carve out some space for each element to live comfortably.
Subtractive EQ is the best approach in this case.
Depending on the frequency characteristics of each element, you might consider high-passing your 808 up to around 30-40Hz so that the kick can dominate the low-end and carving a slight bit of 50-100Hz out of the bass to allow the 808 to cut through.
Of course, this is purely an example and it completely depends on your mix.
What I will recommend is boosting the harmonics of your 808 above 400Hz, as anything below 400Hz is typically inaudible on phone speakers. When mixing 808's its really important to add saturation or distortion to help the low frequencies translate on smaller speakers.
Here are my favorite distortion and saturation plugins. If you're in a hurry, the FabFilter Saturn would probably be my top recommendation for use on an 808.

How To EQ a Snare
Getting a tasteful amount of body and smack with a snare drum is necessary for a bangin’ track. A lot of engineers will start by getting rid of unnecessary low-end energy by filtering up to the fundamental pitch of the snare (the lowest frequency of the snare sound).
High-pass filters are wonderful for adding focus when you’re having trouble getting your snare to cut through the mix.
You might even consider a slight boost around 100-250Hz, as it helps bring out the snare body. You might also consider sweeping for nasty resonances if you hear something poking out of your snare recording.
Here are a few ranges to check when EQing snare:
- Body: 100Hz-250Hz
- Attack: 1.5-3kHz
- Snare Rattle: 5kHz
- Brightness: 9kHz-10kHz
With a snare, you'll also get a lot of tone shaping from a nice plate reverb, like the Arturia Rev Plate 140. If you feel like something is lacking from the snare, try adding EQ on the reverb plate send. Often an airy boost of just the reverb between 7-10 kHz can help lift the snare in the mix with out sounding too harsh. Here are a few more of my favorite reverb VSTs.
How to EQ Hi Hats
Hi-hats can often benefit from a high-pass filter. Sometimes, you can even filter up to 400Hz or higher depending on the track. A bone-dry funk track might benefit from a bit of husk in the snare, while a dense metal track might need extra room in the mid-range for the guitars. The brightness is really genre dependent with hi hats. But you generally don't need much body.
Here are a few ranges to check when EQing hi-hat:
- Bleed or Mud: High-pass up to 300Hz or more
- Body: 600-800Hz
- Nasality or harshness: 800Hz-2kHz
- Clarity: 6kHz-12kHz
If you feel like your hi hat is too harsh, a multi-band compressor or a de-esser is one of the best tools to use. It allows the hats to still sound bright and present, while tamping down on the harshest frequencies when they're at their loudest.
You'll get a lot of milage out of the FabFilter Pro-MB, which lets you dial in precise MultiBand compression appropriate for a wide range of things from vocals to acoustic guitar to entire mixes.
How To EQ Toms
When it comes to EQing toms, engineers often want to get rid of boxiness, enhance the attack, and bring in a bit more thump. Generally, a drum kit will have anywhere from two to three toms. Because each tom is likely tuned differently, you can’t simply copy and paste your EQ settings from one tom to the next.
Factor in the fundamental pitches of each tom and build your EQ settings around there.
Here are a few ranges to check when EQing toms:
- Low-end (Floor Toms): 80-100Hz
- Low-End (Rack Toms) 200-250Hz
- Boxiness: 300-600Hz
- Attack: 5kHz-7kHz
Cymbal EQ
When EQing cymbals, you typically want to get rid of muddy low-end and harshness while adding some sparkly highs. Take the same approach as you did with the hi-hat when high-passing if your mix needs it. Start by finding the fundamental of the cymbal in question and high-passing up to that point.
Here are a few ranges to check when EQing toms:
- Bleed or Mud: High-pass up to 300Hz or more
- Harshness: 2-5kHz
- Sparkle: 6kHz and above
How To EQ Overheads
Engineers often rely on overheads when it comes to defining their drum tone. You can use the ambiance present in the overheads to get a sense of the space and the entire definition of the kit. Similar to the cymbal mics, you want to get rid of unnecessary low-end if you feel that your overall drum tone sounds muddy.
Plus, having tons of low-end bleed from the shells below can cause further issues in processing, especially if you start adding modulation time-based effects.
Engineers will usually brighten the cymbals for a more expensive sound. However, if you feel that your cymbals are totally harshing your mix’s mellow bro, you might consider low-passing them down to around 10kHz.

Much like with hi-hats, overheads can be a great choices for multi-band compression if you need a little extra control.
Here are a few ranges to check when EQing overheads:
- Bleed or Mud: High-pass up to 300Hz or more
- Harshness: 2-5kHz
- Sparkle: 6kHz and above
How To EQ Drum Room Mic
Let me start by saying: a great-sounding room might not need any EQ at all. Amateur engineers often ruin a good room sound by diving too deep with EQ. I also often see tons of misinformation out there about high-passing the room mics.
While a bad-sounding room might need some high-pass treatment to get rid of mud, having boomy low-end in your room might be exactly what you need to give your drums some added beef.
It is often best practice to look for unruly resonances in a room, as they can distract from the rest of your mix. You can do so by sweeping around with a tight Q on a parametric EQ. Or you can automate the search for resonances with plugins like the award winning FabFilter ProQ-3.
Best EQ For Drums: FabFilter Pro-Q 3
If I had a desert-island parametric EQ, it would be the FabFilter Pro-Q 3. Not only does this EQ provide a clean and transparent sound, perfect for subtractive EQ, but it also comes with a wide range of helpful tools you can use to fine-tune your drums.
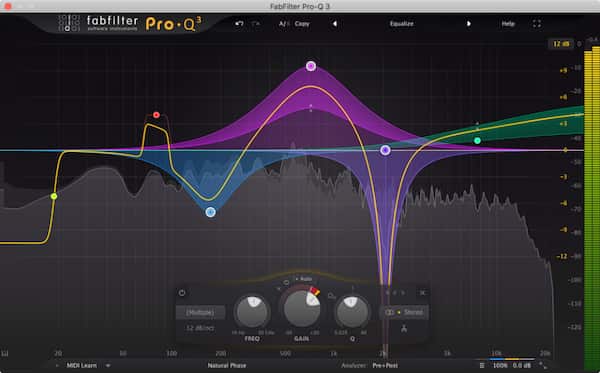
I often find myself using the spectrum analyzer to find out where the fundamentals of my drums sit. The analyzer is incredibly detailed and allows you to use a sidechain so that you can compare the frequency spectrums of two different instruments simultaneously.
For example, you can use the FabFilter Pro-Q 3 to look at the frequency content of your kick and bass in tandem to see where you can make adjustments.
The depth of features, easy of use, quality sound, and great performance are probably why the FabFilter ProQ-3 has won just about every award out there:

I also love the fact that you can use incredibly steep bell filters to cut out unruly resonances without spilling over into other parts of the spectrum.

Best EQ For Drum Bus: Tube-Tech EQ
For a vintage tone, the Softube Tube-Tech PE1C is an excellent choice. It is based on the most sought-after vintage EQs around today, the EQP-1A. Of course, there are many digital emulations of the EQP-1A on the market today, though with plenty of A/B testing, I’ve determined that I like the way this one sounds the most.
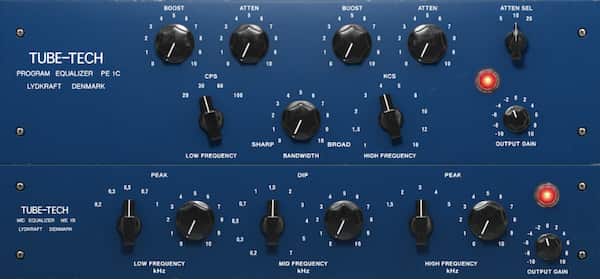
While you won’t get surgical control with this EQ thanks to the fact that it only comes with two wide bands and locked-in frequency controls, you can use it to add tons of weight and sparkle to your source material without introducing harshness.
Many engineers create unique sounds by boosting and cutting simultaneously. One trick many engineers use is boosting the bass content very heavily before attenuating the same content with the other knob. In doing so, you get a deep and clean low-end while clearing out any surrounding frequencies.
Flip the high-frequency knob over to 10kHz and dial-in the boost knob to hear your cymbals source. Trust me, you won’t regret it. It's an amazing tool for creating brilliance that isn't harsh.
How to use EQ Guides
To help you get the most out of your EQ plugins, we've put together these detailed guides to teach you how to use EQ on some of the most popular instruments.
- How to Mix with EQ
- Tips for EQing piano
- Electric guitar EQ tips
- How to EQ acoustic guitar
- How to EQ bass guitar
- How to EQ drums
- How to EQ vocals
- How to EQ woodwinds
- How to EQ strings
- How to Use Mid-Side EQ
- 3 Powerful Ways to Use Dynamic EQ
- How to EQ Loops
- How to EQ Reverb
- How to EQ Percussion
FAQs about How to EQ Drums
These are some of the most common questions I get about mixing drums. If you've got a question that hasn't been answered below, don't hesitate to leave it in the comments section and I'll get back to you!
Tone Shaping With Saturation
If you aren’t using saturation on your drum mix, you are severely missing out. Saturation is unique to EQ in that it adds new frequency content that did not exist in the raw recording. It is important to remember that you will never be able to add new frequency content with EQ, only manipulate what is already present in the sound.
When drums lack energy or fatness, engineers will often look to saturation. Here's some of the best saturation and distortion plugins. You can use saturation to fatten up your kick and snare tone, shape harsh or soul-less drum loops, or add a bit of grit to your tone.
One of my all-time favorite saturation plugins for drums is Soundtoys' Decapitator. From subtle fatness to monster distortion, you can use the many controls found on the Decapitator interface to completely alter your tone.
You should also strongly consider adding tape saturation to your individual drums and the drum bus as whole.
Tape saturation allows for additional tone shaping, adds a little bit of warmth and glue, and can really increase the perceived weight of the drums. Here's my roundup of the best tape saturation VST plugins.
How Much EQ Can I Really Add To Drums?
You can add EQ to your drums as much as your heart desires. There are no hard and fast rules out there. Unfortunately, many “professional engineers” out there tell people “you should never boost more than 3dB” or “make sure to cut narrow and boost wide.”
The truth is, you can do whatever you want as long as you have intention. Don’t go around boosting 10kHz just because this article told you to. EQ guides like this are just that, guides. Everything you read about EQ should be taken with a grain of salt, however, as all mixes are different.
I know it’s not the answer you want to hear, but it’s the truth.
If you can’t get that kick to cut through your dense, new-age metal mix without giving it a hefty dose of 5kHz, then by God, give it the 5kHz it’s asking for! On the other hand, you might listen to your rough balance and say, “this sounds great.” In that case, do you need to EQ at all?
One of my favorite drum tones in recent years came from Ty Segall’s cover of “Every 1’s a Winner.” The drums actually sound like heavy cardboard boxes falling down a flight of stairs. However, it works for that mix.
If you take too much caution in your drum mix with EQ, you’ll end up with a cautious sounding mix. Be bold, be brave, use EQ when it’s needed, and leave it alone when it’s not.
From a Frustrated Producer in a Ragtag Bedroom Studio to Major Placements on TV Earning $1,000s!
My name is Evan, and I've been making music since around 3rd grade. I'm from San Diego, California, but I've lived in Washington, DC for the last 20 years.
While I still have a full-time day job, I have created systems that have allowed me to produce dozens of songs a year in my spare time.
My songs have been on Netflix, TV shows like the 90 Day Fiance, an award-winning indie film, and NPR’s “All Thing Considered.” They've also been streamed millions of times.
In addition to being a music producer, I am passionate about teaching people how they can make professional-sounding music and earn money licensing it, all in their spare time.
Thousands of musicians, like yourself, have trusted me to guide their musical journey. My YouTube videos have been watched nearly a million times. And my story has been in Forbes, Side Hustle Nation, and the Side Hustle School.


EQ is the most essential tool you have for making music sound clean, clear, and professional. In this book you'll learn how to use the R.O.S.E. System, a simple 4-step EQ formula to help you master the world of EQ
