How to EQ Vocals
Even those who are comfortable using recording software can feel overwhelmed when it comes to getting their vocals to sound right. EQ is one of the most important tools when it comes to mixing vocals, as it allows you to shape, manipulate, and fit your vocals into your mix like a puzzle piece.
With so much information scattered around the Internet about EQing vocals, finding the right information can be daunting.
Luckily for you, we’re going to discuss everything you need to know about EQing vocals right here so that you don’t have to spend any more time sifting around engineer forums.
And at the end of this article, you'll find a free Vocal EQ Cheat Sheet that you can right click to download!
Note: this article may contain affiliate links, which mean that I receive a commission for any purchases you make, at no added cost to you.
Challenges of EQing Vocals

One of the most difficult things about EQing vocals is that everyone’s voice is different. A male voice is vastly different from a tenor’s voice, a child’s voice is different from an adult’s voice, and so on. Because of these vast differences, there is no one-size-fits-all approach to EQing vocals.
Beyond the tonal quality of the voice, there are many differences that lie within the recording process. You can record the same voice with ten different microphones and get ten different results.
Plus, when you start placing those microphones in different rooms, you get the unique sound of the ambiance and room modes around the singer. It also depends significantly on the amount of acoustic treatment the room has.
With so many variables in place, there are many things that you need to consider when EQing vocals.
Lastly, if you don’t have the right monitoring equipment (studio monitors, mixing headphones, acoustic treatment, etc.), trying to hear small nuances that lie within the fabric of your vocal recording can be difficult, if not next to impossible.
Of course, that doesn’t mean there aren’t certain constants that present themselves when EQing vocals, which is what we want to share with you today.
If you're wondering which EQ to use, we've put together our list of the best EQ plugins, but if you're too busy to read that, let's just say that the FabFilter Pro-Q3 is our favorite EQ tool for EQing vocals. You can read the full review here. Or if you're ready, you can buy the Pro-Q3 here (affiliate link).
Overview of Vocal EQ Workflow

When EQing vocals, we like to think of the process in three steps:
- Filter
- Subtractive EQ
- Additive EQ
When we talk about filters, we’re talking about high and low-pass filters. Applying these as necessary is one of the easiest steps to start shaping your vocals.
Next, we go for subtractive EQ, which is getting rid of the unwanted frequencies in your vocal recording. These can be harsh, muddy, or resonant frequencies.
Lastly, we use additive EQ to accentuate the parts of the vocal that we like. For example, we might choose to add some top-end sparkle to get a more expensive vocal sound.
Of course, we recommend using more than just EQ on vocals! To learn exactly how we process our vocals, check out our guide to the best vocal signal chain. Then be sure to check out these vocal reverb tips & tricks for added depth and dimension.

Using Filters on Vocals
The first thing we usually like to do is filter the vocal with a high-pass filter. More often than not, you won’t find any useful information in the vocal recording below 60Hz. Most everything down here is eclectic static, mic stand rumble, or air conditioning. With female vocals you can probably set your filter even higher.
By cutting this out of your vocal, you accentuate mids and highs, create more headroom for your master bus, and allow more room for the instruments that need low-end (i.e. the kick and bass) to have their own spot in the mix.
Use a 12dB per octave filter on vocals, as any steeper filter may end up creating unwanted resonances.
How To Use Subtractive EQ on Vocals

As we said before, subtractive EQ is the process of getting rid of unwanted frequencies in your vocal.
One popular method we often see people talk about online is the sweep and destroy method. The idea here is that take a band on your parametric EQ, narrow your Q value, boost by about 21-15dB, and sweep around the frequency spectrum until you find a sound you don’t like before cutting it out.
While this technique can be incredibly effective, it can also be quite dangerous. Inexperienced engineers often make problems out of nothing. Instead of listening to a vocal, hearing the problem, and looking for a way to fix it, they will just start sweeping because someone told them to.
Unfortunately, there aren’t many vocal frequencies that sound good when boosted by 15dB, so, in reality, you’re creating problems that aren’t there by using this technique automatically.
Start by listening to your raw vocal and ask yourself a few questions.
- Are your vocals harsh?
- Are they boomy?
- Are they muffled?
- Is there a pesky resonance in there that you can’t quite pick out?
Once you determine the problem, you can sweep around in that particular frequency range to fix the problem at hand.
As a compromise, you may wan t to try using a dynamic EQ, like the FabFilter Pro-Q3, that allows you to only cut the offending frequencies when they build up past a certain threshold.


How to Use Additive EQ on Vocals

Additive EQ is for accentuating the things you like about your vocal or giving it the right spice it needs to cut through the mix and fit with the other instruments.
When it comes to using additive EQ on vocals, it’s best to use an analog-style EQ plugin. While your stock EQ can get the job done, it won’t impart any character on your vocals. Plus, the algorithms used by digital EQs are far less musical, and can often create unwanted artifacts if you boost too high.
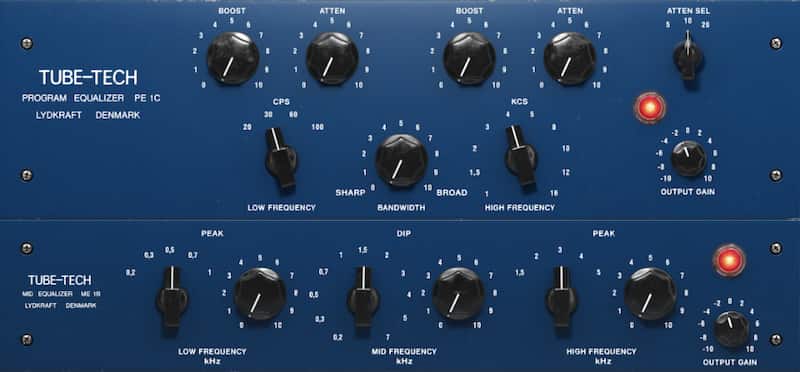
I recommend the TubeTech EQ from SoftTube.
Analog-style EQs are made to sound musical, meaning you can add +10dB of 10kHz to a vocal without it sounding harsh or digitally manipulated. Plus, you can give your vocal that often-desired, warm, analog sound by simply placing an analog EQ plugin on the insert.
Use the same approach that you use with subtractive EQ. Start by asking yourself what your vocals need.
Do they need a bit of top-end because they sound dull?
Do they need a bit of 1-3kHz to cut through the busy mix?
Maybe they need some 100-300Hz because they’re sounding a bit thin?
Sometimes, they won’t need anything at all and that’s okay. Don’t EQ just because you think you have to.
Also, try and stick to wide boosts when working with additive EQ, as they often sound more musical.
How to Use Pultec EQ on Vocals
The Pultec EQ is one of the most sought-after styles of EQ in the industry. The beauty of the Pultec is that it is extremely simple and provides some of the most musical tones out there. When it comes to vocals, engineers will often use the Pultec EQ for adding copious amounts of top-end.
The 10kHz boost knob on the Pultec sounds absolutely incredible and can add the brightness you need without an ounce of harshness. The TubeTech EQ from SoftTube nails the sound of a Pultec EQ and really allows you to add warm, natural tweaks to your vocals.
Advanced Vocal EQ Tip - Using a Dynamic EQ on Vocals
Vocals are dynamic instruments that can change in an instant. For this reason, engineers will often use dynamic EQ, which automatically adjusts the selected parameters according to the changes in the vocal. When it comes to dynamic EQ, the FabFilter Pro-Q3 is first in class.
For example, the singer might have a verse vocal that is soft and breathy and needs a lot of 300Hz to feel full. However, when that vocalist gets to the chorus, they pull up into their chest voice, adding a lot more natural presence and volume. All of the sudden, that 300Hz adds too much mud.
By using a dynamic EQ, you can set your EQ to dip out 300Hz whenever the vocal rises above a certain threshold, similar to a multi-band compressor.
Here is my guide on how to mix with dynamic EQ.
How to EQ Background Vocals

When it comes to EQing any instrument, you need to think of the role it plays. We like to treat background vocals as a single instrument, meaning we process the bus that they’re sent to instead of processing each vocal individually. Most of the time, background vocals are there to support the lead vocal.
The way they offer support is what varies.
Do you have high harmonies atop a low lead vocal melody?
If so, you can probably cut the lows and low-mids out of your background vocals to make room for the lead and boost the highs so that they sit on top.
Maybe you have a female singer singing in her head voice and a low male chant acting as the support. In that case, you can carve out the high mids and highs to make room for the female lead and accentuate the lows.
Most of the time, you can get rid of the low-end on background vocals, filtering up to 100Hz. This is especially true in a busy mix.
If you have tons of stacks, you’ll most often get build-up around 300-600Hz. This build-up is due to room resonances and stacks of fundamentals. If your background vocals lack clarity or sound boxy in any way, think about cutting here.
How to EQ Rap Vocals
In our book, rap vocals need two things:
- Lyrical clarity
- Beef
Rap is all about lyrics. If you can’t understand what the rapper is saying, you’ve lost the listener (of course, mumble rap might be the exception here, but we digress).
If you notice a lack of lyrical clarity, you can boost between 1-3kHz. By boosting in this frequency range, you can add presence without making your vocalist sound harsh or adding unwanted sibilance.
Next, you want to make sure rap vocals have a little bit of beef. By beef, we’re referring to low mid-range. This area, while it may not be desirable in heavily produced pop music, is GREAT for rap.
The low mid-range has a TON of energy and can help your rap vocals sound more aggressive. Plus, a lot of modern hip hop instrumentation is relatively sparse in the midrange, focusing more on the sub frequencies and the high frequencies.
Tread carefully if you decide to add low mid-range, however, and always use wide Q values to avoid creating unnecessary resonances.
Here are some more tips for how to affordably record rap vocals.

How to EQ Male Vocals

Male vocals are much harder to EQ, in our opinion, as the range and timbre can vary widely.
Just think of Johnny Cash vs. Michael Jackson.
However, most of the time, there are a few things you should look at it when EQing male vocals. For starters, you’ll usually find muddy low-end male vocals that you can carve up to help them fit nicely in a busy mix.
Next, many untrained male vocalists often sound harsh when belting. You can usually find problem frequencies around the 1kHz-4kHz area. This harshness might disappear as the singer dips down in his range, which is why dynamic EQ can help a lot in this situation.
Lastly, top-end can be very helpful for male vocals. For modern music, whether it’s pop, rap, country, rock, metal, or indie, adding a touch of top-end (or a whole lot of it) can be helpful. When adding top-end, we recommend using a high shelf above 10kHz and boosting until it starts to sound harsh, then back it off. Analog-style EQs like the TubeTech.
How to EQ Female Vocals
Female vocals have their own set of problems.
For starters, you can usually take that high-pass filter a bit higher when EQing female vocals, as their voices have higher fundamental frequencies. Whereas you might start cutting out useful information above 100Hz when high-passing a male vocal, you can sometimes take female vocal high-pass filters up to 150Hz without noticing a major difference.
When it comes to locating mud in female vocals, the region lies between 200Hz and 300Hz, slightly higher than that of a male vocal.
However, one thing we tend to do with female vocals is ADD a little bit of that good mud back in. Depending on the female vocalist or how her vocals were recorded, they can often come out sounding a bit thin.
By adding a bit of low-mid back in with the TubeTech additive EQ, you can help the vocal get the meat that it needs to sound full and natural.
How to EQ Reverb for Vocals
One thing we ALWAYS recommend doing is checking your reverb sends to see if they need some EQ work. Most often, they do.
In a busy mix, for example, you can cut up to 600Hz with a low-pass filter BEFORE your reverb send. By doing so, you get rid of the muddy build-up that can get in the way of the rest of your mix.
You might also consider using a low-pass filter to push your reverb back a little bit in your mix and get rid of any frequencies masking your vocal. You can checkout this article for more vocal reverb tips & tricks.
For further explanation, we recommend Googling the “Abbey Road Reverb Technique.”
How to EQ Voice for Podcast

When it comes to EQing vocals for a podcast, you typically don’t have to do much. If anything, you can roll off a slight bit of the low-end, though don’t take it as far as you usually would. At the highest, we recommend going to around 80Hz so that you leave in a lot of the low energy and fullness.
Sometimes, depending on the microphone you used to record, you can add a bit of top-end with a high shelf. Or cut just a touch of mud from male vocals between 250-400 hz if the mic/room are particularly boxy.
How to EQ Harsh Vocals
Harshness typically appears in the 1kHz-4kHz range. If your vocal sounds harsh, start by sweeping around this range to see if anything pops out to you. Do this with a very narrow Q. When you find a harsh resonance, pull the EQ back and dip it out.
In this case, it is best to use a very narrow Q so you can get rid of harshness without negatively affecting the other frequencies around that bad frequency, which often add to the overall presence of the vocal.
How to EQ Nasal Vocals
If your vocals sound nasal, you can look between the 800Hz-1kHz range. It’s best to take the same approach that you would take when EQing harsh vocals. By that, we mean using a narrow Q so that you don’t impact surrounding frequencies after taking out nasality.
You might figure out that nasality only appears on certain notes, which is quite common. In that case, we recommend finding the frequency that the nasality is coming from, and using a dynamic EQ so that you cut it only when the singer hits that nasal-sounding note.
Questions?
If you ever have any questions about how to EQ vocals, don't hesitate ask me in the comment section below! I'll reply to you a quick as I can.
Feel free to leave any comments as well if you've got more suggestions!
Vocal EQ Cheat Sheet & Key EQ Frequencies for Voice
As we said before, all vocals are different.
However, after YEARS of EQing and mixing different vocalists, there are some clear constants between most vocalists. Here are some of the key frequency areas you should look at when EQing a vocal and what kinds of sounds they correlate with:
- 0Hz - 100Hz: Unwanted noise (rumble, AC, electrical hum)
- 100Hz - 150Hz: Boomines, fullness, warmth
- 180Hz - 240Hz: Male muddiness
- 200 - 300Hz: Female muddiness
- 300Hz - 800Hz: Boxiness, room resonances
- 800Hz - 1kHz: Lyrical clarity, nasal tone
- 3kHz - 6kHz: Presence, harshness
- 4kHz - 9kHz: Sibilance
- 9kHz - 11kHz: Brightness
- 12kHz: Air
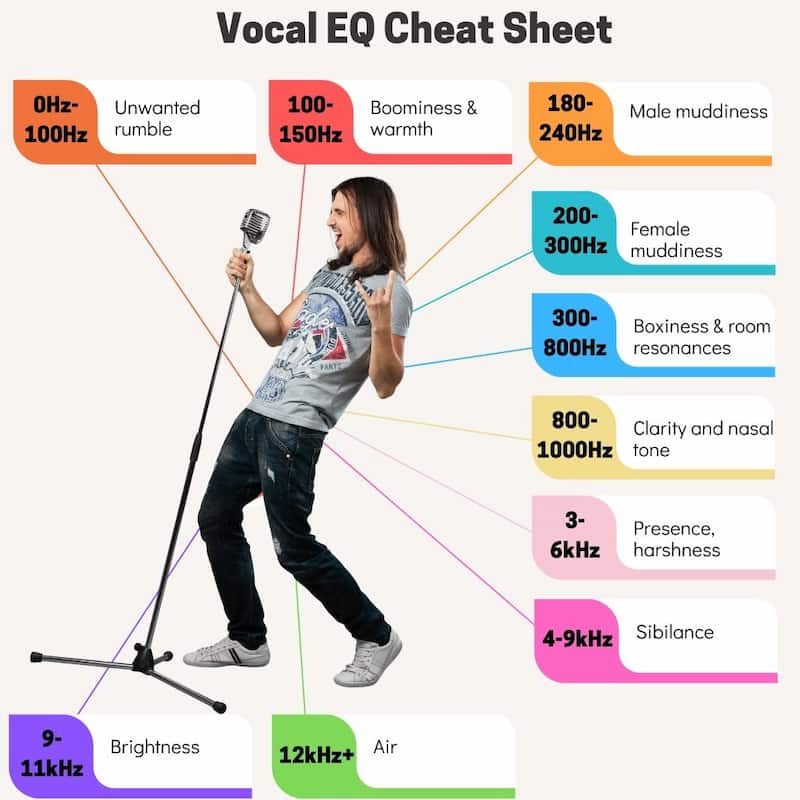
Feel free to download this vocal EQ chart for reference!
It is best to start by looking around 0-80Hz to cut unnecessary frequencies out of the voice, especially if you’re dealing with a busy mix. However, there are cases where these “unnecessary” frequencies can be helpful, such as in a solo acoustic guitar and vocal mix. Even though these low frequencies are hard to hear, they can add a little bit of warmth to your mix.
If your vocal sounds a bit muddy, cut around the 100Hz-300Hz region. On the other hand, if your vocal sound thin, you may consider boosting here.
For presence, boost around the 3kHz-6kHz area, or cut if your vocal sounds harsh.
Lastly, it’s usually a good idea to boost around 10kHz with a high shelf to allow your vocal to rise above the mix and give it a more luxurious sound.
How to use EQ Guides
To help you get the most out of your EQ plugins, we've put together these detailed guides to teach you how to use EQ on some of the most popular instruments.
- How to Mix with EQ
- Tips for EQing piano
- Electric guitar EQ tips
- How to EQ acoustic guitar
- How to EQ bass guitar
- How to EQ drums
- How to EQ vocals
- How to EQ woodwinds
- How to EQ strings
- How to Use Mid-Side EQ
- 3 Powerful Ways to Use Dynamic EQ
- How to EQ Loops
- How to EQ Reverb
- How to EQ Percussion
From a Frustrated Producer in a Ragtag Bedroom Studio to Major Placements on TV Earning $1,000s!
My name is Evan, and I've been making music since around 3rd grade. I'm from San Diego, California, but I've lived in Washington, DC for the last 20 years.
While I still have a full-time day job, I have created systems that have allowed me to produce dozens of songs a year in my spare time.
My songs have been on Netflix, TV shows like the 90 Day Fiance, an award-winning indie film, and NPR’s “All Thing Considered.” They've also been streamed millions of times.
In addition to being a music producer, I am passionate about teaching people how they can make professional-sounding music and earn money licensing it, all in their spare time.
Thousands of musicians, like yourself, have trusted me to guide their musical journey. My YouTube videos have been watched nearly a million times. And my story has been in Forbes, Side Hustle Nation, and the Side Hustle School.


EQ is the most essential tool you have for making music sound clean, clear, and professional. In this book you'll learn how to use the R.O.S.E. System, a simple 4-step EQ formula to help you master the world of EQ
