The Best Mastering Chain Order

If you are in the world of production or mixing in any capacity, then you have probably heard the words “mastering chain” before. The idea of creating a complex mastering chain can feel overwhelming for some, especially when you consider the fact that mastering is the final stamp on a piece of music before it gets released to the public.
Don't worry though - we're here to help!
We understand you're struggling to figure this production skill.
The questions you might have could be:
Are there secrets to developing a “proper” mastering chain, or does it depend on the song?
Are there plugins I should use or plugins I should avoid altogether?
Can I master a song even if I’m not a mastering engineer?
Learn How to Master Your Music, For Free!
Our goal with this article is to show you that mastering isn’t some dark art. Anyone can master a song. However, understanding how different processes within a mastering chain work is vital to get the result you are looking for.
Note: This article may contain affiliate links, meaning I would receive a commission - at no cost to you - for any products you purchase.
What Is Mastering?
While there are many definitions of mastering, we like to think of the mastering process as taking a final audio mix and preparing it for release and distribution. Mastering is sort of like adding the finishing touches to a photograph or adding a bit of garnish to a delicious plate of pasta.
It is that added sheen and shimmer that allows a recording to hold its own against other professional recordings out in the world. With mastering, you can unify the sound of a record, hit the correct standards for distribution, and create consistency throughout a song. But remember that a great master starts with a great mix - so don't skimp on the mixing process!
Why Your Mastering Chain Is So Important
A mastering chain is a series of processing effects that sits on the master bus in a linear fashion. Essentially, each processor element can significantly impact the one before it, which is why the order of a mastering chain is such an important thing to consider. Thinking through the signal chain beforehand will help you to avoid having to compensate with lousy ordering choices later down the line.
Now, as for why the mastering chain is so important to the record, you have to consider that the purpose of mastering is to create a balanced, cohesive, and professional sound that can stand up against other commercial releases.
Making proper EQ, compression, and stereo width moves and adding harmonic flavor like tape saturation can help a mix come together.
Your mastering chain is the last thing that will ever touch the record before it is potentially heard by millions. It is your chance to make the record sound as good as it can sound.
What To Think About For Mastering Chain Order
When it comes to mastering, your goal should be to make the most subtle tweaks possible. If the mix has problems, there is only so much you can do to fix it. This article teaches you the difference audio mixing vs. mastering, so that you can make sure you're mixes are actually ready to be mastered!

There are a couple of stages that I like to separate mastering in, including:
- Clean-up
- Glue
- Enhancement
Cleaning up any problems should be your first goal, as you don’t want to enhance these problems later on in your mastering chain. For example, using a parametric or dynamic EQ as the first thing in your signal chain is pretty standard, as you can use it to get rid of nasty frequency build-ups, harshness, or boominess.
Once you’ve done that, you can move onto the glue portion of the chain. Gluing a record together is the process of using a compressor(s) to put a cohesive layer atop the mix. Again, this compression should be subtle.
Lastly, you want to think about enhancing the mix. Does it need more low or high-end? A boost or two on an analog EQ might be perfect. Does it need a bit more character? Maybe try some tape saturation. Feeling a little narrow? A stereo spreader might do the job.
The Best Mastering Chain
With so many different plugins out there, there are infinite possibilities for mastering chains. What we mean is, there is no such thing as the “Best mastering chain” out there. However, we have compiled a very universal-style mastering chain below that will work for pretty much any record. The most important thing is to put all of these plugins on your master buss and set the master fader to unity (aka "0").
We make some plugin recommendations in this article, but if you're just interested in the gear, we've put together a review of the best mastering plugins.
Do keep in mind that just because these plugins are in your chain does not mean you have to use them. Listen to the mix you are working on and decide what it needs. That's why we've noted which of these steps are optional. They depend on your personal taste. They also depend on your source material.
On the other hand, some of these steps are non-negotiable. For example, you absolutely need to do gain staging and brick wall limiting.
This typical mastering chain adopts a lot of the best bits of an analog mastering chain, while getting all of the benefits of a clean, loud digital mastering plugin chain.
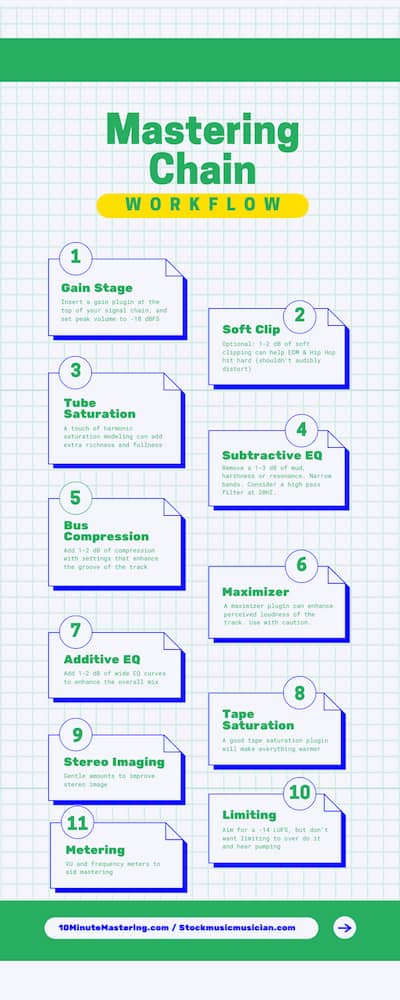
If you're looking to do just a basic mastering chain, just use steps 1, 4, 7, 10, and 11. A basic mastering chain would require gain staging to get the most from your plugins, subtractive EQ to remove harmful frequencies and additive EQ to enhance the mix subtlety.
When using a basic mastering chain, all you'll do from there is limiting/maximizing to get the sound as loud as possible, while monitoring the volume levels throughout. If your a music producer who wants to master with the minimum knowledge, you should check out the AI mastering features on iZotope Ozone is probably the best plugin for basic mastering, as it includes all of the tools you need in an affordable, easy to use package.
Audio Mastering Step 1: Gain Staging
Producers often get confused when the word gain staging is thrown around. However, the process is relatively straightforward. You can think of gain staging as making sure that each point in your signal chain is optimized in terms of volume to maintain a clear, clean sound.
Signals that are too loud in the digital world will clip, giving the mix a nasty distortion that you don’t want. A too quiet signal may bring up unwanted noise, especially if you are using analog-modeled plugins or analog hardware.
Being aware of gain staging and using a gain staging plugin on your mastering chain can help you avoid either of these scenarios.
Audio Mastering Step 2: Tube Saturation (optional)
Tube saturation is one of the most popular forms of analog emulation. If you want to give your mix a classic vibe, then tube saturation is a wonderful choice. When electrons flow through a tube, they run from the cathode to the anode. However, when there is a positive charge between the two and the electrons can no longer flow, tube saturation is created.
Depending on how much the tube is being saturated, you will get both even and odd harmonics, as well as second-order harmonics. Tubes have a full, warm sound with low-frequency accentuation, perfect for a mix that is lacking low end. Just remember, when it comes to mastering plugins, a little bit goes a long way!
Because of this added harmonic distortion, tube saturation can also help mixes translate better to smaller speakers (think cell phones and laptops). Adding tube saturation to your mastering signal chain will help your recording sound great, without adding unwanted harshness that EQ might cause.
Of course, you may be looking for a different level of control or aggression with your saturation. I've put together this review to help you find the best saturation plugins. For best results, I recommend getting one with a high-pass filter so that you can keep your low end intact and saturation free!
Recommended Tube Saturation plugin for mastering

Audio Mastering Step 3: Subtractive EQ
When using subtractive EQ in the mastering stage, you typically want to use a linear phase parametric EQ, as a linear phase parametric EQ allows for more precise editing while retaining transparency.
Mastering engineers will often use subtractive EQ to get rid of rumbly low frequencies to tighten up the low end or tame muddy build-up in the mids. A mix that is too harsh might even benefit from a slight reduction in the high mids.
There are so many great subtractive EQ plugins out there, though we recommend looking for one that has a spectrum analyzer on it, as you’ll have an easier time seeing where problem frequencies lie.
You may also want to consider using a subtractive EQ that features dynamic EQ, like the FabFilter Pro Q-3. The benefit of a dynamic EQ is that it only turns down an unwanted frequency range when there is too much of it, leaving the mix unaffected at other times. This allows you to be more precise in your choices.
Here are the best EQ VST plugins around if you are looking for additional ways to tweak your sound.
Recommended Mastering EQ Plugin for Subtractive EQ

Audio Mastering Step 4: Clipping (optional)
It is often a good idea to make sure that your mix is rather controlled before clipping, as clipping can add some harsh artifacts. However, many people enjoy the sound of clipping, as it allows for a louder, more aggressive master. This can be especially powerful in genres like EDM and Hip Hop.
It is important to be subtle when clipping, as you can annihilate your low-end clarity if you clip too much. If you're going to consider adding clipping to your master, please please please listen closely!
Recommended Clipping Plugin for the Master Bus

Audio Mastering Step 5: Bus Compression (optional)
Using a high-end mastering compressor can help add a slight bit of glue and cohesion to your mix. A bus compressor can thicken up your mix in a natural way by bringing up low-level signals and attaining high ones. Typically, you won’t want to compress more than -3-4 dB on the master bus. You can also use bus compressors to help clean up problem areas.
Dynamic parallel compression can be great too, as you can add heavy compression to your mix to get more sustain and punch before dialing the mix knob back to blend the natural and compressed sound to taste.
You may also choose to go with multiband compression at this point, as you can add different compression amounts across the frequency spectrum, attaining only the frequency ranges that need work. There are a lot of great mastering compressors, each with their own flavor - here are the best VST compressor, including my favorite multiband compressor.
The Best Precision Compressor for Mastering

A lot of the choices you making when applying compression during mastering will also depend on choices made during the mixing process. For example, some people prefer to have a compressor on their master bus while mixing. So they probably would not want to include much compression when mastering.
If you're just looking to add a little bit of warmth and glue to the master, then 1-2dB of gain reduction with an analog style tube compressor is your best bet. You really can't go wrong with the Tubetech as your bus compressor, as it will also add a bit more harmonic saturation and warmth. Here are some of the best bus compressors which all have their own special sauce.
The best analog style bus compressor for mastering

These types of bus compressors are used to help you better control problem spots in the mix. Notice that they occur after the subtractive EQ, so that you don't further magnify unwanted frequencies. It also occurs before additive EQ, so that you don't overwhelm the compressor with the boosted frequency curve.
Audio Mastering Step 6: De-Essing (optional)
If the high frequencies in your mix are sounding a bit overbearing, you may consider using a de-esser. Oftentimes, if the “Ss” in a vocals are still sticking out or the cymbals are sounding a bit too sizzly, a de-esser becomes the perfect tool for the job. With a de-esser, you can turn down any offending frequencies as they appear without having a negative impact on the rest of the frequency spectrum.
Of course, you might be thinking,
I can do the same thing with EQ.
However, if you only want to turn a few frequencies down occasionally, a de-esser is a much more practical choice. Do be careful though, as you don’t want to squeeze the good high end out of the track. This is one of those things that you want to try to fix in the mix, if possible. There's a lot of great de-essing plugins out there to chose from, but with mastering you want to be sure to have a plugin that's really transparent.
The Weiss DEES is the Top Mastering De-esser For Taming Harsh Frequencies

Audio Mastering Step 7: Additive EQ
The additive EQ plugin should be different than your subtractive EQ plugin. Hardware EQ emulations come in handy here, as they can add a bit of color and a pleasant, musical distortion with each boost. Digital EQs can often sound too pristine or non-musical for additive EQ work. The wider curves and fixed frequencies inherent in a plugin modeled after vintage analog EQ hardware makes it hard to find a bad setting.
Having an emulator of a tube EQ as part of your mastering chain will also add just a touch more harmonic richness to your overall sound. We recommend two different analog emulations. The Tubetech EQ if you're interested in subtle warmth. Or the Chandler Limited Curve Bender if you're looking to be a bit more aggressive.
With additive EQ, you should only look to create small boosts for frequencies that need highlighting. We often find that a boost of high shelf EQ can really bring out the feeling of space and air in your mix. You might even consider automating your additive EQ so that you only get that additional high end in the chorus, for example.
The Chandler Limited Curve Bender is the Best Additive EQ for Mastering

Audio Mastering Step 8: Tape Saturation (optional)
Tape saturation is great for creating warmth, as it attenuates the low-end and generates unique even and odd harmonics for added color. There are plugins that create warmth while reproducing high frequencies naturally, however, meaning it comes down to the tape emulation plugin you choose to use. A bad tape plugin really won't help you along.
Another great thing about using tape emulation is that it creates a touch of compression. This helps further glue the mix together, making things sound tighter and more organic.
Tape saturation is great to use at this point, as it can reintroduce any low-end lost during compression and tame any added frequencies during the additive EQ portion of the chain.
There are tons of tape emulation plugins out there, and it's worth experimenting with different options for each song. Here are the best tape emulation plugins.
SofTube's Tape is the Best Tape Saturation Plugin for Mastering

Audio Mastering Step 9: Maximizing (optional)
In modern mastering, engineers are often looking for ways to achieve the highest levels possible. With the option to maximize with so many plugins these days, modern loudness is easily achievable.
Maximizing works in real-time by processing certain parts of an audio signal at one time (ex. low-mids) and using compression or limiting to maximize the level of the signal. Typically, maximizing plugins will use lookahead functions to look at audio peaks and decide whether or not it should turn up the audio.
Maximizers should be used with caution, though if used properly, they can help even out the overall level of a track and provide more volume. Still, if you use the right maximizer, it really can feel like you've just enabled a "cheat code" for maximum volume and clarity.
The Oxford Inflator by Sonnox is the Easiest Way to Add Volume to a Master

Audio Mastering Step 10: Stereo Expansion (optional)
With stereo expansion, you can push the right and left channels out further, expanding your stereo width to help your mix sound more expansive. While width should be dialed in during the mixing phase, a stereo expansion tool can help push a mix slightly further so that it doesn’t sound narrow and amateur.
Typically, a stereo expansion tool will use Haas effect to produce a wider sound. If you aren’t careful to check your mono compatibility, you could end up dealing with phase issues. But we'll talk about metering your masters in a minute.
You're DAW probably includes a stereo expander, which can be ok. But the reason we recommend the stereo imager included with iZotope's Ozone (not the free imager available from iZotope) is because it has multi-band widening.
So that means you could just widen the mid-range frequency while preserving the high and low end.
Or you could just narrow the low end to make it a little tighter.
It also makes for a great plugin to use on individual tracks. My favorite trick is putting the imager on a reverb send effect and really widening the upper mids to enhance the feeling of space! Here are the best stereo imaging VST plugins.
The Stereo Imager Included with iZotope Ozone is Hands Down the Best

Audio Mastering Step 11: Limiting
Limiters might be one of the most important tools in the mastering chain, however, these tools are often misused and misunderstood. While engineers used to slap limiters on their mastering chains and crank them as loud as they would go, those days are long gone. The so-called “loudness wars” are coming to an end as streaming services begin pushing back.
Using a limiter properly means creating balance. You want a mix that is both loud and dynamic. Even though genres like EDM or rock might require more aggressive limiting, the last thing you want to do is completely crush your track and create a lifeless master.
If you've done a good job mixing and setting up your mastering signal chain, then you should be having more than a dB or two of limiting compression, while your master should sound plenty loud. A good limiter is one of the most essential audio mastering tools. It's essentially the last plugin in your audio mastering chain. Every limiter is going to have a slightly different flavor and level of aggression, here are more of my favorite limiter plugins.
The BX Limiter True Peak is the State of the Art Limiter for Amazingly Loud Masters

Of course, the Brainworx True Peak limiter doesn't come cheap. That's why I've put together this review of the best limiter plugins to help musicians of all budgets.
Bonus Audio Mastering Chain Step: Metering
Metering is not there to process your mix, but it is a crucial element in your mastering chain. Meters are used to make sure your mix will translate well when it is played on other systems. Loudness meters, for example, will tell you how loud your track is. Loudness meters are often referred to as LUFS, and different streaming services have different LUFS standards.
For the most part, you will want your track to sit anywhere between -16 and -20 LUFS, according to the AES (Audio Engineering Society).
True peak meters show you whether the loudest parts of your track are too loud or whether or not your song will clip when it converts from digital to analog.
Lastly, we have correlation meters, which will tell you whether or not your track is out of phase. If the correlation meter hits around +1, your song is in phase. If it leans towards -1, your song is out of phase.
One of the reasons we recommend Ozone so highly is that it includes a full suite of tools for mastering, including great metering options. It's a great bundle to use as a beginner, and then gradually slot in high performance plugins as you improve.
That said, if you're looking for a great standalone plugin, you won't be able to beat Levels by Mastering the Mix. It's got so many useful features in a super easy to use interface. Here is my review of the best metering VST plugins to help you find one that works for you.
Best Metering Plugin for Mastering? Levels, by Mastering the Mix

Mastering Chain Plugins vs. Building Your Own Mastering Chain
With the introduction of mastering chain plugins like Izotope, the question of whether or not producers and mix engineers should use pre-made mastering chain plugins or build their own chain with plugins is a popular one.
Mastering chain plugins are excellent tools in many ways. First of all, they provide all the tools one would typically use for mastering in a single plugin, consolidating processing, and keeping the master bus clean. Secondly, these mastering chain plugins come with quality presets to get users started. Mastering chain plugins can teach us a lot about how pros master, though they do have their limitations.
As I noted before, if you're starting from scratch, Ozone by iZotope is really your best bet. It includes everything you need to make great masters, it has an incredible interface, helpful AI features, and tons of presets. Few of the individual modules in Ozone are best-in-class, but they are all a big upgrade from what you find in most DAWs. Over time, it's really easy to use the other plugins recommended here with Ozone to great a custom mastering chain that grows with your skills and budget.
If you’re someone who has come to enjoy the sound of a particular type of tape saturation or analog compression that a mastering chain plugin doesn’t give you access to, you may have to make a substitution.
There's no Doubt: Ozone is the Most Powerful One-Stop Mastering Chain Plugin

Is Your Mastering Chain Genre Dependent?
You might be wondering whether a mastering chain for hip hop should be different than a mastering chain for jazz, for example. I don’t believe so, as it depends on how you process the signal in each step.
A hip hop, rock, EDM, or metal track, for example, might require heavier processing compared to a jazz or folk track. You would probably end up using heavier bus compression and bolder EQ moves, as a natural sound isn’t as much of a concern.
Using Reference Tracks When Mastering
Using references is a wonderful way to make sure that your mixes sound comparable to commercial releases. Think of a reference track as a guide. For example, if you’re mastering a hip-hop song, you might use a Drake track as a reference. How is your tonal balance compared to the Drake reference? How’s your stereo width? Could your track use a bit more compression?
A reference track shouldn’t stifle your creativity or put a kink in your flow, though it can act as an anchor if you’re ever unsure about a move you’re making.
Mastering Chain FAQ
These are some of the most common questions we get from folks about building a mastering chain. If you've got any that haven't been addressed, please leave it in the comments section below and we'll respond!
Can I Use Mid/Side Processing When Mastering?
Absolutely! Mid/side processing allows us to affect the middle and side channels independently. Applying different EQ and compression settings to both could be incredibly beneficial. Just be careful that you maintain the stereo field.
For example, you could want to accentuate the high frequencies on the side while tightening things up and adding some sub in the middle. Mid/side processing is a pro technique and provides endless possibilities.
Can I Use Reverb When Mastering?
Using reverb on the master bus can be very destructive, as you impact the entire mix rather than individual parts that need to be pushed back in the soundstage. Using reverb on an entire mix doesn’t create depth, as it takes an entire mix and pushes it back to the same spot. Essentially, you aren’t creating soundstage separation like you would in the mix phase if you sent certain instruments into reverb and kept others dry.
To avoid washiness, loss of impact, and phase problems, it’s best to avoid master bus reverb altogether.
Can I just use AI mastering?
Not really. At least not in 2021. I've reviewed a couple of the most popular AI mastering services (including demos), and I just don't think they sound good enough. You can read my Bandlab Mastering Review here, and my Landr mastering review here.
Can I just use stock plugins?
Not really. Mastering is one of the places where the quality of the plugins really starts to mater, because they affect the entire mix. While knowing what you're doing is essential (which is why you should register for this free audio mastering workshop), you're only going to get so far with stock plugins.
Other Helpful Mastering Articles
From a Frustrated Producer in a Ragtag Bedroom Studio to Major Placements on TV Earning $1,000s!
My name is Evan, and I've been making music since around 3rd grade. I'm from San Diego, California, but I've lived in Washington, DC for the last 20 years.
While I still have a full-time day job, I have created systems that have allowed me to produce dozens of songs a year in my spare time.
My songs have been on Netflix, TV shows like the 90 Day Fiance, an award-winning indie film, and NPR’s “All Thing Considered.” They've also been streamed millions of times.
In addition to being a music producer, I am passionate about teaching people how they can make professional-sounding music and earn money licensing it, all in their spare time.
Thousands of musicians, like yourself, have trusted me to guide their musical journey. My YouTube videos have been watched nearly a million times. And my story has been in Forbes, Side Hustle Nation, and the Side Hustle School.


EQ is the most essential tool you have for making music sound clean, clear, and professional. In this book you'll learn how to use the R.O.S.E. System, a simple 4-step EQ formula to help you master the world of EQ
