Best Bus Compressor Plugin & Master Bus Compression Settings

Bus compression is one of the most important tools for mixing your music.
For those who aren’t aware, bus compression is the act of utilizing a compressor on the a group of tracks, or on the master bus or master output to create a more cohesive and uniform sound overall. We often use bus compression to create a unified timbre for the entire mix.
While bus compression hasn’t always been a very popular form of compression, it is becoming more and more popular in the digital age of processing. The reason for its popularity is the ease of implementation.
While bus compression makes use of a compressor, the effect that mix engineers seek to achieve with bus compression is much different than regular compression.
When we use a compressor on a single track, the settings are often much more aggressive.
When used on the master bus, however, we typically use very subtle settings so that there are not any noticeable artifacts or compression byproducts. This helps add groove and "glue."
Beyond controlling dynamics, bus compression helps the small, quiet details in a mix stand out better by bringing low-level signals up. Of course, bus compression used improperly can absolutely destroy a good mix.
If you’re looking to learn more about how to implement bus compression in your mixes, continue reading below! And read this article to learn how to use a compressor. This article will explain the different types of compressors - from FET compressors to Optical compressors and beyond.
Note: This article may contain affiliate links, meaning I would receive a commission - at no cost to you - for any products you purchase.
Mixing Using Buses
A bus is a path in your DAW that you can use to route multiple signals to a single destination. These destinations might include aux sends, a stereo mix, or individual instrument groups.
Typically, all drums are routed to a single drum bus, or all of the instruments in a mix will be routed to a stereo master bus.
Other common bus groups including sending all of the backing vocals to a single bus, or all of the guitar takes.
Busses can be used to process multiple instruments at once, creating cohesion and lowering your CPU usage, as you won’t have to use as many plugins to achieve your desired goal.
But there's more to recommend bus compression than simply saving processing power! With the write bus compression settings, it becomes one of the most popular forms of bus processing, as it helps to glue multiple things together. While you might use channel compression to deal with a single vocal or guitar, you might choose to use bus compression to process a set of background vocals, drums, a horn section, etc.
How To Use A Compressor On Busses to Create Glue Compression
As modern producers and mix engineers, we often have tracks that we’re working with that were recorded or sampled from different places. It is often the job of a mix engineer to make sure those tracks all sound like one cohesive unit. There are many ways in which we can achieve this so-called “glue,” including saturation or room reverbs, though bus compression is a wonderful place to start.
However, don't make this mistake when using bus compression or you'll choke your mix.
Using bus compression creates glue in many ways. For starters, it allows your mix to breathe and move as a single unit. It also helps to bring out the quieter elements in a mix, which creates a sense of sonic depth. With bus compression dialed in correctly, you can raise the RMS levels and smooth out your transient peaks.
If you think back to the old days of analog, mix engineers had the ability to push their mix levels into the red without having to worry about the harshness of digital clipping. In return, the console would impart a wonderfully musical type of saturation on a mix, creating a pleasing sense of cohesiveness and compression.
While we aren’t able to push our mixes into the red in a digital format, we can absolutely use bus compression to get a similar sound. Here is our review of the best compressor VSTs.
How to Use Bus Compression
To help you better understand some of the many was bus compression can help, we put together guides on the best bus compression uses and compressor settings.
Using Drum Bus Compression
While there are many ways to make use of drum bus compression, we will discuss how people use it in its simplest and most basic form. For starters, you must route all of your drum tracks to a single bus in your DAW. How you do this completely depends on your DAW, as the process is slightly different.
You will use this drum bus to process all of your drum tracks at the same time. Once they are routed, inset a compressor onto the bus (this is in addition to any compression you may have on individual drums, like snares and kicks).
When dialing in your drum bus compressor settings, it is best to avoid short attacks and long releases, as they will reduce your drum transients too much, squashing your sound. Consider your kick, snare, toms, and hats, all of which have very fast transients. You want to be sure to preserve the percussive nature of your drums with a slow attack (at least 30ms).
The same thing goes for your release setting. If you have too long of a release, your compressor will latch onto your signal for too long, catching other transients in the process. However, if your release is too fast, you'll be able to noticeably hear the compressor turn the volume up and down. That pumping sound is not what you're going for with this technique.
As noted, your drum bus compressor's attack and release settings are extremely important when it comes to your drum bus compression. It is often recommended to use a slow attack and a fast release, though avoid moving your release below 20ms, as this could cause unwanted distortion on low-end frequencies.
It is also a good idea to make this type of compression very subtle. Typically, you should aim to compress between 2dB and 4dB, though if the individual tracks were already compressed, you might consider even less gain reduction.
If you have a knee setting on your compressor, you might consider setting it to a soft-knee or moderate-knee to create more gradual, natural-sounding compression.
Best Drum Compressor Plugin For Aggressive Drums: Empirical Labs Mike-E Compressor
The Empirical Labs Mike-E Compressor is a wonderfully aggressive preamp and compressor filled with crunchy distortion, an ELI Distressor-based form of compression, and a soft-clipping circuit saturator.
The plugin delivers ultra-versatile coloring that provides users with the best characteristics found in vintage analog recording equipment. If you’re looking for punchy and beefy drums, look no further. Not only can you use this particular plugin as a traditional compressor, but it also shines as a transient shaper, decay shaper, and saturator. There are tons of unique features onboard to mess around with.
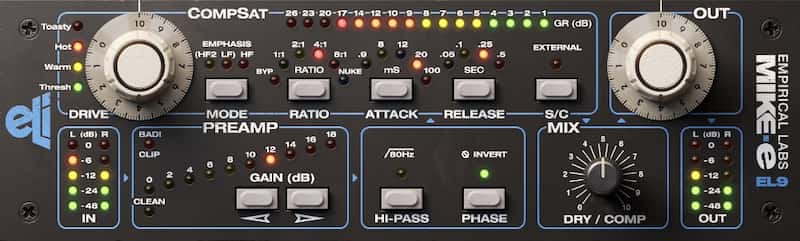
The preamp section has been modeled to emulate the original piece of hardware. It makes use of unique stepped gain control, allowing you to push the CompSat section hard to get more saturation and compression. With the large, white knobs, the compressor is very easy to use.
One of our favorite tricks with the Empirical Labs Mike-E Compressor is the NUKE mode, which acts like a very steep limiter. When in NUKE mode, you can use different attack and release shapes to completely smash your drum room mics and make them larger than life. Then use the wet/dry knob to allow mostly the unprocessed signal through. You'l preserve your dynamics while getting a ton of character.

Best Drum Compressor Plugin For Warm Drums: Comp VCA-65
The original DBA 165A was unlike any other compressor that came before, when it was released decades ago. Instead of using a vacuum tube, which could be found on most compressors during the time, it used a solid-state VCA paired with innovative RMS dynamics detection. This sound can be heard on countless recordings and is still used extensively today.
With Arturia’s advanced TAE modeling, the company has recreated and upgraded the DBX 160 to create the Comp VCA-65. From the “over easy” knee to the peakstop crunch, every quirk and characteristic from the classic hardware is here. Of course, as with most any great emulation plugin, you also get a ton of updated features.

You can enjoy a manual mode for your sidechain, triggering it only when you need it to see how it reacts. There is also a handy “Time Warp” function, which allows you to take advantage of placing your compression envelope as it engages with the attack and release.
While many used the Comp VCA-65 to add crunch and attitude to their drums, it also provides a unique sense of warmth that you can’t get anywhere else. Plus, you can use the parallel compression knob to dial in the amount that you need, giving you the best of both worlds when using ultra-heavy compression.
How To Use Master Bus Compression
There are many ways to use a mix bus compressor, though most importantly, we are looking for glue and control. Glue, as talked about earlier, is the way in which your tracks gel together to become one cohesive unit. Control is the idea of controlling both the dynamic range and tonal characteristics. You can be bolder with your fader moves and help different sections of the song flow into one another with mix bus compression.
When using mix bus compression, most mix engineers will tell you to keep it subtle. Of course, you might be wondering,
How much is “subtle?”
Master Bus Compression Settings
For starters, it is best to set your ratios pretty low. We recommend 1:5:1 or 2:1. You can move up to 4:1 if your mix is begging for that “processed” tone, though typically, having a low ratio is preferred, as it allows for a more dynamic and transparent mix.
You also want to make sure that your compressor is able to recover between beats. Essentially, it should not be clamping down all the time. You should also try starting with a slower attack. Anywhere from 50ms to 100ms should do the trick. A fast release is also a good place to start. Anywhere from 0.2ms to 1.0 ms is solid. The exact numbers you choose aren’t as important, but just listen to what happens when you take the opposite approach with attack and release, and you’ll see why we choose to start with subtler settings. If your compressor includes an "auto" release feature, it's often a good place to start!
To get the settings right, we like to crank up the compressor threshold to cause a lot of gain reduction. Then we adjust the attack and release settings until they make the volume groove organically with beat.
From there, you'll turn down the threshold to get your final master bus compression settings. When it comes to how much you should compress, we recommend trying to hit 1dB or 2dB on your mix bus. Of course, these are simply guidelines you should start with, especially if you are new to mix bus compression and you are having a difficult time hearing what your compression is doing.
At that point, you can add a couple of dB of make-up gain and you're good to go. Remember, there's no need to overthink this!
Best SSL G Bus Compressor - Waves SSL G-Master
The SSL Bus Compressor has long been the gold standard for mix bus compression. Most professional mix engineers would agree that it's the best master bus compressor. Waves modeled the famous hardware unit to provide users with stunning detail and accuracy.
This plugin is fully endorsed by Solid State Logic, meaning you know that you’re getting the real deal. When it comes to power, cohesion, and drive, the G Bus is one of the best compressors around.
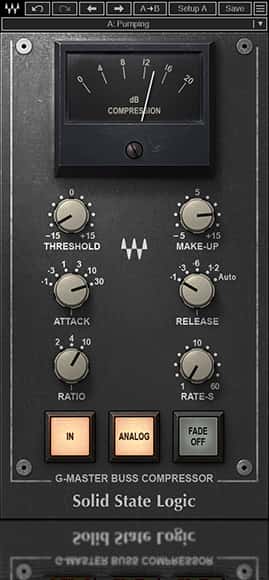
There are plenty of high-quality presets to get you started, many of which come from top-of-the-line producers and mix engineers, including Chris Lord-Alge.
As with the older console unit, the SSL 4000 G Bus plugin comes with the Auto Fade feature. With the Auto Fade feature, you can get that signature SSL fade taper, which lasts up to 60 seconds, and is often a great place to start dialing in your compression settings.
Overall, this compressor is one of the most renowned for mix bus compression and a must-have in any mix engineer’s toolkit.
Best Mix Bus Compressor - Comp Diode 609
The Comp Diode-609 is a re-engineered software emulation of the Neve 33609 Diode Compressor and Limiter unit, which has become a legendary piece of hardware thanks to its smooth, warm, and versatile response.
To be honest, this style of compression is what we ofter prefer on our mix bus. It just adds a beefy fatness that is lacking with the SSL. At the same time, the 33609 is NOT transparent. It will definitely color your sound!
No matter what kind of music you make, this compressor is another gold standard. From Coldplay to Daft Punk to Michael Buble, the Comp Diode 609 has been used on plenty of big-time records. The response it has is unmistakably creamy and Arturia nailed its sonic flexibility and unique characteristics.

As with most plugin emulation, you’ll find a few modern upgrades on the Comp Diode 609. With built-in sidechain EQ controls and mid-side processing, you have greater flexibility to suit the needs of your mix. All the while, you get the revered sound of the Neve, which has become somewhat of a cornerstone sound in the realm of engineering.
Whether you want to use crunchy limiting to tighten and liven up your mix, stereo processing to narrow or widen your stereo field, advanced sidechaining to protect your low-end or get rid of annoying sibilance, or mid-sid processing to process the middle and sides of your mix independently, the Comp Diode allows you to do so.
Best Bus Compressor (Most Versatile) - Arturia Bus FORCE
While the above compressors are great for those seeking out a particular sound, the Arturia Bus FORCE is a great plugin for anyone seeking out versatility. The FORCE plugin not only comes with built-in compression, but you’ll also find EQ, filtering, saturation, and custom routing. Overall, it’s more of a sonic enhancer toolkit.
With this unique plugin, you can incorporate the sound of many different pieces of outboard gear into your mix, using them full-on or in parallel. The beauty is that you can use this plugin to impart flavor to your mix or tweak it ever so delicately to get transparent compression.

Use the classic filter module to tighten up your low end or fix harshness in the high end. Use the compression module, which is a proprietary VCA compressor, to smooth out your mix or make it sound more explosive. With handy sidechain controls, you can attack certain frequencies in detail.
On top of all that, you have a Pultec-style Equalizer module with broad, musical curves, as well as a saturation module with intuitive sound shaping and four types of saturation to choose from. There are so many paths to take with the Arturia Brute FORCE, which is why we love it so much.
Best Bus Compressor (Best Value) - JST Bus Glue Bundle
The Bus Glue Bundle series from Joey Sturgis Tones is a budget-friendly bundle of bus compressors, providing users with a wide variety of “flavors” to choose from. The great thing about this bundle is that all of the compressors are very detailed, allowing you to use fewer plugins and achieve all of the same results that you would typically only be able to achieve with stacking. It also makes organizing your sessions a lot easier.
While the bundle provides you with compressors for drums, guitars, vocals, keys, and bass, the bundle’s mix bus compressor is the knight in shining armor. With a workhorse-like characteristic, you can choose from a variety of flavors and attributes for your mix. Whether it is punch, glue, or both that you seek, you can find it with the BG Mix plugin.

The controls are very simple to use, too, making it the perfect choice for those new to mixing and producing. Start by turning the dial between the different compression modes, which include Careful, Lively, Bold, and Fearless. The attack and release controls are automatic, changing to give you the best sound as you dial in the desired amount of compression.
With such a low price and more versatility than you could expect to find in any other compression bundle, the JST Glue Bundle is where it’s at for value-minded producers and engineers!
Learn more about Mixing with Compression
This is only one part of mixing with compression! Luckily, I've put together a bunch more articles to help you master this crucial mixing skill!
- How to Use a Compressor: Learn to Mix with Compression Quickly!
- Sidechain Compression Explained for Beginners & Key Settings
- 3 Tips for Using a Sidechain Compressor to Add Punch & Clarity
- Multi-band Compression Tutorial for Great Vocals, Drums & More!
- How to Use Mid-Side Compression for Amazing Recordings!
- How to Use Parallel Compression for Powerfully Punchy Mixes
- Should You Compress Reverb? The Real Answer Finally Revealed.
- The 5 Types of Compressors (And Exactly When To Use Each)
- 10 Vocal Compression Mixing Tips (Including Best Settings)
- 9 Powerful Drum Compression Techniques for Punchy Pro Mixes
- Loud, Punchy Kick Drums with these Compression Settings
- How to Compress Snare - Use *These* Settings Punchy Snares
- Exactly How to Compress Bass for Tight Low End Thump!
- How Compress Acoustic Guitar Perfectly, Every time
- How to Compress Synthesizers: Best Compressor Settings for Synths
- How to Compress Organ: 4 Steps to a Great Mix!
- How to Compress Percussion: Compression Settings for Everything
- How to Compress Strings: 8 Magic Settings You Need to Know
From a Frustrated Producer in a Ragtag Bedroom Studio to Major Placements on TV Earning $1,000s!
My name is Evan, and I've been making music since around 3rd grade. I'm from San Diego, California, but I've lived in Washington, DC for the last 20 years.
While I still have a full-time day job, I have created systems that have allowed me to produce dozens of songs a year in my spare time.
My songs have been on Netflix, TV shows like the 90 Day Fiance, an award-winning indie film, and NPR’s “All Thing Considered.” They've also been streamed millions of times.
In addition to being a music producer, I am passionate about teaching people how they can make professional-sounding music and earn money licensing it, all in their spare time.
Thousands of musicians, like yourself, have trusted me to guide their musical journey. My YouTube videos have been watched nearly a million times. And my story has been in Forbes, Side Hustle Nation, and the Side Hustle School.


EQ is the most essential tool you have for making music sound clean, clear, and professional. In this book you'll learn how to use the R.O.S.E. System, a simple 4-step EQ formula to help you master the world of EQ
