How to Compress Bass

Your bass should act as a strong, solid foundation for the rest of your mix. If it doesn’t provide a solid foundation, then your mix will sound weak and thin.
One way to get a strong foundation for yo bass is learning how to compress it properly. In most modern mixes, the bass has compression. There’s no way around it. Of course, there’s nothing that destroys a mix more than poorly-implemented compression.
Today, we’re going to dive in and show you some simple techniques to get radio-ready bass compression and create more professional sounding mixes.
Note: This article may contain affiliate links, meaning I would receive a commission - at no cost to you - for any products you purchase.
What Compression On Bass Does
If a song does not have a solid, steady low-end, then it will lack energy. If you want your track to create excitement and energy in your listeners, you need to build a firm foundation. Compression is the tool that helps us keep our bottom end consistent. For example, if you listen to track from the 60's, you'll often loose the bass in the mix due to a lack of compression.
If you don’t compress your bass, some notes will sound loud while others die out quickly, creating noticeable and unwanted dynamic changes in your foundation. On the other hand, dialing in the right amount of compression for your bass can create the fullness and strength you’re after.
Beyond that, compression can provide unique tonal qualities that you can’t achieve with simple volume balancing tools. Click here to see our review of the best compressor VSTs.
Is Compression Necessary for Bass?
While most modern mixes use compression on bass, there are many lighter genres that don’t require compression. For example, if you listen to classical, folk, or jazz, you’ll probably notice far more dynamics than you would in pop, rock, or electronic songs. Lighter genres tend to call for a more natural sound.
How To Use a Bass Compressor
To use a bass compressor, you can place it as an insert on your bass track in your DAW. I usually like to start with a ratio between 3:1-4:1, a slow attack (100ms is a good starting point), and a very fast release (25m or less).
From here, you can begin decreasing the threshold until you get the right amount of gain reduction to even out the peaks in your bass track. Sometimes you’ll only need 3dB of compression, while other times you’ll need 10dB. It all depends on the dynamic character of the bass recording.
We’ll go over specific settings for electric and synth bass later in the article.
Where to Place the Compressor In Your Bass Signal Chain?
It’s a good idea to place your compressor early on in your signal. However, I often like to place it after the subtractive EQ that I used to get rid of unnecessary sub frequencies and unwanted mud. Compressors tend to react heavily to sub frequencies, which is why it’s a good idea to get them out of the way before compressing. Check out this article to learn how to EQ bass.
Steps Before Adding Compression to Bass
Before you put any compression on your bass, be sure to take these steps to ensure that the compressor works optimally. This will result in a much more musical bass compression, and usually allowed you to retain a more dynamic sound.
Clip Gain / Volume Automation
Before compressing, it’s a good idea to even out your bass levels using automation and clip gain adjustments. In doing so, your compression will sound much more natural, as it won’t have to deal with massive spikes in volume that only come around every so often in the track.
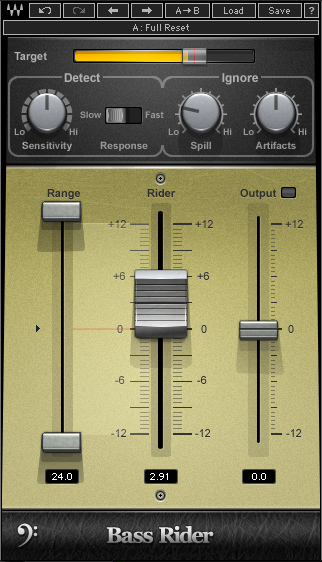
For well balanced bass, we recommend the super-affordable Waves Bass Rider to quickly dial in a consistent bass volume for the compressor.
Transient Shaping
If you know right off the bat that you want to enhance the transients on your bass to make it punchier or dull the transients on your bass to make it softer, you should do so before going into your compressor. We've put together this review of the best transient shapers here. If you want to skip to the chase, though, this is our favorite transient shaper for bass.
Subtractive EQ
Using subtractive EQ to sculpt the tone of your bass and get rid of any unwanted frequencies is a great way to make sure your compressor isn’t working overtime for no reason. In doing so, you’ll be able to compress only the frequencies you want to keep around.
Using a Compressor for Louder Bass
Compression works by bringing down the loud portions of a signal so that they sit evenly with the rest of the signal. In turn, it almost feels as if the quieter parts of the signal increase in volume, which can make your bass sound louder overall. In many ways, this is perceived loudness.
Because you have a more solid foundation when your bass is compressed, it can sit better and louder in your mix without peaking and spilling over.
Compression Settings for Electric Bass
When setting your ratio, it’s standard to start between 3:1 and 4:1 when compressing bass. It’s a good idea to pull your threshold down so you’re getting tons of compression, then flipping through the ratios and listening closely to how each one impacts the sound. When you hear one that sounds good, stick with it.
Next, you’ll want to adjust the attack, which is one of the most important variables in bass compression. The attack is how fast the compressor engages when the signal crosses its threshold. You’ll often want a slower attack so the initial thump or transient of the bass can pop through. If your attack is too fast, you’ll squash your transient, leaving your bass sounding over-compressed and lifeless.
After that, you can adjust your release. The release time depends on your song and your bass part. A short release allows the sustained portion of a note to return back to normal, while a fast release adds more sustain. Generally, faster releases work better for faster bass parts, while slower releases work better for slower, sustained bass parts.
If you have the choice between a hard and soft knee with your particular compressor, I recommend starting with a soft knee, as it’ll give your bass a much smoother sound.
Compressor Settings for Slap Bass
When compressing slap bass, it’s important to make sure you have a slow attack to allow the transients to pop through. You may also want to set your threshold so that it doesn’t clamp down when the slapped notes hit, helping accentuate the rhythm of the bassist. With slap bass compression, it may also be advisable to use a higher ratio because the transients can be so extreme.
Heck, you may want to chain two compressors back to back to help smooth out the bass more transparently.
How Do You Compress a Bass Synth?
Bass synths usually don’t need as much compression as bass guitars, though if you notice that yours needs compression, you can follow the same settings you used on your bass. However, note that synth basses come in a wide variety. A plucky, funk-style synth bass may benefit from electric bass-style compression, though deep sub-bass may need completely different settings if you don’t want to suck the life and low-end out of your tone.
Using Sidechain Compression on Synth Bass
When it comes to bass synths (here's our favorite bass synth VSTs), you're more likely to need side chain compression. How you set up side chain compression really depends on your DAW, but you'll often want to start with 6 dB of gain reduction on the bass, triggered by the kick. I usually like a fast attack so the effect is really apparent, then try to time the release to be fast enough that the bass still feels full.
Best Bass Compressor Plugin - Arturia FET 76
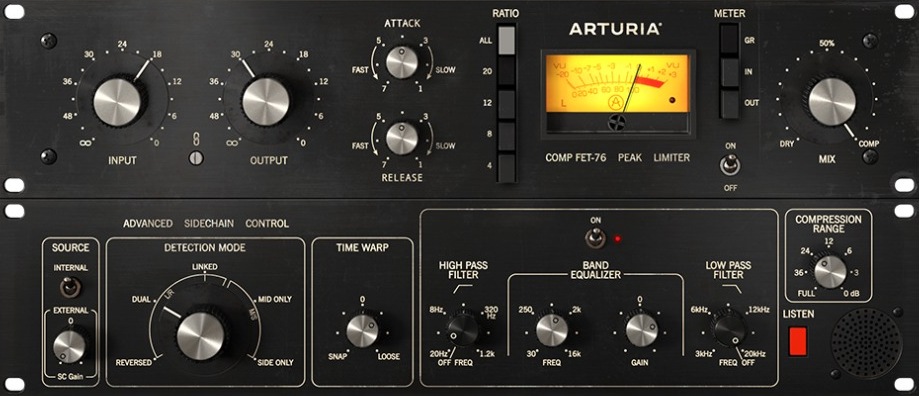
The Arturia FET 76 is Arturia’s emulation of the classic Univeral Audio analog 1176 compressor. The beauty of this plugin is that it’s very simple to use, giving you four knobs, including Attack, Release, Input, and Output.
Bass players everywhere use 1176-style plugins like this to add color to their bass tracks while enhancing the transients. The ultra-fast FET gain reduction technology is perfect for taming the most dynamic bass parts imaginable (learn how to use the 6 styles of compressors here).
Best Bass Compressor Pedal - MXR Bass Compressor
The MXR Bass Compressor is one of the most transparent bass compression pedals around, perfect for creating tight low-end, and studio-quality sound. You get total control over the functionality of your compression, thanks to the five controls: Attack, Release, Ratio, Input, and Output.
The lights on top function as a gain reduction meter, giving you a visual sense of how hard the compression is working. Plus, the robust design makes it perfect for gigging and touring.
Learn more about Mixing with Compression
This is only one part of mixing with compression! Luckily, I've put together a bunch more articles to help you master this crucial mixing skill!
- How to Use a Compressor: Learn to Mix with Compression Quickly!
- Sidechain Compression Explained for Beginners & Key Settings
- 3 Tips for Using a Sidechain Compressor to Add Punch & Clarity
- Multi-band Compression Tutorial for Great Vocals, Drums & More!
- How to Use Mid-Side Compression for Amazing Recordings!
- How to Use Parallel Compression for Powerfully Punchy Mixes
- Should You Compress Reverb? The Real Answer Finally Revealed.
- The 5 Types of Compressors (And Exactly When To Use Each)
- 10 Vocal Compression Mixing Tips (Including Best Settings)
- 9 Powerful Drum Compression Techniques for Punchy Pro Mixes
- Loud, Punchy Kick Drums with these Compression Settings
- How to Compress Snare - Use *These* Settings Punchy Snares
- Exactly How to Compress Bass for Tight Low End Thump!
- How Compress Acoustic Guitar Perfectly, Every time
- How to Compress Synthesizers: Best Compressor Settings for Synths
- How to Compress Organ: 4 Steps to a Great Mix!
- How to Compress Percussion: Compression Settings for Everything
- How to Compress Strings: 8 Magic Settings You Need to Know
From a Frustrated Producer in a Ragtag Bedroom Studio to Major Placements on TV Earning $1,000s!
My name is Evan, and I've been making music since around 3rd grade. I'm from San Diego, California, but I've lived in Washington, DC for the last 20 years.
While I still have a full-time day job, I have created systems that have allowed me to produce dozens of songs a year in my spare time.
My songs have been on Netflix, TV shows like the 90 Day Fiance, an award-winning indie film, and NPR’s “All Thing Considered.” They've also been streamed millions of times.
In addition to being a music producer, I am passionate about teaching people how they can make professional-sounding music and earn money licensing it, all in their spare time.
Thousands of musicians, like yourself, have trusted me to guide their musical journey. My YouTube videos have been watched nearly a million times. And my story has been in Forbes, Side Hustle Nation, and the Side Hustle School.


