How to Use a Compressor
Audio compression is a confusing and mysterious subject for many new audio engineers. In this in-depth guide, we’re going to break down hot to use a compressor so that you can feel more comfortable with one of the most popular mixing tools.
While the overarching subject of compression might make it seem confusing, we’re going to break it down into five easy-to-digest parameters so that the process of learning to compress won’t feel nearly as scary.
However, before we dive in and get to know the various controls found on compressors, we want to make sure you understand what compression is.
Note: This article may contain affiliate links, meaning I would receive a commission - at no cost to you - for any products you purchase.
Compression Explained
Compression is a tool that we use in mixing to massage the dynamic ranges of our tracks so that they are crisp, clear, and more comfortable to listen to. Dynamics are one of the most fundamental aspects of music, which is why it is so important to have control over them.
Overall, what is important for you to understand is that compressors are made to reduce the overall dynamic range. When we say dynamic range, we mean the level between the loudest and softest sounds in your track.
Compressors tend to focus on the loudest (or most dynamic) portion of a sound. By changing the volume of the compressed portion of a sound to the uncompressed portion of the sound, we can radically adjust the energy, tone, and groove of a recording.
There are many types of compressors out there, which we’ll get into in a minute. However, it is essential to note that different compressors have different strong suits or impart unique colors on audio, which is why getting to know specific compressors is incredibly important.
You can think of compression as consistent volume automation. Think of it this way. Imagine that you have a vocal track with a whisper and a scream that happen simultaneously. In real life, hearing those two things simultaneously would probably be distracting and quite terrifying. A compressor could attenuate (reduce) the scream and bring up the whisper so that both of them were around the same volume level.
It's important to understand that one of the key functions of a compressor is how quickly it reduces the volume of the loudest portion. This will affect how much of the initial loud signal makes it through. Similarly, it's important to pay attention how quickly the compressor returns the sound to its regular volume. Too slowly and only the the initial sound may be apparent. Too quickly and the pumping of the volume changes may be annoying. This article will explain the different types of compressors - from FET compressors to Optical compressors and beyond.
Types of Compression
The biggest mistake we see beginners and intermediate students make is using compression just for the sake of using compression. You'll get much better results if you use compression with intentionality.
We've put together this section to suggest the different ways you can consider using compression. In our view, there are four principle uses for compression, explained in more detail below:
- Glue compression
- Controlling volume
- Controlling transients
- Tone shaping
For example, do you instruments not sound like they're grooving together? Add some glue compression!
Does your bass track have loud spikes? Try using compression to control volume instead! If you're looking for a round up of all the best compressors out there, we've already written a review of the best compressor VSTs!
Glue Compression
With glue compression, you can tighten up multiple elements in a mix to make them sit together better. Think about it this way: let's say you send a drum kit and a bass to a glue compressor. The loudest parts (usually the kick drum) will cause the compressor to kick in, turning the bass and drums down just a touch. This adds a subtle groove to the recording, as if two players were in the same room together playing.
Glue compression is one of the softest forms of compression and is excellent for bus processing. You might decide to put a compressor on your drum bus to glue your individual drum elements together to create one, cohesive kit. You may also consider using a glue compressor on your master bus so that all of the elements in your mix sit together nicely. If you're looking for more of great bus compressors and bus compressor settings, check out this article.
The Pulsar Mu is one of our favorite glue compressors. It's a slower compressor, so it easily adds just the right amount of groove to a track, while imparting a touch of color. On top of that, it's got a really powerful input section that allows you to more precisely shape what the glue compressor is responding to (i.e. is it triggered by the kick or the snare).

The Pulsar Mu has over 700 five star reviews - see why!
Volume Smoothing
Music is very dynamic, which is a good thing for the most part. However, dynamics can sometimes get out of control. A singer could go from loud to soft over the course of a single phrase, becoming difficult to hear when the music is dense or popping out way too far during quieter passages. A kick drum, snare drum, or bass usually requires dynamic consistency throughout a song to provide a foundation.
With this type of compression, we can even out inconsistencies in volume to make our tracks much more listenable. When it comes to volume smoothing, with compressors, it's often best to use 2 compressors together. That way neither has to work as hard, and both will sound more transparent.
A classic combination is to first use an 1176 style compressor for its speed to shave off the fastest loud bits. Then follow it up with an LA2A style compressor to maintain a more constant volume.
Controlling Transients
Transients are often the loudest part of the rest of your waveform, meaning a compressor will often recognize a transient more than any other part of the signal. Think of a transient as the initial, high-energy moment in your signal. A transient provides our brains with most of the information regarding sound characteristics and quality. One of the best examples of a transient is a cracking snare. The initial hit of the snare is the peak, otherwise known as the transient. The peak energy will then taper off depending on how loose or tight the snare is.
You can use certain controls on a compressor, such as the attack and release, to control transients. Let’s say that you have a snare drum with a pokey transient that isn’t sitting right in the mix. You can adjust the compressor in such a way that it rounds out the snare transients, fitting it slightly better with the rest of the kit.
If you're looking to tame transients with a compressor, you'll want something fast. Typically, that would mean something like an 1176 compressor, or if you're looking for even more aggressive sounds, a Distressor. If you have bigger transient issues with your track, you may want to consider using a specialized transient shaping plugin.
Tone Shaping
Beyond controlling dynamics, a compressor can shape the tone of a sound. When it comes to vintage-style compressors, such as the 1176 or Tube-Tech style compressor, this is especially true. Just like guitar amps, these types of compressors use tubes and transformers to add unique tones to the source signal. You can adjust the different parameters on your compressor to make your signal sound fatter, thinner, rounder, or more upfront. Some engineers simply allow their signals to run through a compressor without any gain reduction at all, just to get the tone.
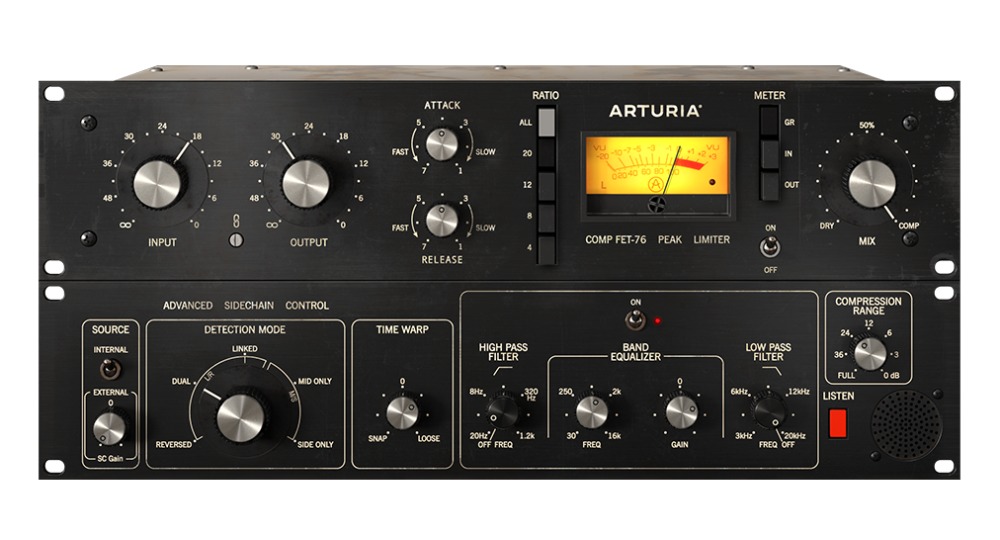
Key Compressor Controls
Every compressor is a unique machine, with its own unique set of controls. That said, they all pretty much attempt to do the same thing. Here we're going to cover some of the most common controls seen on compressors.
The main controls you'll see on most compressors are:
- Threshold
- Ratio
- Attack
- Release
- Make-up gain
If you can master these controls, and understand why you're using the compressor, then you can do amazing things!
Threshold
The threshold is the point at which your compressor starts working. It is the most important control on your compressor. If you don’t set your threshold low enough, you won’t get any compression at all, which is why it is crucial to understand how it works.
Let’s say you set your compressor threshold to -10dB. This means that it will not affect anything under that range. However, as soon as the signal rises above -10dB, the compressor will begin reducing the volume.
Typically, we will set the threshold to catch the loudest peaks in order to bring dynamic consistency into the track.
Ratio
Ratio can be a confusing parameter for many, as it deals with numbers and math. However, once you understand what the numbers mean, it becomes very simple.
The ratio of a compressor determines how much it reduces the volume. Let’s say you have a compressor with a ratio set 2:1. What this means is that any signal that goes above the threshold will receive a volume reduction by a factor of 2. Let’s say a vocal passes through this 2:1 ratio compressor and goes over the threshold by 8dB. Now, rather than the vocal getting 8dB louder, it will only get 4dB louder.
The higher the ratio, the more intense the compression will be. Any compressor with a ratio of 10:1 or greater is considered a limiter, meaning that it essentially prevents anything from being louder.
Attack
Next to the threshold and the ratio, the attack is the most important parameter on a compressor.
The Attack parameter on a compressor is how quickly the compressor engages. Let’s say you set your attack time to 10ms. Whenever the signal rises above the compressor’s threshold, it will take 10ms for the compressor to kick in. The attack time that you set is very important, as it can make or break your sound.
More often than not, you want to go with a slow to medium attack time that is anywhere between 4ms and 40ms, though it truly depends on the instrument and what you’re trying to accomplish. If transient shaping is your goal, though, you'll want something quite fast.
It's also worth noting that not all compressors have the same attack speed ranges. The 1176 is notoriously fast, while the LA2A is known for being slow and steady.
Release
The Release parameter on a compressor is the length of time it takes to dis-engage compression. Think of it as the polar opposite of the Attack parameter. When your signal drops back below your threshold, the compressor will allow the audio to return to normal volume. How long it takes for that to happen is determined by your release. It is always best to tweak your release in the context of your track so that it fits nicely with the rhythm.
You should also note that not all compressors come with release controls. Many have auto-release controls, which gauge the quality of the signal to determine how quickly the release should be.
Makeup Gain
When you reduce the volume of your track with compression, you make it quieter. To compensate for this loss in volume, we use the makeup gain parameter, otherwise known as the ‘output gain’ parameter. Think about it this way. We’ve reduced the volume of your signal’s loudest peaks. Because we don’t have to worry about loud peaks sticking out in our mix, we can turn the overall signal up.
It is often a good idea to set your makeup gain so that the compressed version of your signal is the same level as it was prior to putting the compressor on it. In doing so, you can make sure that the compression your hearing works for the mix without being fooled by the added volume.
Advanced Compression Techniques
When pros reach for a compressor, they're often doing the simple things described above. But sometimes they reach for these "advanced" techniques to help them sculpt their sound even more.
Layering Multiple Compressors
Compression can be your best friend or your greatest enemy depending on how you use it. One of the easiest ways to get the most out of audio compression is compressor stacking. The idea here is that you can do more with less. Rather than letting one compressor do 10dB of heavy gain reduction work, you can let two compressors perform mild 5dB gain reduction.
The end result is compression that sounds much more natural. Typically, you will use a heavier and faster compression first to tame the peaks, and rounder, warmer compression next to even out your tone. A timeless compressor stacking duo is the 1176 and LA-2A.
Looking for legendary sounds of the 1176? The Comp FET 76 is a must have!
For example, you might want to layer multiple compressors on a vocal to make it sound upfront and consistent. You can use an 1176-style compressor to tame the loudest peaks of your vocal signal and get rid of any harsh transients. Once the vocal is at an even level, you can use the smooth and round opto-style compression from the LA-2A to tame any leftover harshness from the 1176 while catching any inconsistencies that it may have missed.
Sidechain Compression
With sidechain compression, a compressor will monitor another signal while controlling another. The point of sidechain compression is that we can reduce the volume of a particular signal based on how loud a different signal is getting.
Let’s look at a classic case. Sidechaining first became very popular in electronic music. Producers would load up a compressor on a bass track and set the sidechain or input of the compressor so that the kick was feeding into it. Every time the kick would appear, the compressor would clamp down on the bass to reduce its level.
The idea was to get the bass out of the way for a split second so that the kick could have time to pop through. You’ve probably heard sidechaining’s more obvious effects, such as heavy pumping often found in EDM. However, it can be used very subtly in several situations, such as slightly reducing the level of a certain instrument whenever the vocal appears.
Parallel Compression
Parallel compression is one unique way to get the best of both worlds. When used properly, parallel compression can maintain a perfectly consistent signal while allowing the dynamics of a dry signal to remain intact.
Sometimes referred to as “New York Style Compression,” parallel compression is often used on drums to bring out sustain, though it can just as easily be used on vocals, bass, or just about any other instrument. The idea is that you’re mixing your original, uncompressed audio source in with heavily compressed audio.
For example, let’s say you have a drum bus. You might leave that drum bus uncompressed and send your bus into an aux track so it is heavily compressed. You would then slowly mix your heavily compressed signal into your uncompressed signal until you find the right balance for your song.
The benefit of parallel compression is that you retain the natural dynamics of a signal while getting the fullness, sustain, and consistency from compression.
Alternatives To Using Compression
Of course, you shouldn't always reach for compression first! Often compression is the last thing you should look for when trying to solve the problems described below.
In reality, there are many tools available to achieve the four types of compression described above.
For example, if you wanted more glue, you could try recording a better take where the musicians are all really playing together in the pocket. Or if you wanted less transient energy on your kick, you may be better off reaching for a transient shaper instead!
Recording a More Consistent Performance
While compression can be an extremely helpful tool, some producers and engineers rely on it too much. You’d be better off getting a more consistent performance during the recording phase so that you don’t have to heavily compress later on. If you’re recording vocals, for example, you might choose to track the soft and loud parts of the song separately so that you can adjust the gain and make your levels consistent going in. A drummer should make sure every kick drum is consistent and a bassist should make sure every pluck matches the volume of the last. There is truly no substitute for performance consistency.
Manually Adjust or Automate Gain
Too many producers and engineers forget about the most important tool in their DAW, which is the fader. Long before compressors, EQs, reverbs, and delays, engineers used volume faders to balance the levels in a song. Nowadays, riding the level of a track is much easier than manually sitting and making adjustments.
Of course, you have the option to use your fader as a volume performance tool like engineers did in the console days, though there are many cutting-edge tools available that help automate volume for you. One of our favorite tools for volume automation is W.A. Audio's Outlaw. Pro engineers will often automate vocals to death so that they sit perfectly in a mix. Outlaw does all of the painstaking volume automation work for you, giving you better consistency prior to using compression.
Transient Shapers
As we said before, you can use compressors to shape the transients of your signal. However, we now have tools that are made specifically to shape signal transients using in-depth attack and sustain parameters. Transient Shaper from SofTube is one of our absolute favorite transient shaper tools. With it, you can round off the attack of a snare drum, extend the sustain of a kick drum, bring out the finger sound on a bass guitar, or minimize the pick sound on an acoustic guitar.
Transient shapers share almost the same amount of importance as compressors for mixing modern music.
Soft Clipping
You’ll often find a soft clipping parameter built directly into your compressor. Soft clipping is a wonderful technique used by producers and engineers to introduce warm, harmonic distortion into the signal. To achieve a more analog feel in the digital realm, soft clipping can be very helpful. When run through a soft clipper, you can add warmth and weight to drums, bass synths, or just about any other kind of instrument. A little bit goes a long way.
The beauty of soft clipping is that it helps round out the transient of a signal, very similar to the way a fast attack on a compressor or reduced attack on a transient shaper would. Our favorite soft clipper is Standard Clip by Sir Audio Tools. We literally use it multiple times every mix!
Saturation
While many describe saturation as simply harmonic generation, it is also a form of soft-knee compression. Saturation happens when the output of a signal cannot match the input of a signal in a linear fashion. For this reason, the output of the saturation plugin will clamp down on the signal and round off the transients, creating a sonically pleasing effect that is slightly less dynamic.
A plugin like SofTube Harmonics gives you flexibility to inject the right type of saturation on to each track. Simple, yet flexible, having the ability to select from multiple style of saturation, and then set the drive and character allows for excellent tonal control and balance.
Tape Emulation
Tape emulation plugins are made to model the old tape machines that engineers used to record music to back in the day. When you run your signal through a tape emulation plugin, you get what is called “tape saturation.” This type of saturation is quite unique compared to tube or transistor saturation, as it rolls off higher-end frequencies and slightly boosts the lows.
With a good tape emulation plugin, you can round off your transients and create a smooth, soft-knee-style compression to reduce the overall dynamics of your signal. For a straightforward, warm tape plugin at a great price, we'd highly recommend Tape by SofTube.
Learn more about Mixing with Compression
This is only one part of mixing with compression! Luckily, I've put together a bunch more articles to help you master this crucial mixing skill!
- How to Use a Compressor: Learn to Mix with Compression Quickly!
- Sidechain Compression Explained for Beginners & Key Settings
- 3 Tips for Using a Sidechain Compressor to Add Punch & Clarity
- Multi-band Compression Tutorial for Great Vocals, Drums & More!
- How to Use Mid-Side Compression for Amazing Recordings!
- How to Use Parallel Compression for Powerfully Punchy Mixes
- Should You Compress Reverb? The Real Answer Finally Revealed.
- The 5 Types of Compressors (And Exactly When To Use Each)
- 10 Vocal Compression Mixing Tips (Including Best Settings)
- 9 Powerful Drum Compression Techniques for Punchy Pro Mixes
- Loud, Punchy Kick Drums with these Compression Settings
- How to Compress Snare - Use *These* Settings Punchy Snares
- Exactly How to Compress Bass for Tight Low End Thump!
- How Compress Acoustic Guitar Perfectly, Every time
- How to Compress Synthesizers: Best Compressor Settings for Synths
- How to Compress Organ: 4 Steps to a Great Mix!
- How to Compress Percussion: Compression Settings for Everything
- How to Compress Strings: 8 Magic Settings You Need to Know
From a Frustrated Producer in a Ragtag Bedroom Studio to Major Placements on TV Earning $1,000s!
My name is Evan, and I've been making music since around 3rd grade. I'm from San Diego, California, but I've lived in Washington, DC for the last 20 years.
While I still have a full-time day job, I have created systems that have allowed me to produce dozens of songs a year in my spare time.
My songs have been on Netflix, TV shows like the 90 Day Fiance, an award-winning indie film, and NPR’s “All Thing Considered.” They've also been streamed millions of times.
In addition to being a music producer, I am passionate about teaching people how they can make professional-sounding music and earn money licensing it, all in their spare time.
Thousands of musicians, like yourself, have trusted me to guide their musical journey. My YouTube videos have been watched nearly a million times. And my story has been in Forbes, Side Hustle Nation, and the Side Hustle School.


EQ is the most essential tool you have for making music sound clean, clear, and professional. In this book you'll learn how to use the R.O.S.E. System, a simple 4-step EQ formula to help you master the world of EQ
