Parallel Compression

Parallel compression is one of the most powerful techniques in music production. The idea is to combine an uncompressed signal with a heavily compressed version of that same signal. With this technique, you can increase the average level of a signal and lock a sound into place without getting the negative artifacts of aggressive compression.
Note: This article may contain affiliate links, meaning I would receive a commission - at no cost to you - for any products you purchase.
What Is Parallel Compression In Music Production?
Parallel compression in music production works by creating an identical duplicate version of the signal, which is then sent back into your DAW to be mixed with the dry signal.
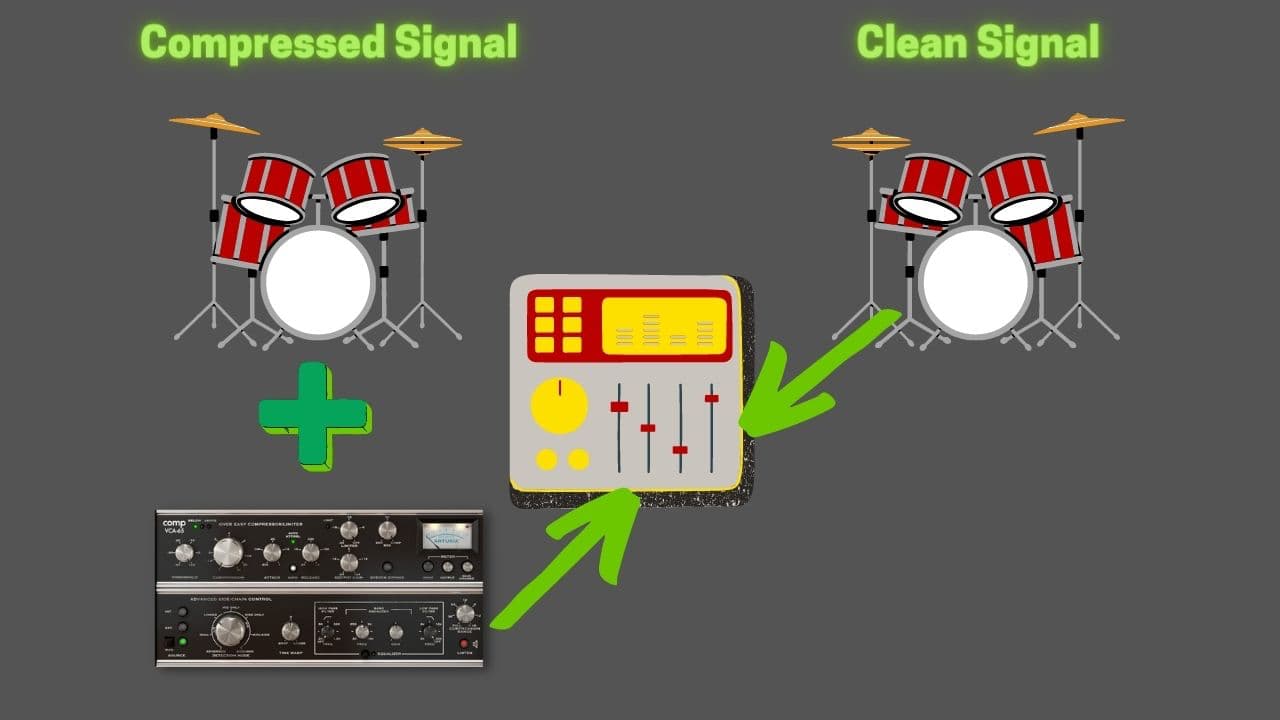
One signal is compressed. The other clean.
Basically, you are combing a clean signal with the compressed signal, then balancing the volume of the two.
So, What Are The Benefits of Parallel Compression?
One of the main reasons you might use parallel compression is that you can increase low-level audio signals without negatively impacting the transient peaks of your signal.
Another word for transients is punch. The great thing about parallel compression is that the clean signal lets you preserve all of that powerful punch in your signal.
At the same time, compression artifacts are nice too! A good compressor, like the highly recommend Arturia Comp-FET76, will add warmth, saturation, and a touch of hype to whatever you run through it. Plus, by reducing the transients of the compressed signal, the quieter parts of that signal become relatively louder, resulting in a fatter sounding overall mix.
Frequently, parallel compression is best for producing an “invisible” form of compression to get the best of both worlds.
You can heavily compress your audio to reduce the dynamic range and maintain control over your peaking transients, creating an aggressive sound that you can blend in with your open and dynamic signal.
When To Use Parallel Compression
Parallel compression can be used whenever you need to increase the punch or presence of a signal while retaining the dynamic qualities of the dry audio. Parallel compression is very common on vocals and drums, though it can be used on just about any instrument.
I frequently also find myself using parallel compression on:
- Bass
- Percussion
- Glitch-loops
- My entire mix!
How To Use Parallel Compression
There are two main ways to use parallel compression:
- Wet/Dry Knob
- Effect Send
How to Use Parallel Compression as an Insert Effect
To use parallel compression on your insert, you need to use a compression plugin that allows you to blend your compressed signal in with your dry signal. Look for a compressor with a Mix knob, like the Arturia Comp FET-76.
Depending on the DAW you use, you might have a compressor with a parallel parameter built-in.
How to Use Parallel Compression as a Send Effect
However, if you want a bit more control over your compressed signal, you may consider using it on an effect send. Essentially, you can set up your compressor on a bus and send a copy of your dry signal out to it. Once you’ve dialed in the perfect compression settings to get heavy, punchy compression, you can slowly mix it in with your main signal until you get the perfect blend.
I often like using parallel compression on an effect send, as I can EQ or saturate the heavily-compressed signal how I please, giving me a bit more control.
Recommended Parallel Compression Settings
The idea behind parallel compression is that you want to squash your signal to blend it back in with your original signal. To do so, you’ll want to use a high ratio. I often like to start with 8:1 and move higher if need be.
You can take your threshold down pretty low as well to get a fair amount of gain reduction. I often find myself taking off around 20dB of gain to really squash the signal and get rid of its dynamics.
The attack and release will depend on what you’re using your parallel compression for, though a fast attack and medium release will often do the trick to start. If you need a bit more transient punch, you can slow the attack down to let the front end of the signal through.
Best Plugin for Parallel Compression
If you want to get the "classic" parallel compression sound, though, you need to use a compressor that mimics the 1176 compressors all buttons in mode (aka "nuke"), like the Arturia Comp FET-76. This compression setting results in a ratio over over 20:1 and absolutely blitzes the parallel signal in the most pleasant way possible.
It sounds great, looks beautiful, includes multiple advanced compression modes, as well as a built in sidechain. On top of that, you can also use it for mid-side compression.
And even better, it includes a built-in high and low pass filter, as well as a simple EQ. It also includes a wet/dry knob. This lets you easily use it as an insert effect where other compressors might muddy things up.
Best Waves Plugin for Parallel Compression
Waves also makes a really affordable plugin that is great for straightforward parallel compression. The CLA-76 is a no frills approach to the classic 1176 compressor. While it looks like a dog, it sounds pretty good, and includes the famous all buttons mode.
It's definitely worth checking out if you're not sure whether parallel compression is for you.
Learn more about Mixing with Compression
This is only one part of mixing with compression! Luckily, I've put together a bunch more articles to help you master this crucial mixing skill!
- How to Use a Compressor: Learn to Mix with Compression Quickly!
- Sidechain Compression Explained for Beginners & Key Settings
- 3 Tips for Using a Sidechain Compressor to Add Punch & Clarity
- Multi-band Compression Tutorial for Great Vocals, Drums & More!
- How to Use Mid-Side Compression for Amazing Recordings!
- How to Use Parallel Compression for Powerfully Punchy Mixes
- Should You Compress Reverb? The Real Answer Finally Revealed.
- The 5 Types of Compressors (And Exactly When To Use Each)
- 10 Vocal Compression Mixing Tips (Including Best Settings)
- 9 Powerful Drum Compression Techniques for Punchy Pro Mixes
- Loud, Punchy Kick Drums with these Compression Settings
- How to Compress Snare - Use *These* Settings Punchy Snares
- Exactly How to Compress Bass for Tight Low End Thump!
- How Compress Acoustic Guitar Perfectly, Every time
- How to Compress Synthesizers: Best Compressor Settings for Synths
- How to Compress Organ: 4 Steps to a Great Mix!
- How to Compress Percussion: Compression Settings for Everything
- How to Compress Strings: 8 Magic Settings You Need to Know
- How to Compress Brass: Compression Settings for Trumpet, Tuba, & More!
- How to Compress Woodwinds: 4 Powerful Settings to Know
- The Very Best Compressor VSTs for Loud, Punchy Mixes
- The 5 Best Vocal Compressors VSTs (Including Free)
- Best Bus Compressor Plugins & Master Bus Compression Settings
- Make Your Music Loud! The Best Limiter Plugins for Max Volume.
- How to Use Compression in Reason - Inside Reason's Main Compressors
- The Secret to Great Mixes: How to Use Parallel Compression in Reason
From a Frustrated Producer in a Ragtag Bedroom Studio to Major Placements on TV Earning $1,000s!
My name is Evan, and I've been making music since around 3rd grade. I'm from San Diego, California, but I've lived in Washington, DC for the last 20 years.
While I still have a full-time day job, I have created systems that have allowed me to produce dozens of songs a year in my spare time.
My songs have been on Netflix, TV shows like the 90 Day Fiance, an award-winning indie film, and NPR’s “All Thing Considered.” They've also been streamed millions of times.
In addition to being a music producer, I am passionate about teaching people how they can make professional-sounding music and earn money licensing it, all in their spare time.
Thousands of musicians, like yourself, have trusted me to guide their musical journey. My YouTube videos have been watched nearly a million times. And my story has been in Forbes, Side Hustle Nation, and the Side Hustle School.


EQ is the most essential tool you have for making music sound clean, clear, and professional. In this book you'll learn how to use the R.O.S.E. System, a simple 4-step EQ formula to help you master the world of EQ
